It’s been around 18 months since Phase One first launched the concept of Frame Averaging in their IQ4 series of digital backs – a technology that can produce an in-camera long exposure image, essentially “decoupling” time from the traditional exposure triangle, with no need for filters in front of the lens.
As one of their global ambassadors, it was great to see it develop through from those very first images I shot for the Phase One Interactive Long Exposure guide and XT camera launch in Scotland, through to now – where it’s become a reliable feature that gives me amazing results in the field.
As a relatively new feature, even now, I’m often asked to explain “how it works” and what it actually means to a landscape photographer. Having now presented the subject at several conferences, college talks, stand-out forums and magazines, it feels like the right time to offer up the content of those presentations and help everyone understand what this technology means for them in real life.
With that in mind, I’ve incorporated a selection of those slides, my explanations, and my thoughts in text below. Starting with a simple question – “how long was the exposure?”
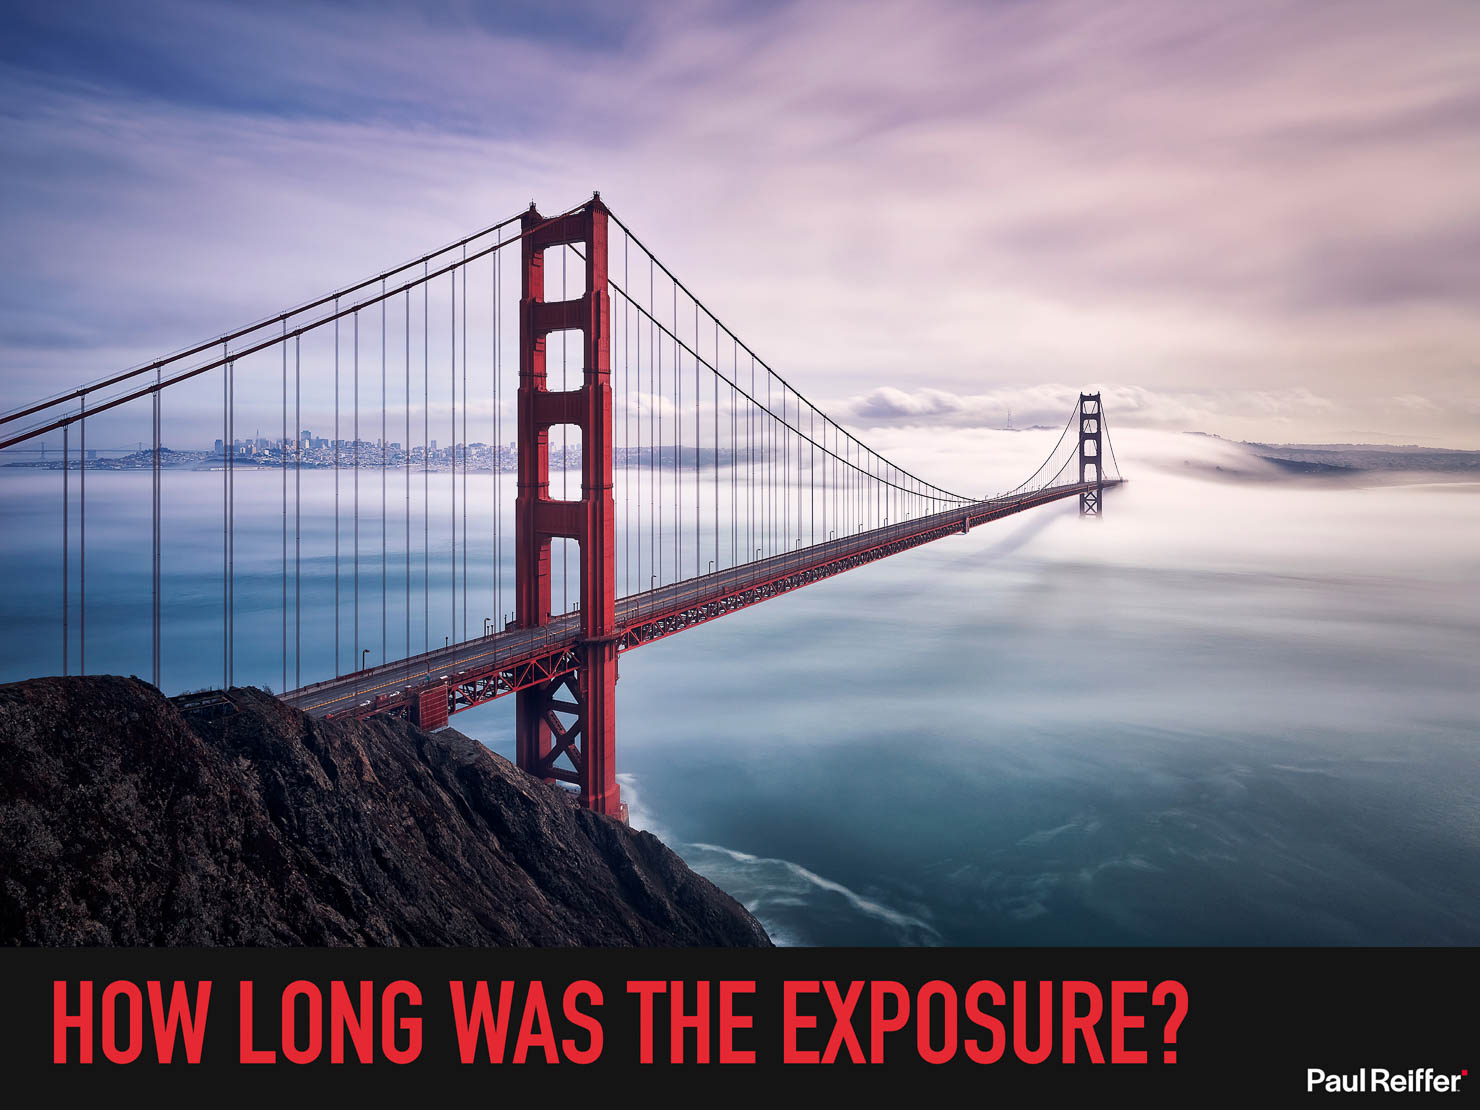
It’s a relatively simple question, and while wind speed would have an impact on the answer, a seasoned photographer would probably hazard a guess that the shot above of the Golden Gate Bridge was somewhere between 20 and 60 seconds. They’d be right, of course, this shot from a few years back was a 30 second exposure – the shutter was open (or the sensor was recording the same scene) for 30 seconds, assisted by a Neutral Density (ND) filter to allow it not to over expose.
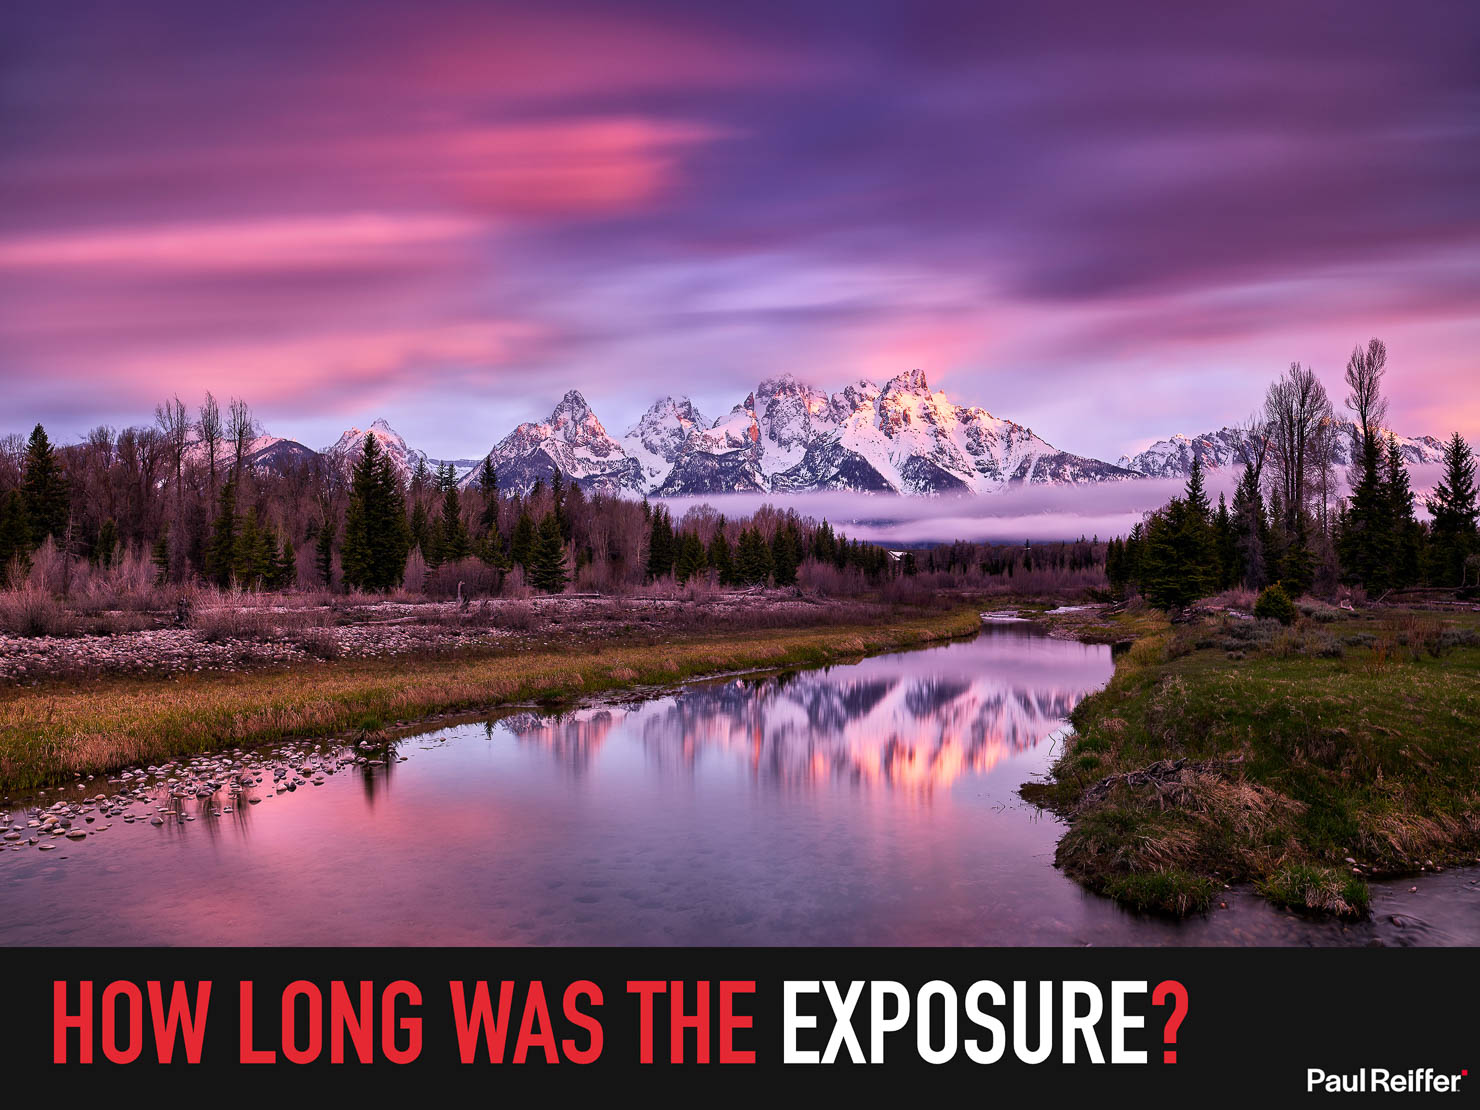
So what about the next shot?
I mean, it has long moving clouds, whispy low-lying fog, milky water – has to be a long exposure, right?
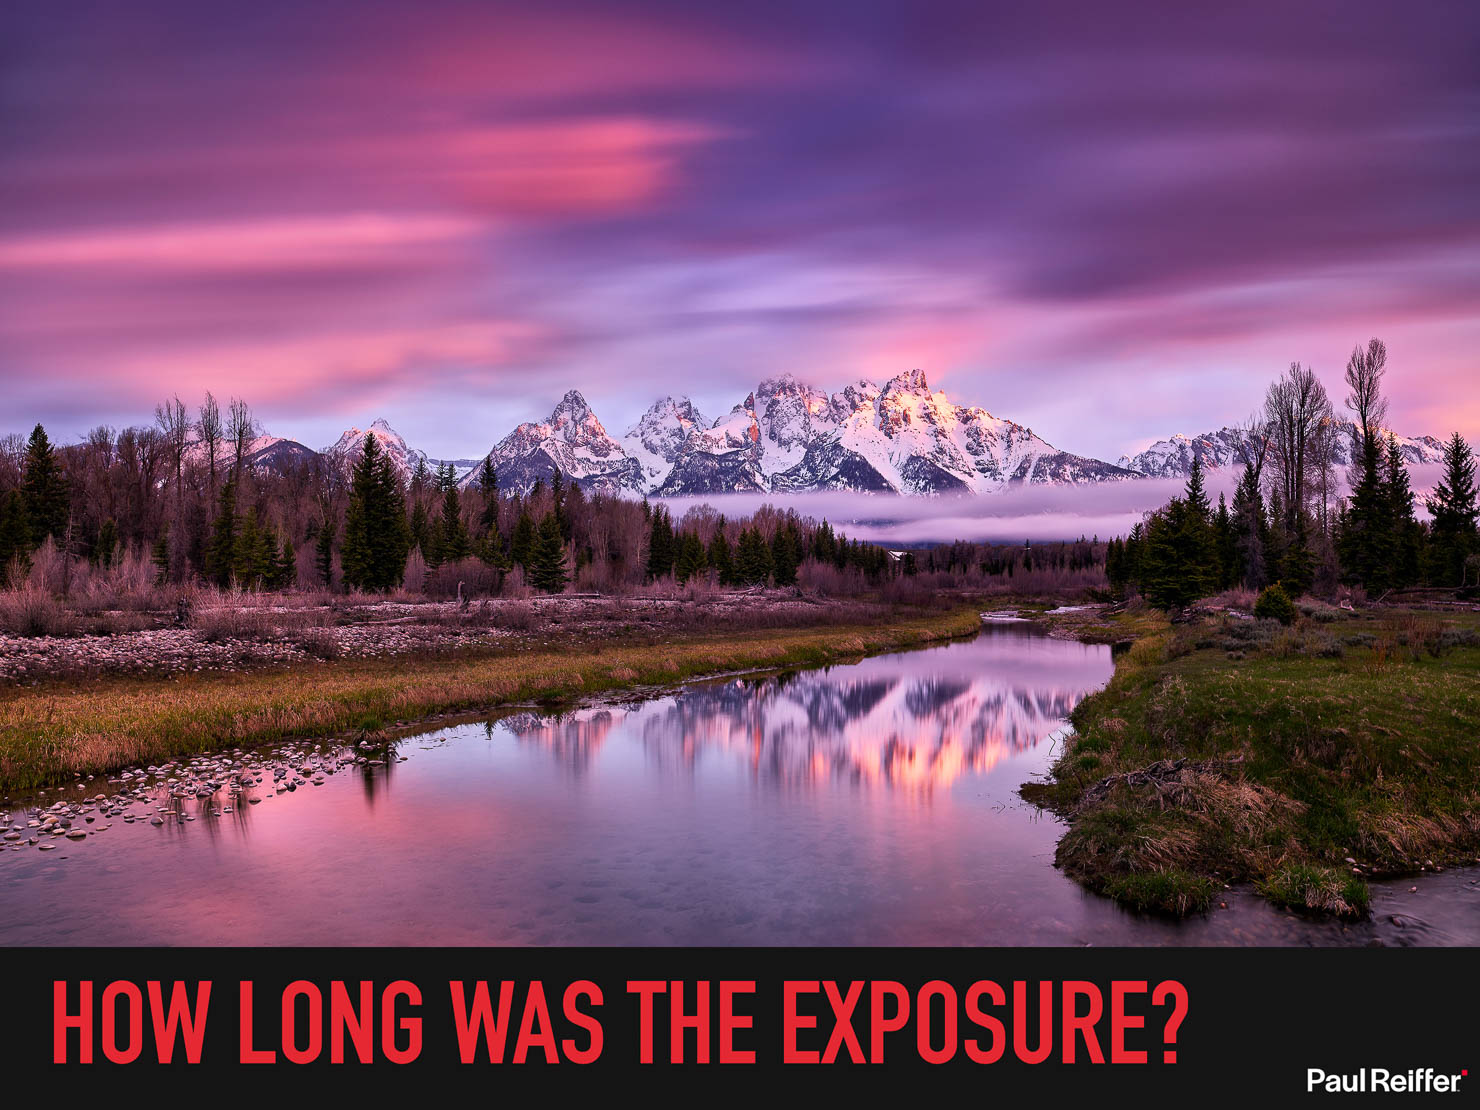
Wrong.
This shot’s exposure time was actually 1/30th of a second.
But how can that be? Unless those clouds were moving at around (my guess) 2,344mph – there’s no way all that motion was caught in a fraction of a second – and that’s very true.
Because while the exposure was 1/30s, it was capturing the scene for nearly a minute.
And that, is Frame Averaging.
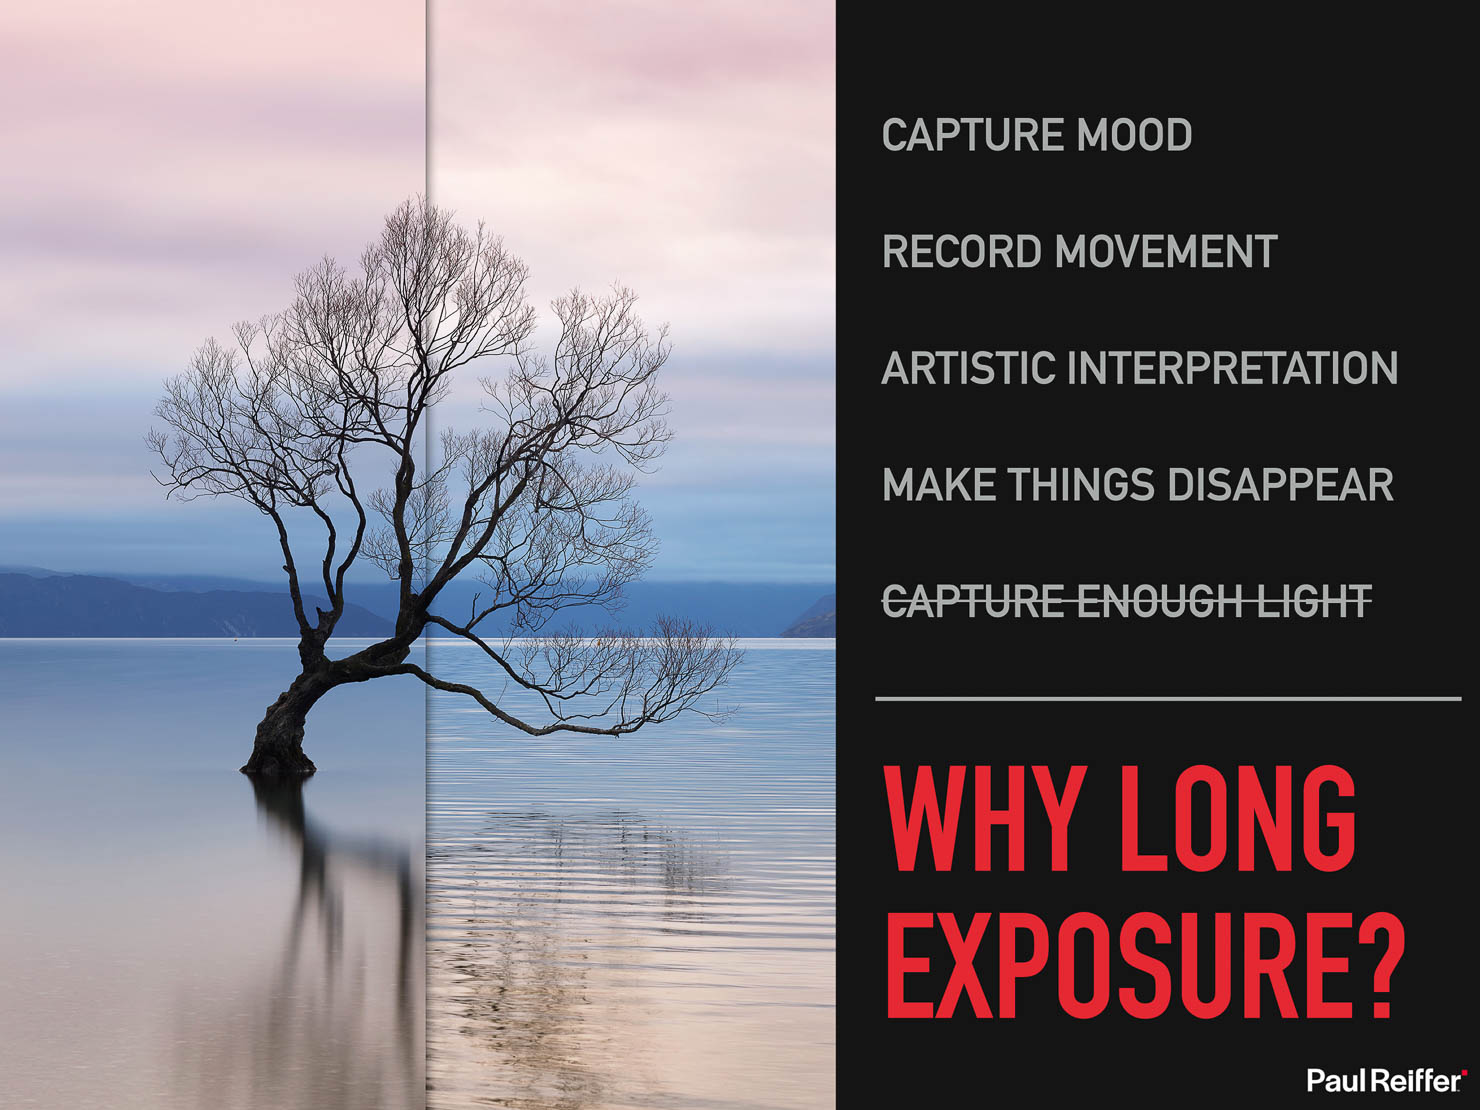
Why Long Exposure?
Before we get into the mechanics of why frame averaging (or “automated frame averaging”/AFA to give it’s full name) is different, let’s just spend a few moments thinking about why we shoot some scenes with a longer exposure than “normal”.

For the most part, it’s an artistic decision – blurring water, capturing motion in clouds, making people disappear, catching light trails – they’re all creative methods to bring feeling to your shot.
Plus, of course, we have the technical issue in there at the bottom: To capture enough light.
If the scene is dark, we need our shutter open for longer to capture more light. If we want to force the shutter to be open for longer (for those creative reasons), then we need to make the scene dark – and that typically needs a Neutral Density/ND filter to allow the camera to be fooled.
So let’s go back to basics, to understand why Frame Averaging is such a groundbreaking step forward (bearing in mind, as with all things, the technologies that start at the top tend to trickle down to the wider industry over time…)
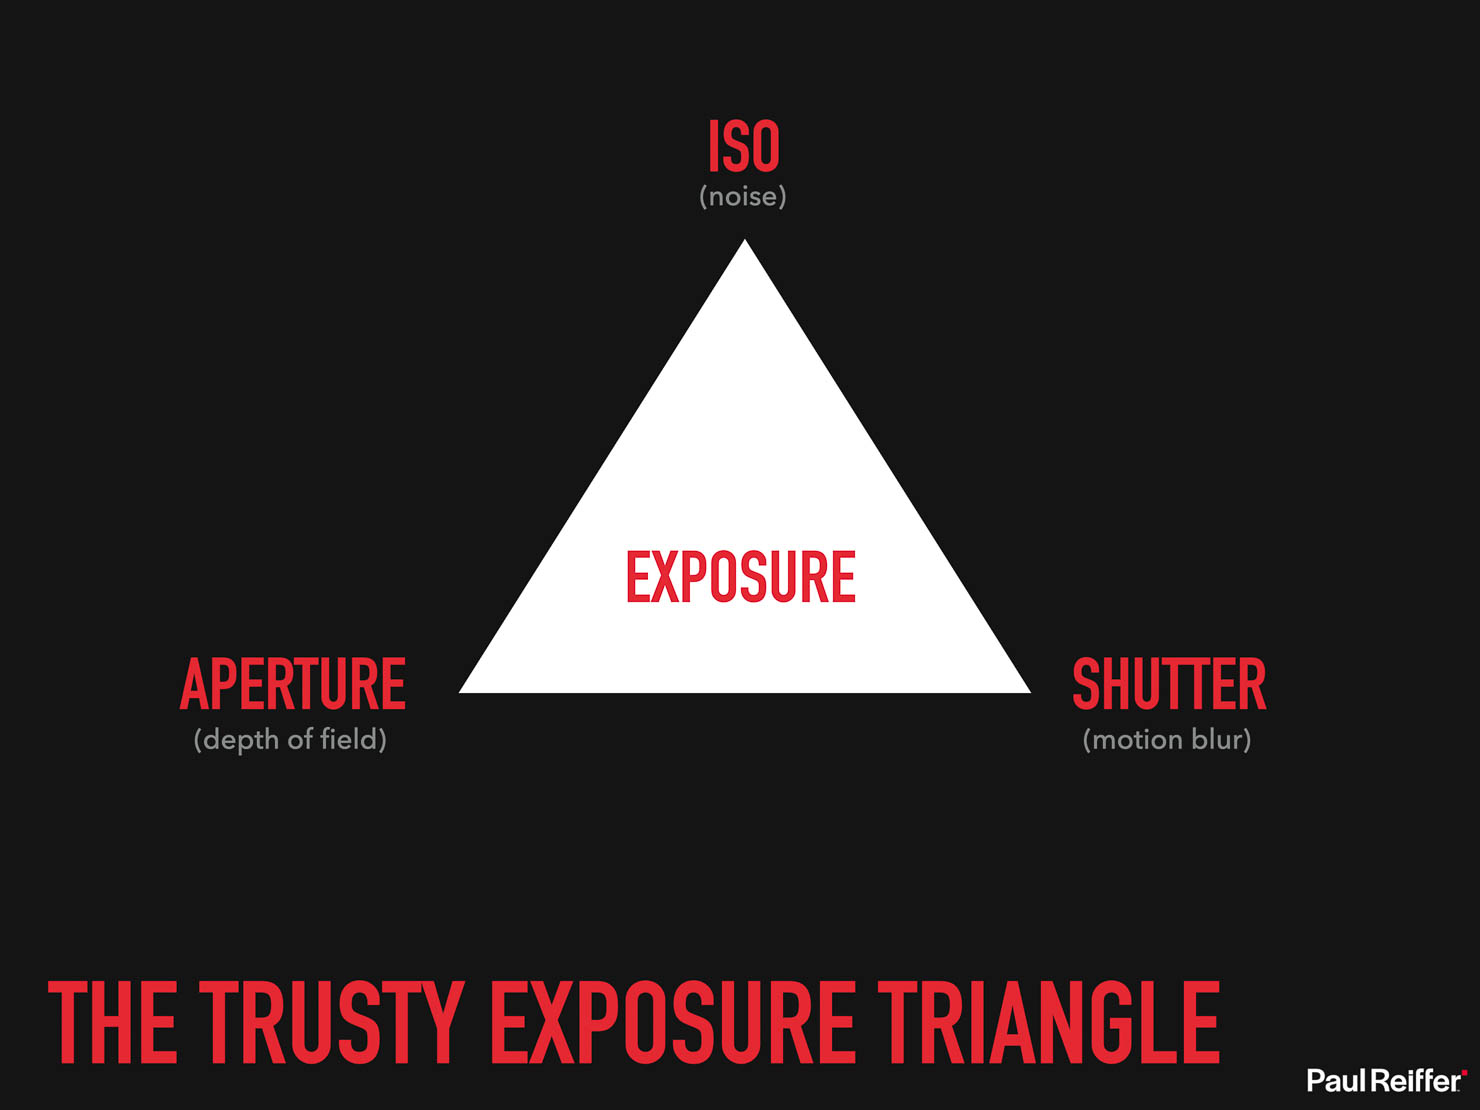
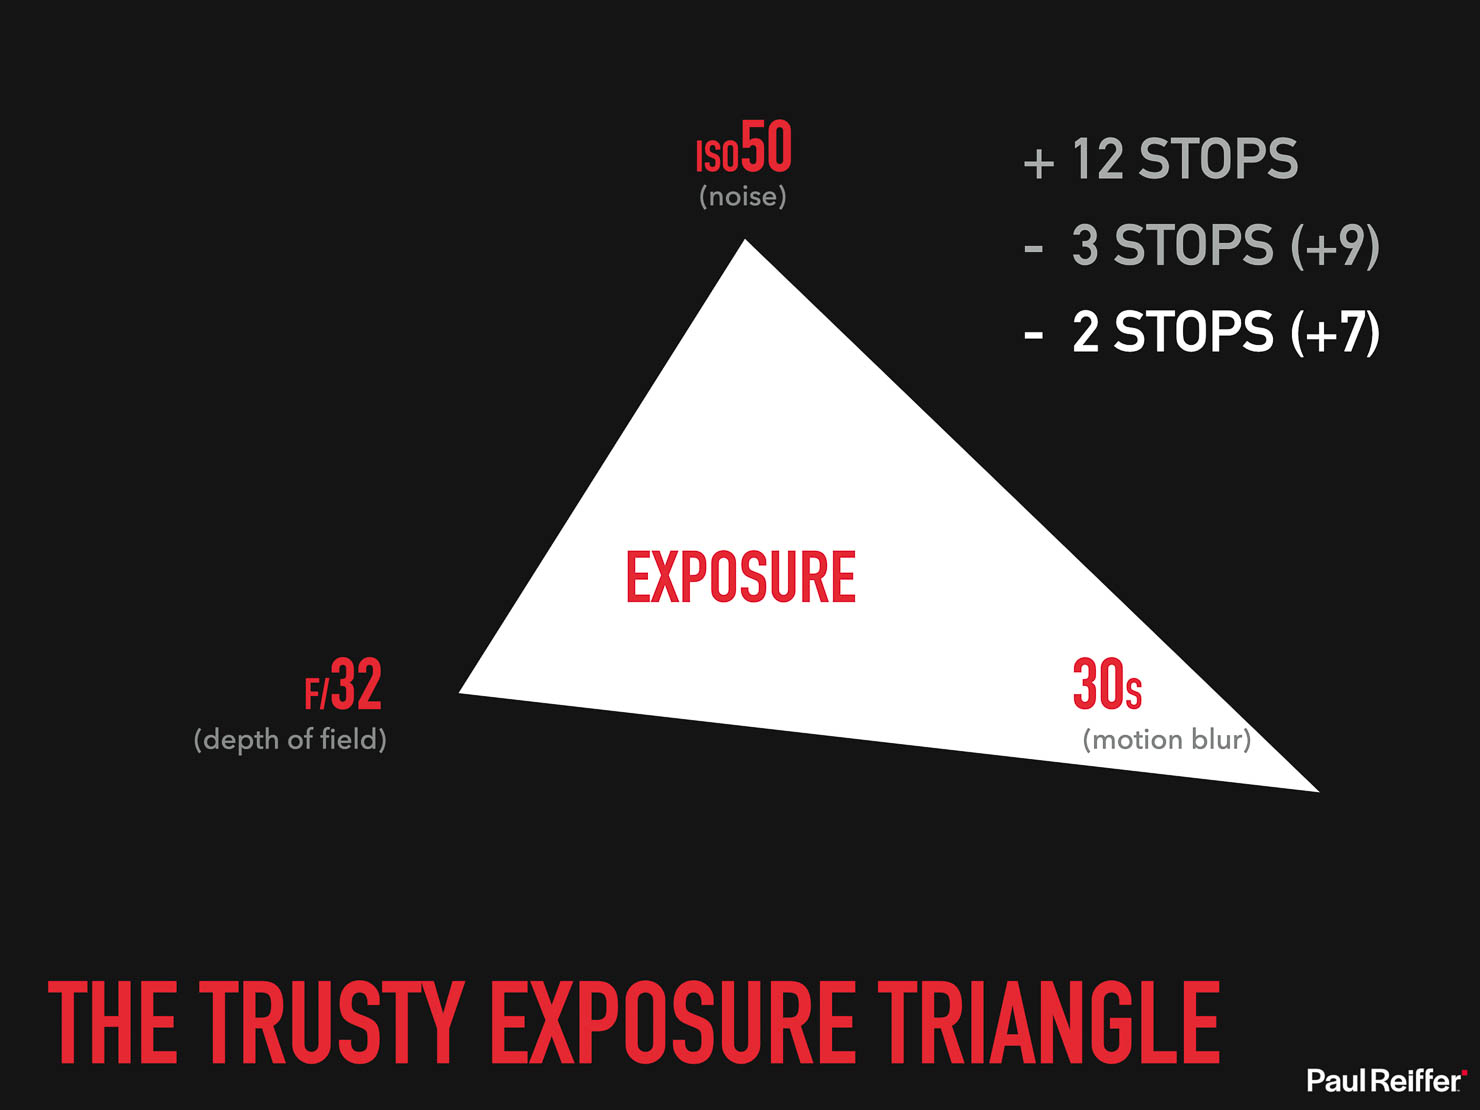
Looking at our standard exposure triangle, things are quite simple. For any given scene, our “ideal exposure” is made up of only 3 factors in reality: ISO (sensitivity to light), Aperture (how much light to let in) and Shutter Speed (how long to let it in for).
Of course, each of those has a secondary effect on the shot: ISO can increase or reduce the “noise” level in an image, Aperture also controls how much of the shot is in focus (the “depth of field”) and our Shutter speed allows us to freeze motion, or allow it to blur and suggest movement.
While that’s all very good when the scene is ideal for the exact depth of field, motion blur and noise values we were looking for – sometimes we want something different, creatively, and that’s where the triangle can break through too many trade-offs.
Let’s take a “standard” scene, and for this imaginary exposure the ideal settings are f/11 on Aperture, a value of 200 for ISO and a shutter speed of 1/125s. Perfect.
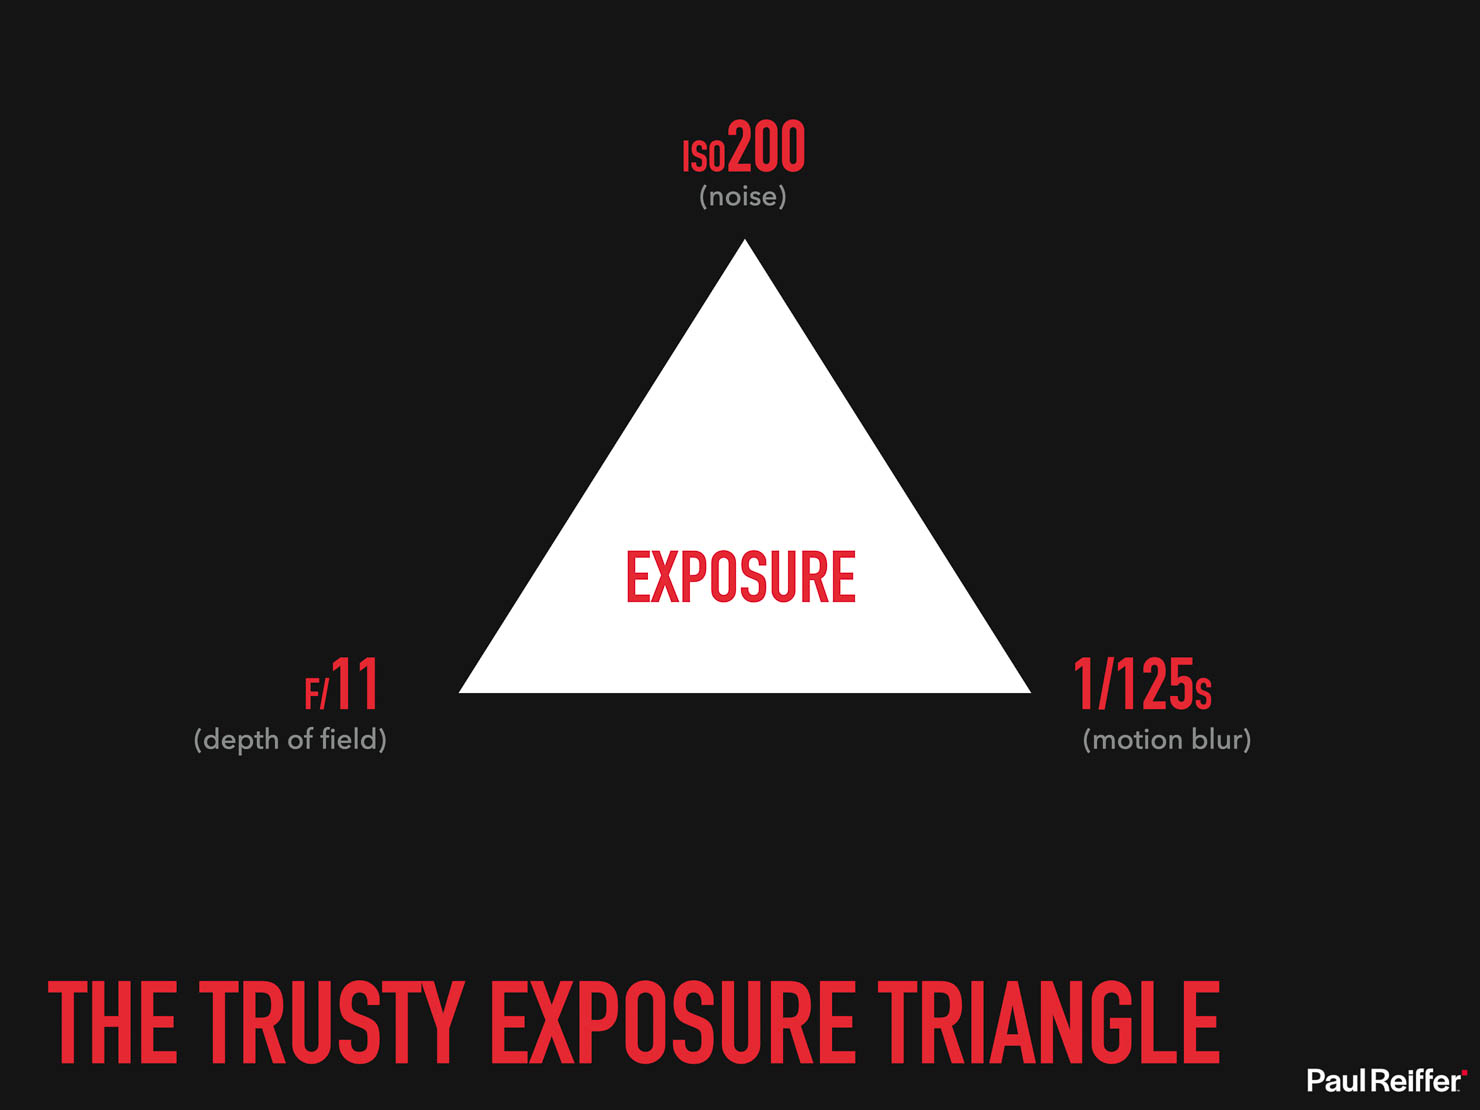
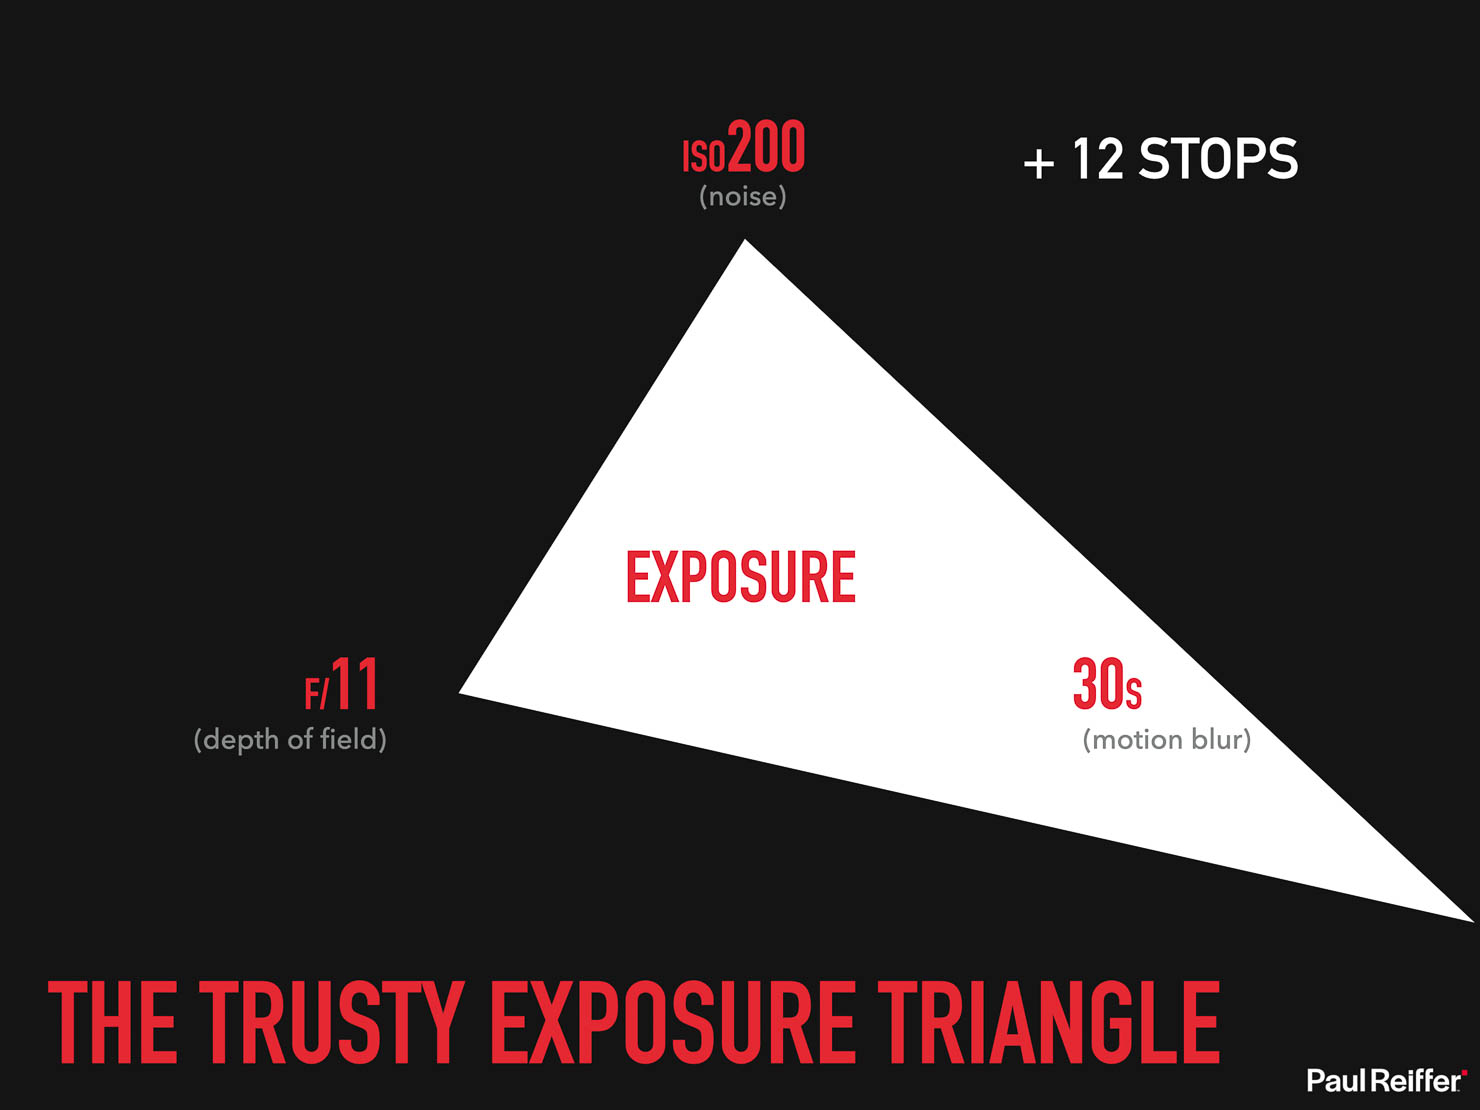
But let’s say I want to open the shutter for longer – to allow me to capture the movement in some clouds, or water – well for that, I’d simply slow down the shutter speed to (say) 30 seconds and all is good, right?
Well, no.
You see, by opening the shutter for longer, in this particular setup, we’ve increased the amount of light coming in to the camera by 12 stops. Note: with each “stop” doubling or halving the amount of light, that doesn’t mean 12x more light – it means 4000x more light (ouch!).
So what can we do?
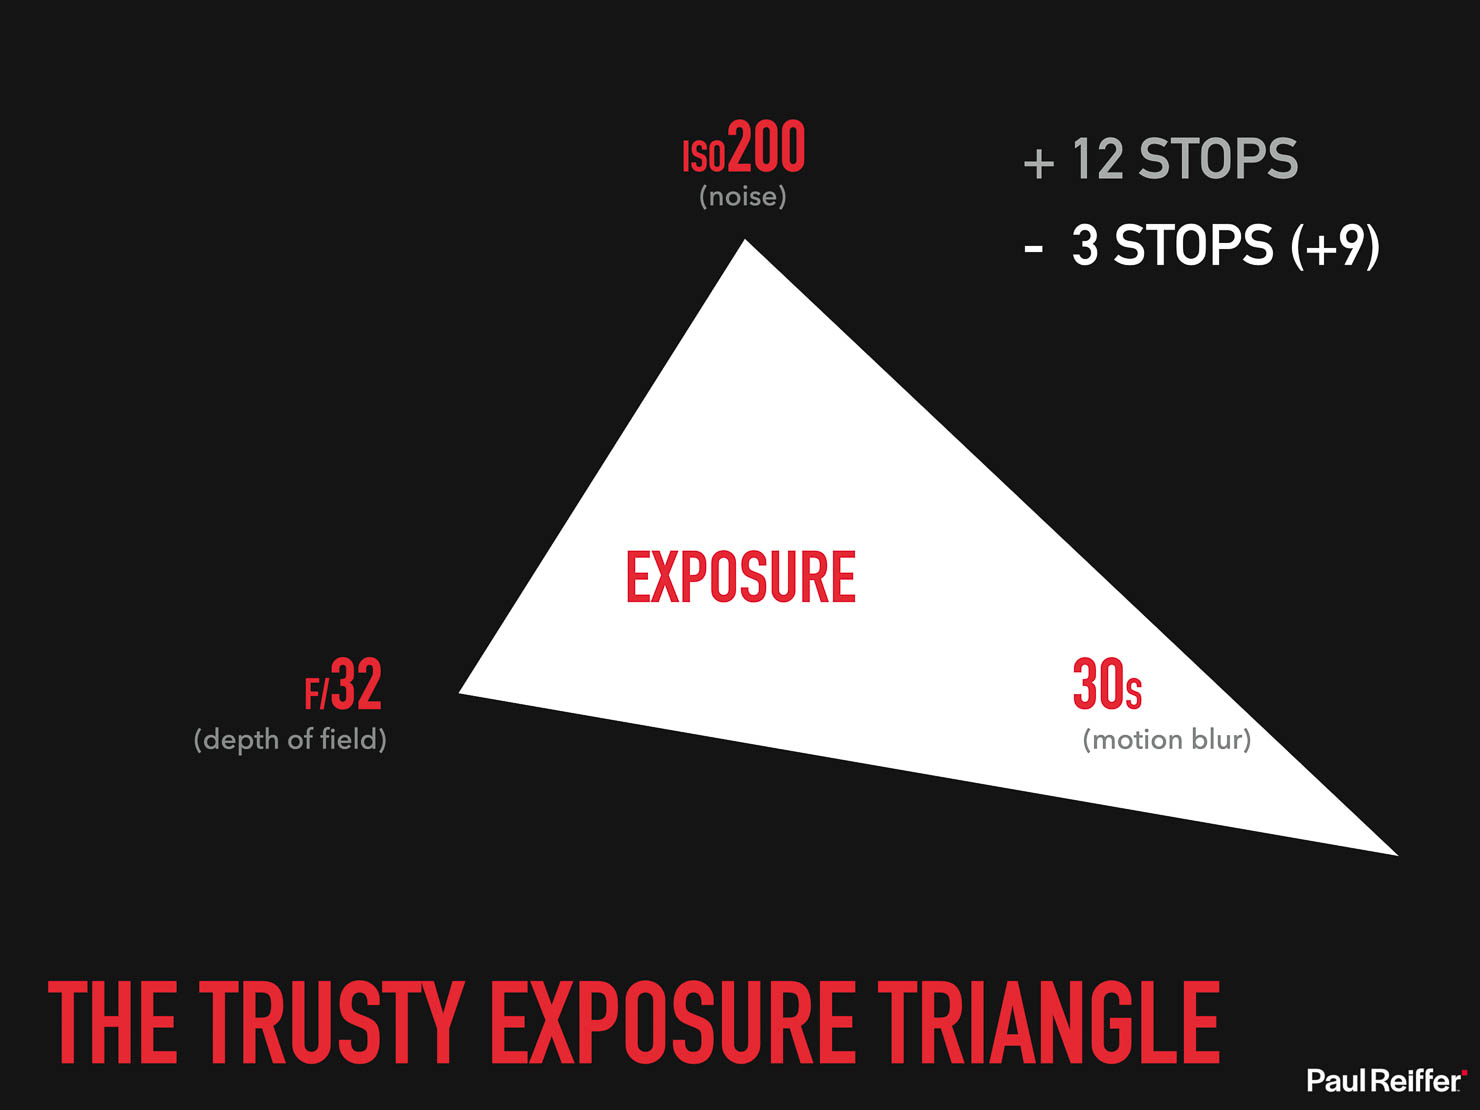
Well, luckily, we have some other points on the triangle that we can adjust to accommodate for the change. First up, let’s look at pushing our aperture to be much smaller (letting in less light in one go) – to f/32. That’s 3 stops of difference (or 8x less light), but we still have 9 stops (512x) too much light coming in and we’ve changed our depth of field and likely ended up with a heavily diffracted image as a result.
So what else can we do?
Well, we could reduce our ISO, that’s generally always a good thing anyway – so reducing that to ISO50 would be a further drop of 2 stops and deliver us a cleaner (less noisy) image at the same time.
But we’re still dealing with 7 stops (128x) too much light for our “perfect” exposure…
Which is exactly where traditional ND filters come in.
Why We Use Filters
Thinking of them as “sunglasses for your camera”, these neutral density filters are designed to cut light with very little impact to the tint or tone of the image. Effectively, this allows us to keep our shutter open for longer, without the risk of over-exposure.
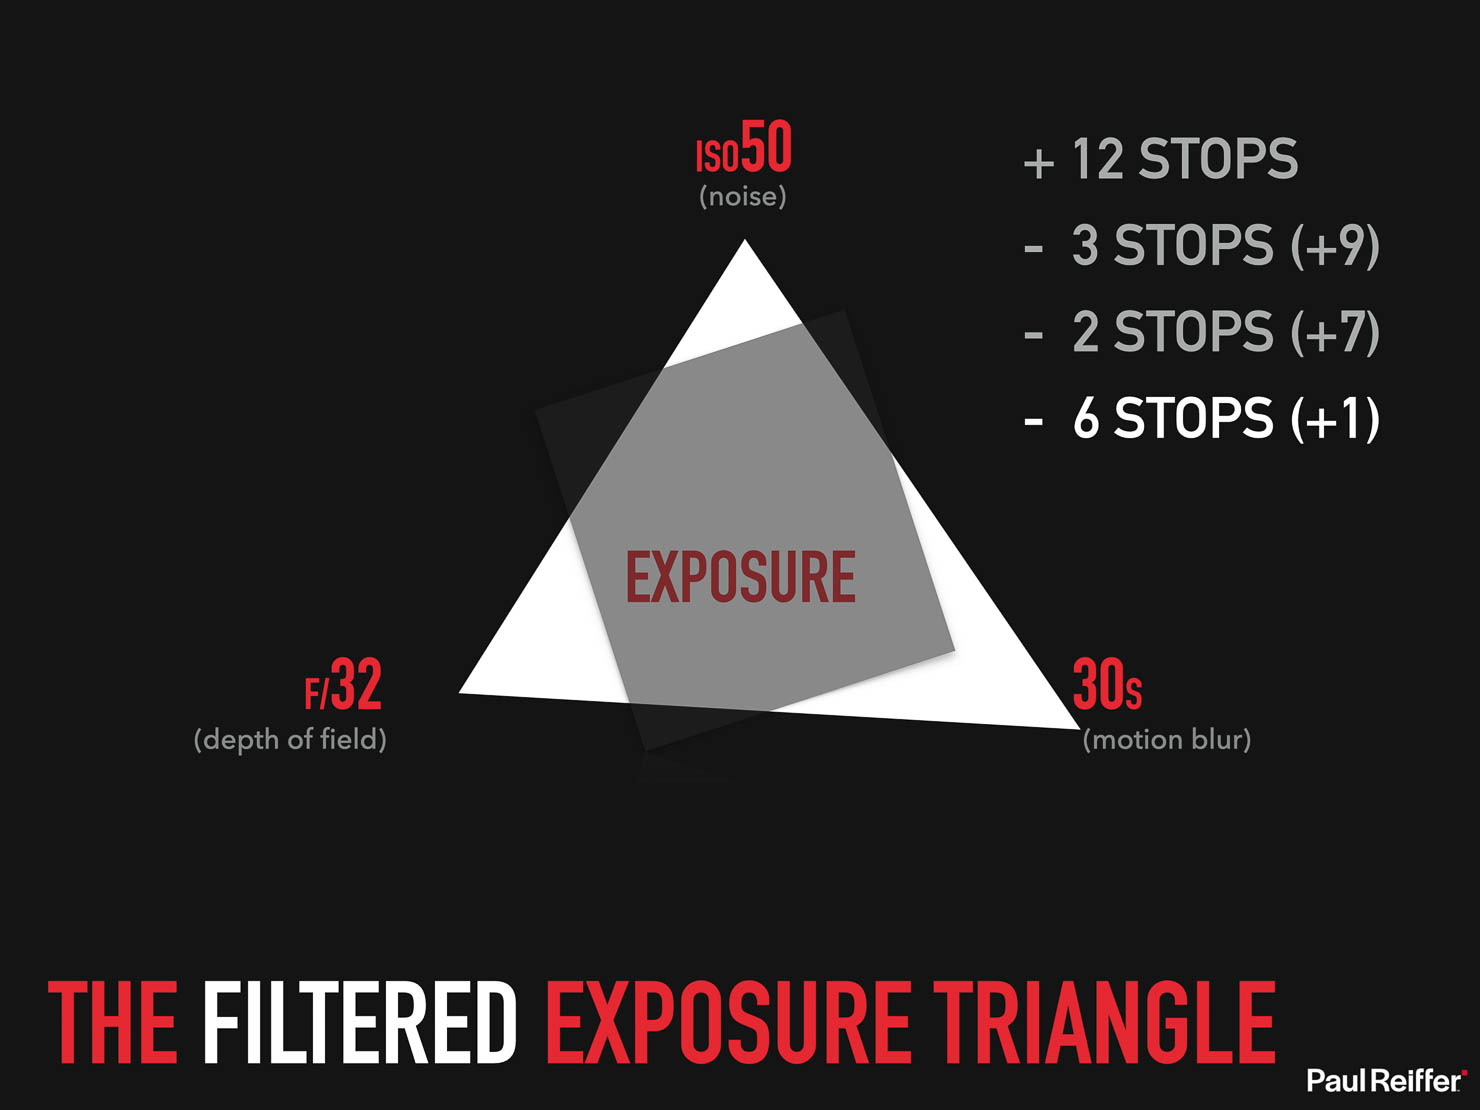
So let’s imagine we put a 6 stop (ND64) filter in front of our camera.
We’re left with an exposure that’s only 1 stop off our “perfect” triangle, and to be fair, most modern cameras can easily take that within their stride. The issue here is more that we’re still left with our soft f/32 aperture, which isn’t ideal.
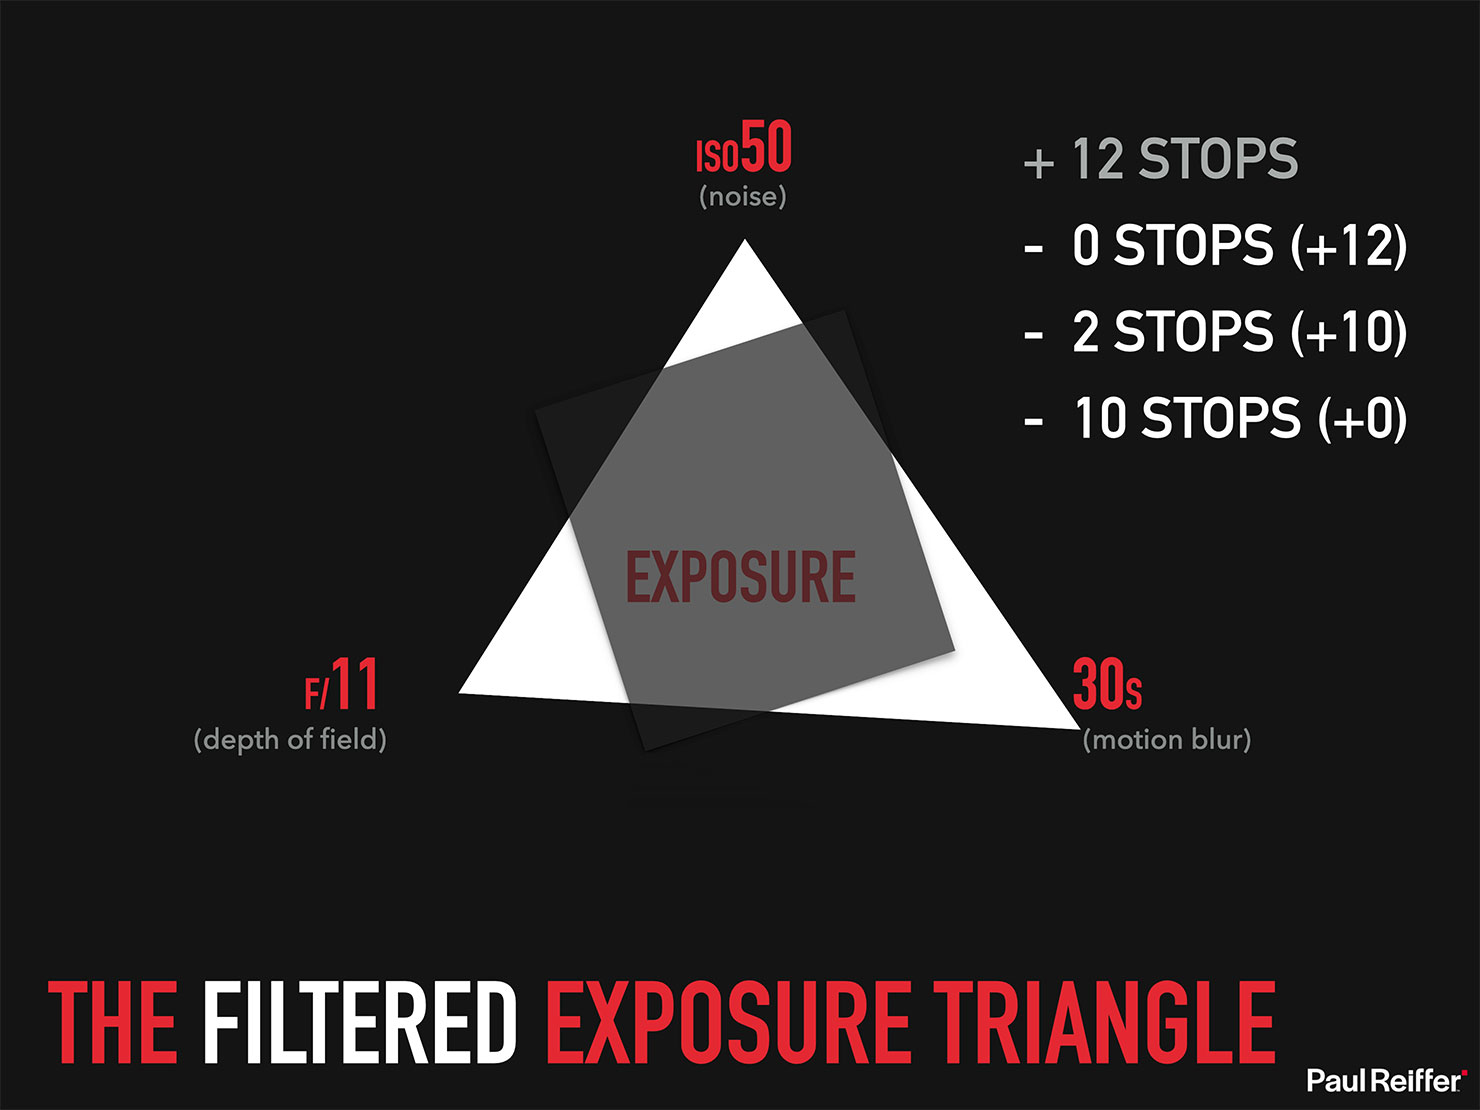
So for completeness, let’s swap out that filter for a 10 stop / ND1000 / “Big Stopper” ND instead, allowing us to reset our aperture back to a nice sharp f/11 and keep our ISO nice and low at 50 (if the camera will take that).
Great stuff – we’ve now got our “perfect” 30 second exposure, by using a filter in front of the lens..
The Problem with Filters…
In theory, we’re all set – taking a variety of filters with you on a shoot will allow you to manipulate our trusty exposure triangle to allow for an array of different shutter speeds, giving the flexibility to capture motion (or not) in almost any situation.
But in practice, filters come with their own challenges – and we’ve explored a few below.
First, the issue of “colour cast”.
Our post-processing software is designed to “fix” this problem, but it’s a fact that any substance put in between the source of light and your camera’s sensor does, in some way, affect the wavelengths of that light in different ways – yes, even a diamond will(!).
The issue is compounded when filters are stacked, one on top of each other – so while building your “sandwich” of glass in front of the lens, with each and every addition we’re risking the quality of our final image.
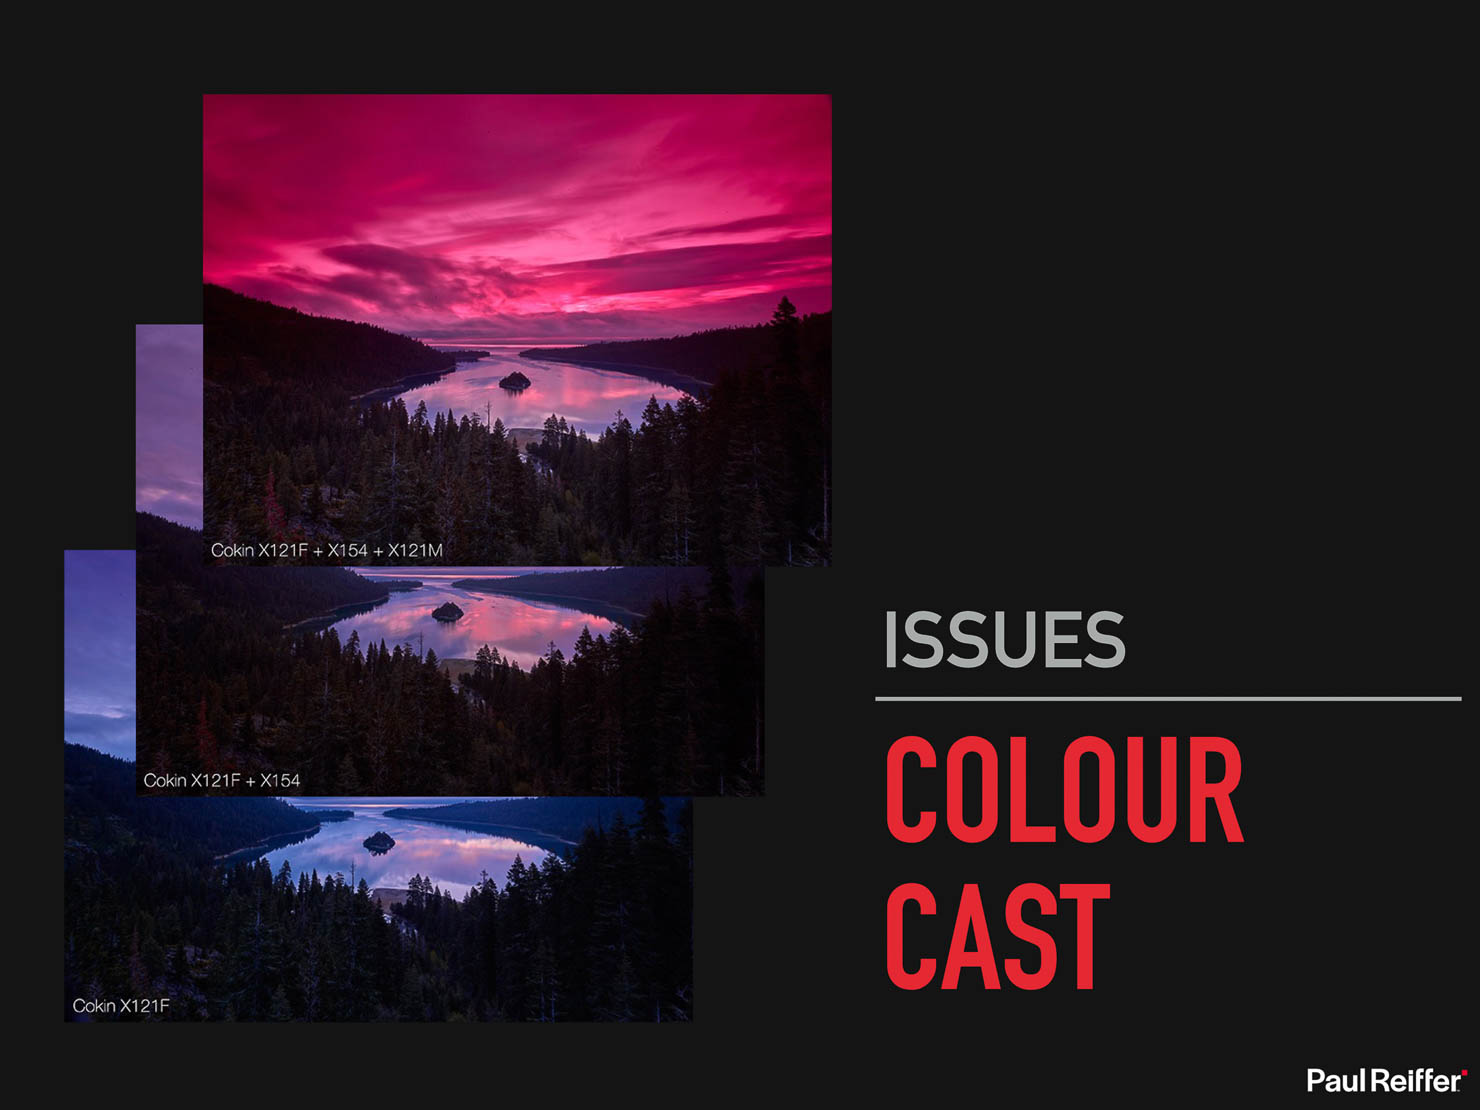
Of course – some manufacturers will claim “ZERO colour cast”. They’re lying. Pure and simple.
It can have a “very low” cast, or even an “ultra low” cast, which is great – but stack 2 or 3 of their filters together (such as the extreme example above with 1, 2 and 3 Cokin filters a few years back) and you’ll see the lie.
Now colour cast, ironically, isn’t always a bad thing – indeed, I’ve used it myself to enhance the natural tones in a sky – meaning that it can be a “happy error” in some situations.
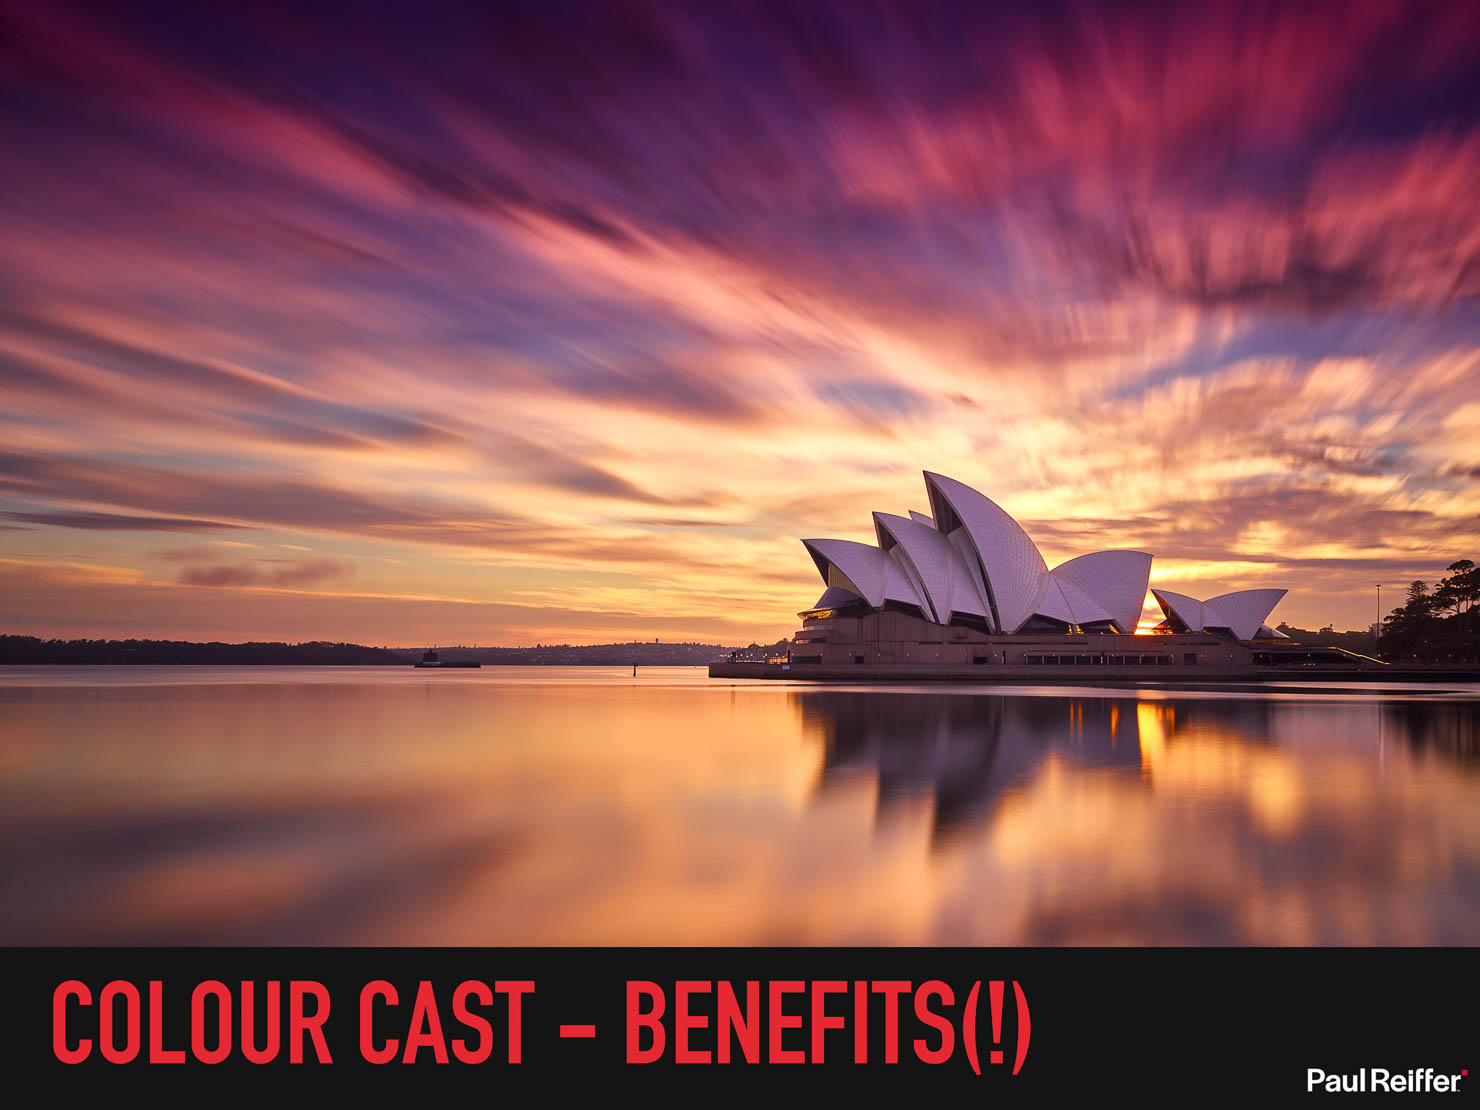
…but I’d still prefer my camera to capture exactly what was in front of it, rather than the light which has been fed through a set of “neutral” glass (or resin) filters.
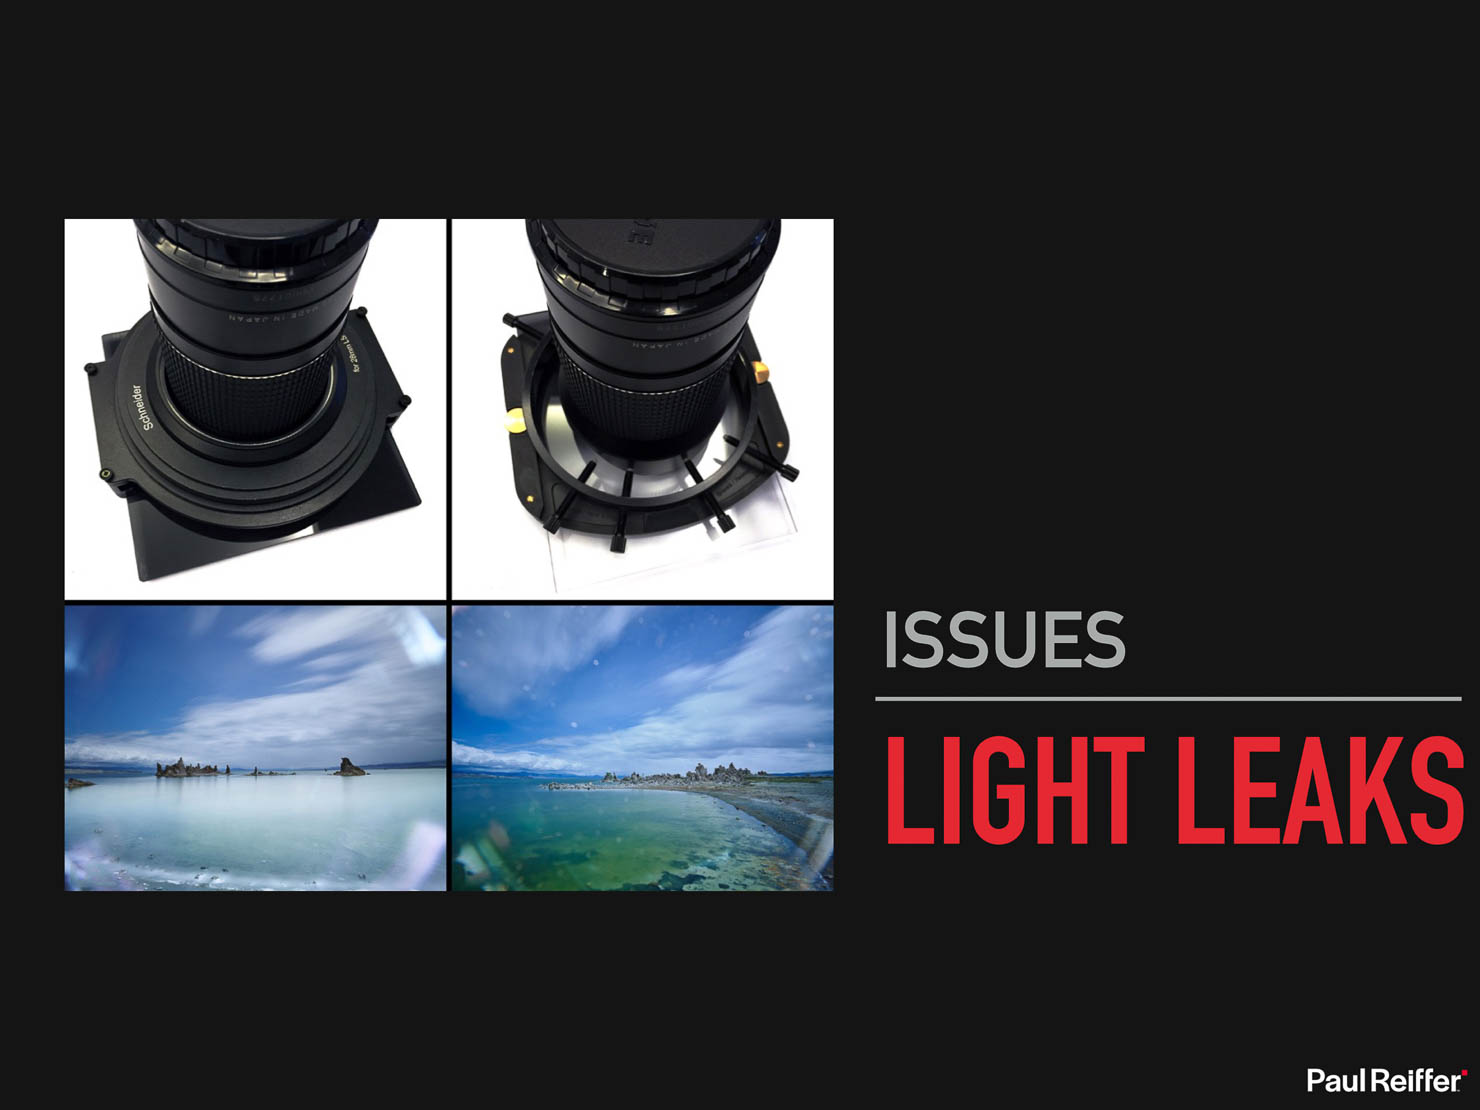
Moving on, we then look at the practicalities of filters – specifically when it comes to ultra-wide landscape shooting.
While the holder technology has certainly improved over the years, just like with colour cast, each and every time I add something in front of the lens I risk my image quality – and light leaks from a poorly designed filter holder can be the ultimate killer of an image.
Then we come to the issue of how easy it is to assemble our array of glass panels in front of the lens.
I can tell you, when you’re dangling on the edge of a skyscraper, the last thing you want to be doing is screwing on metal rings and hoping those sheets of glass are slotted in correctly – for obvious reasons. Plus, it’s another set of kit to pack for every shoot, especially if you need different holders for different lenses.
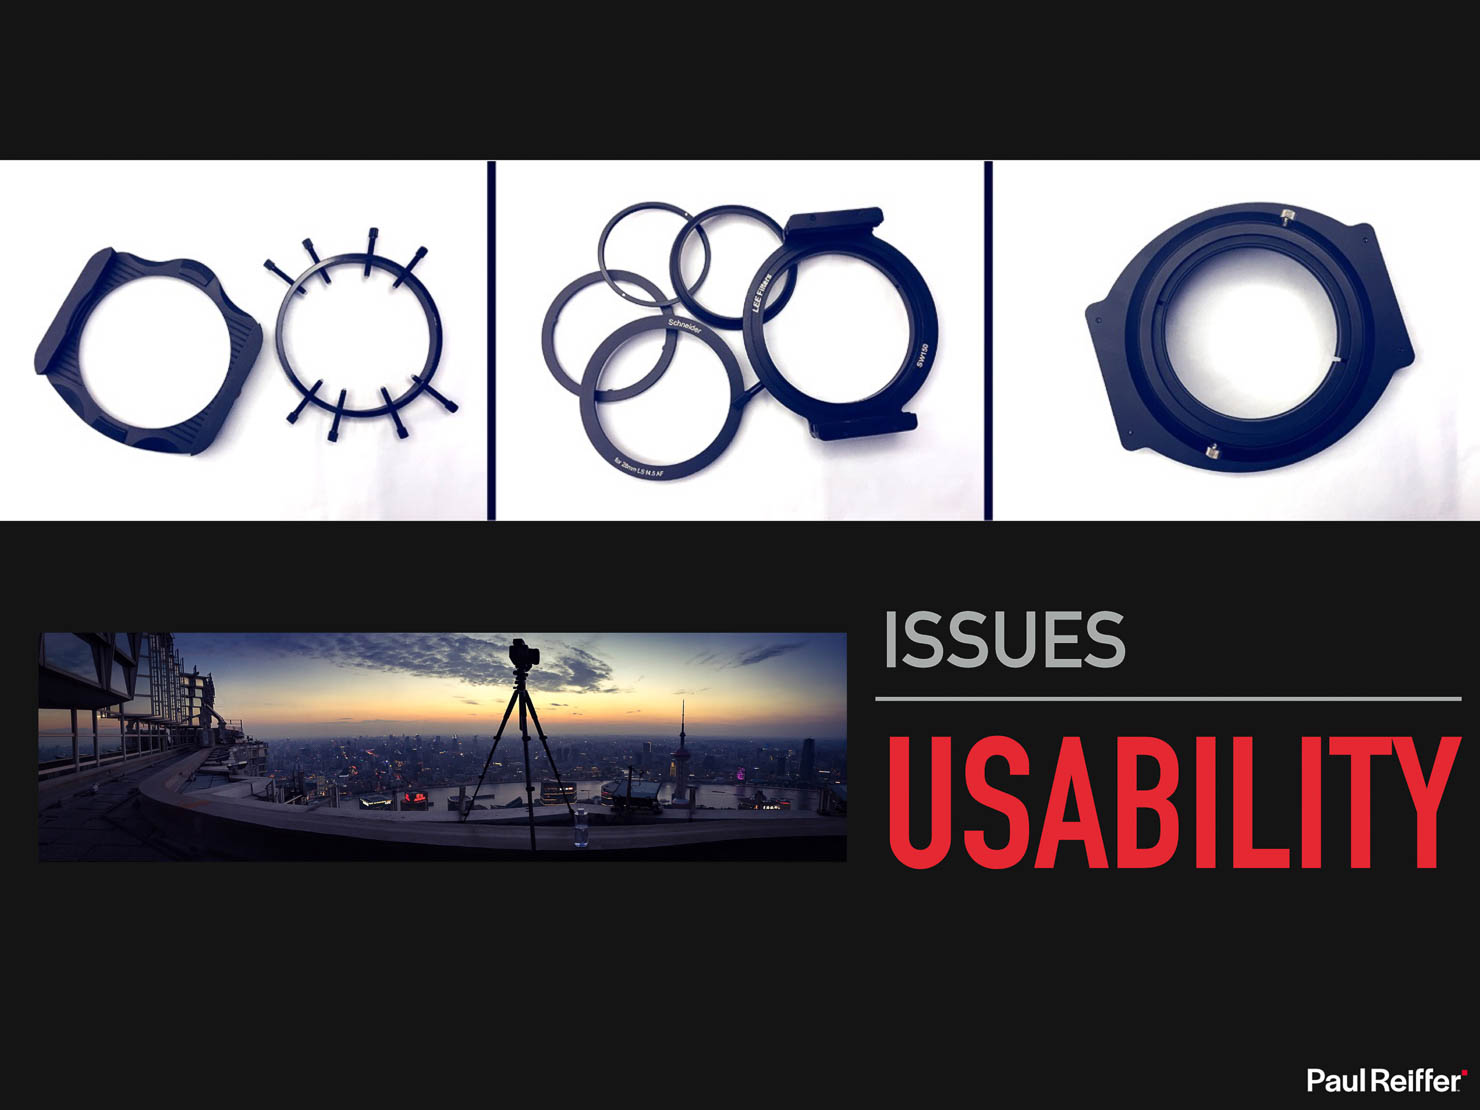
Which brings us on to our next challenge – that happy little pack of glass, metal holders, adapter rings, etc. comes at a real cost in terms of weight and size. For those who didn’t know, this became a real problem for me at the end of 2019, as a result of carrying a bag of kit that was way too heavy for my back – and these filters and holders contributed several kgs to my carry-weight.

By the way – photographers – lighten your bags, before it’s too late, trust me.
Back to our issues, let’s look at one final, practical, one. The “Black Reference” or “Dark Curtain” shot.
In theory, this is in-camera genius to get around a problem: When sensors are “on” for a long period of time, they heat up. When sensors heat up, they generate noise on the image. Long Exposures, therefore, can be noisier than shorter shots – especially at higher ISOs.
So what many camera manufacturers offer is a bit of wizardry at the time you click the button – the camera takes (say) a 2 minute exposure, getting the sensor nice and warm, leaving “hot pixels” all over the image…
…but then it automatically takes another 2 minute exposure, right afterwards, in the same temperature but with the shutter closed. The image on the sensor is black apart from those hot pixels – which shine nicely red, green or blue.
The camera (or processing software) then “deletes” those pixels from the first scene, and fills them in with the average of what surrounds them instead.
Great, right?
Well, no – not quite.
First, let’s remember this “wizardry” is only there to fix a problem: the sensor gets too hot from being on too long. In an ideal world, it wouldn’t be needed (as it’s filling in those gaps with artificial interpretation).
Second, and more importantly, those dark curtain delays can be the difference between getting a shot at sunset/sunrise or not. Imagine we’re shooting a 2 minute exposure at the exact point the sun hits the horizon – with a black reference, that’s now 4 minutes’ total time taken for one shot.
You now have ONE shot to get it right, the sun doesn’t hang around for anyone…
The Big Issue with Time-Based Exposure.
And that leads us to our biggest issue with filter photography and, to a certain extent, the traditional exposure triangle. If you stop your exposure early, or decide you want to expose for more or less time, your shot is now over or under-exposed, and there’s nothing you can do about it.
Let’s say you’re shooting a 4 minute exposure, when a minute in – a boat arrives across your scene. You only have two options – you can stop the exposure (2 stops under-exposed), or carry on and have the shadow/trail of that boat in your shot.
So what if we could separate out our artistic and creative decisions around time, from the practical side of that triangle – the one that’s purely focused on capturing enough light…
Well, that’s exactly what Frame Averaging is there to do.
Videographers often take to the concept a little quicker – but imagine making your exposure completely independent of time captured. In video terms – a 5 minute sequence is still captured at 30 frames per second – there are just 9000 frames that go into that series.

Which is what Phase One have built into their IQ4 digital backs, to great effect.
Let’s revisit our exposure triangle – the “old”/traditional one:
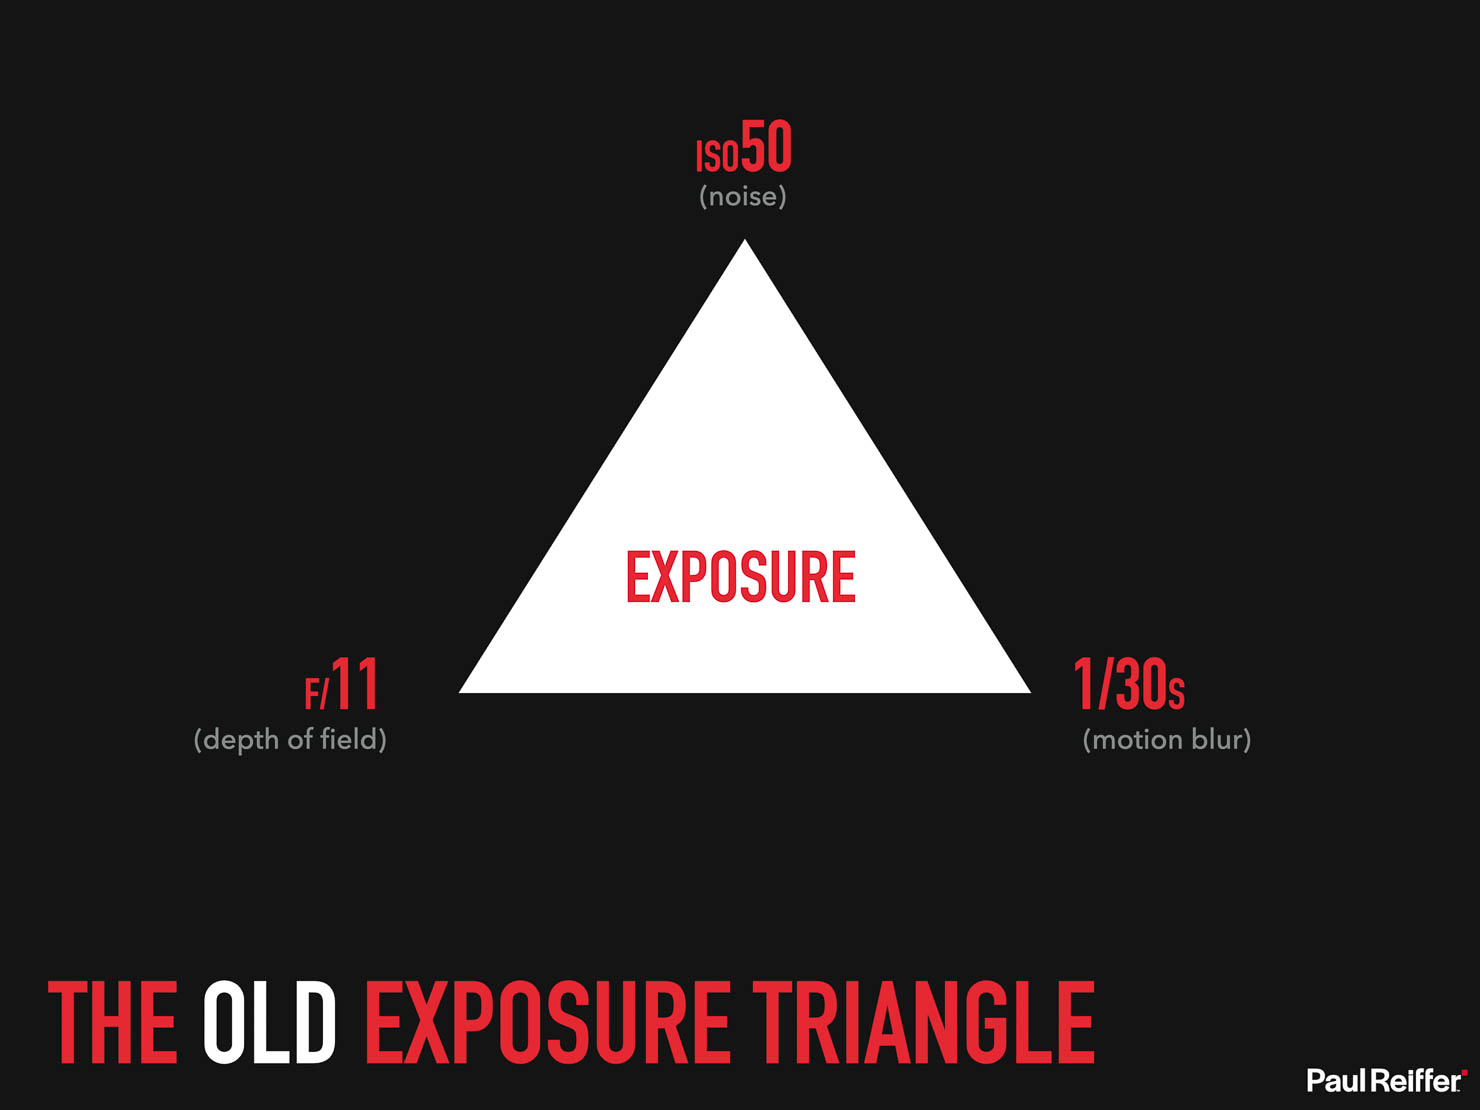
Here, we find our three elements, coupled with their three by-products (or “alternative aspects”) as a result of altering them.
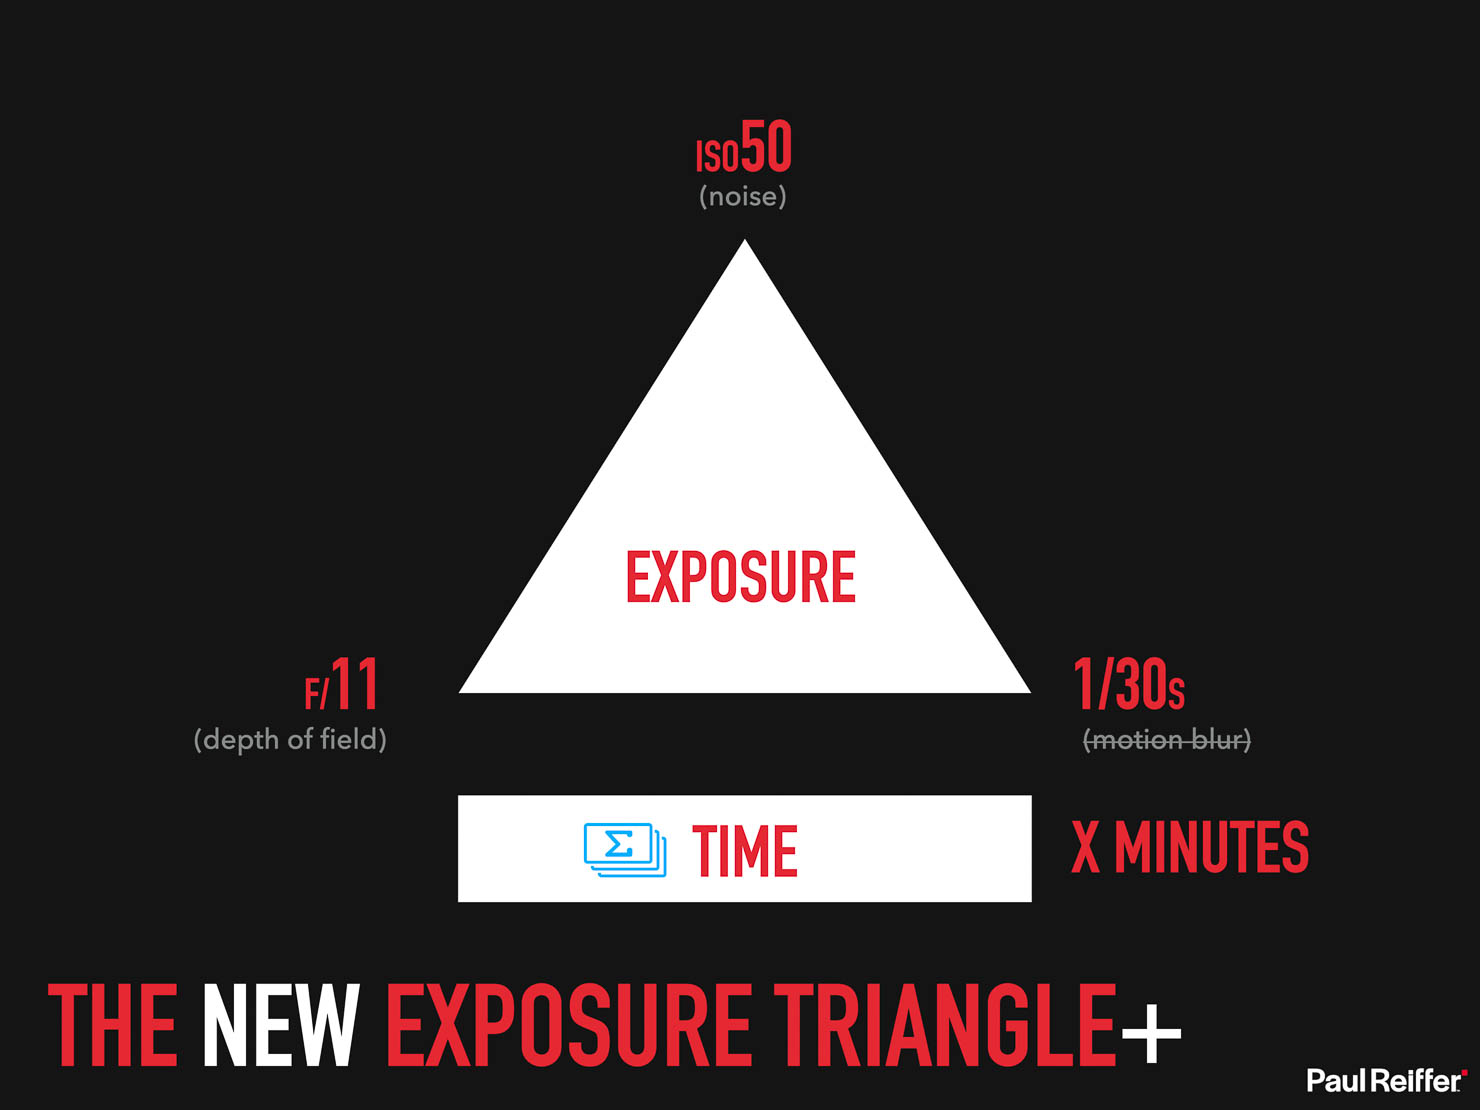
And here is our new exposure triangle – or “Exposure Triangle+” as I’ve been calling it for the past 2 years!
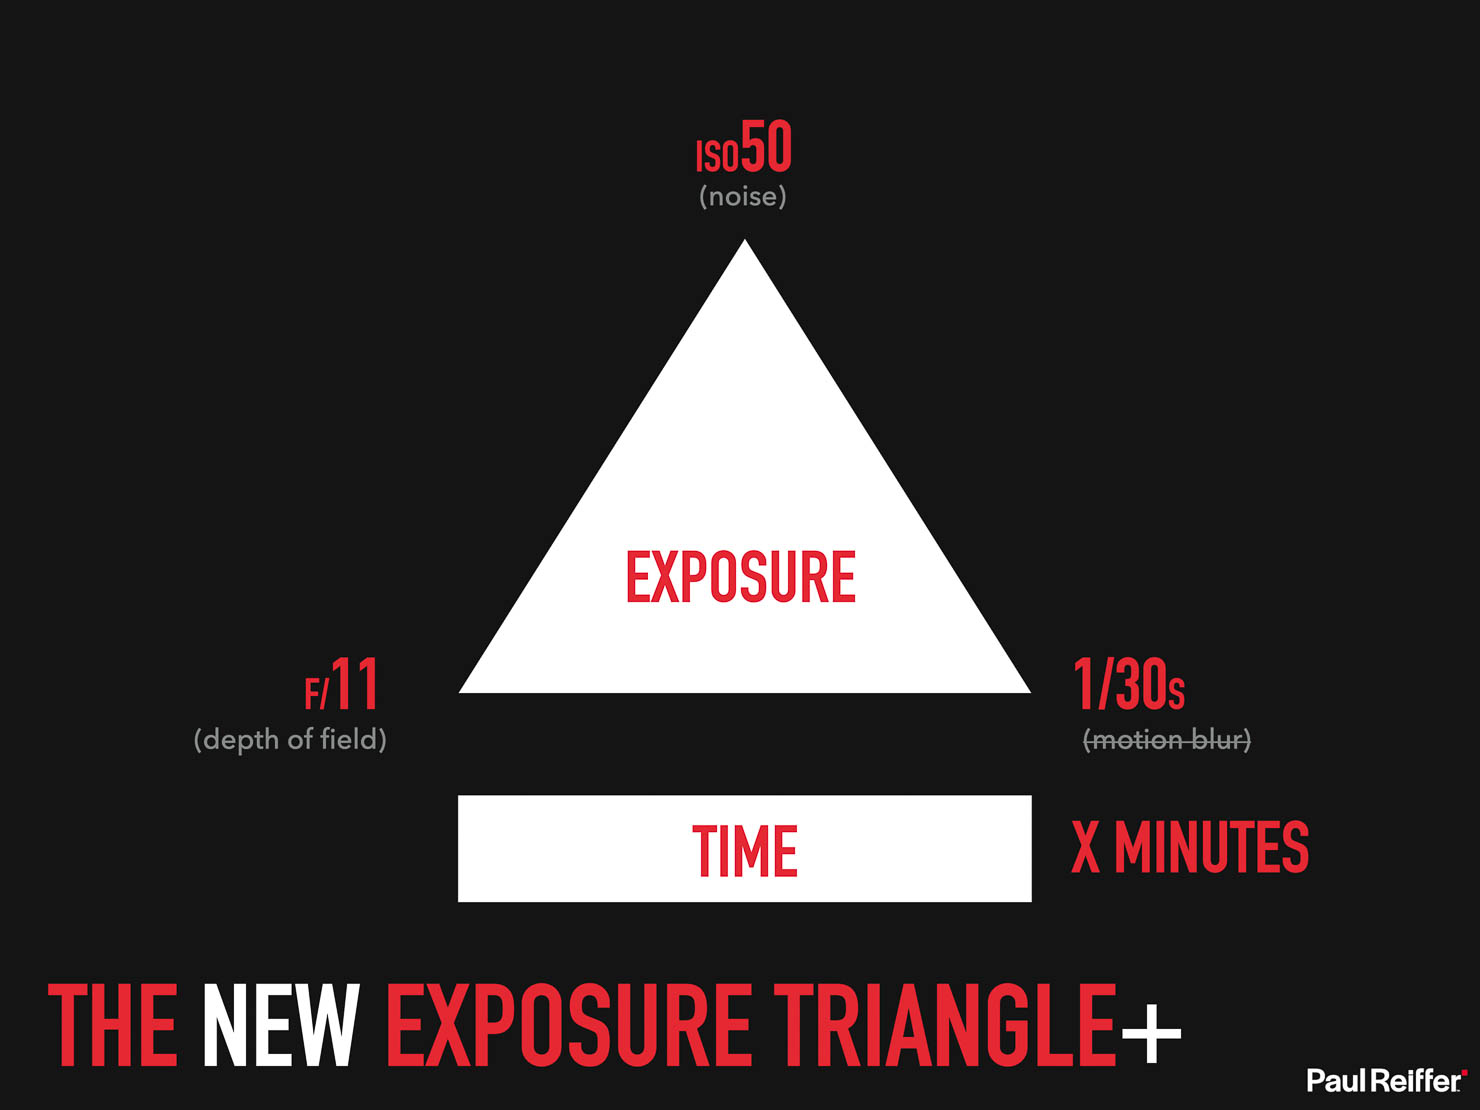
Effectively, we’ve taken the aspect of time away from shutter speed, and given it a separate variable – so we can have any given exposure for any given period of time.
So how does Frame Averaging Work?
First things first, Frame Averaging is still producing ONE, single, RAW file (or IIQ in the case of Phase One) – not a series of frames all stored on the card. This is important to understand, as you cannot split out a frame averaged image into individual “cells”, and for good reason…
Once activated, the camera takes a given number of frames of your chosen individual exposure for your selected amount of time, and records the pixel values for each one – effectively offloading them into “buckets” as it goes.
Once it hits the end of that sequence, it averages (hence the name!) all those values, for each pixel, and produces that one raw file with the combination of what it saw across the entire series as one.
Fun Fact – if we frame average a shot for the maximum amount of individual frames, while the resulting single RAW file is around 180MB, the IQ4 digital back has actually processed over 1.2 TERRABYTES of data in order to produce it.
And that whole process happens seamlessly, inside the camera – we just tell the system what the correct exposure for each frame should be, and how long we want to average it out for.
Better still – because it’s an average of each (correctly exposed) frame that’s being produced – we can choose to record for longer, or cut short our capture, on-the-fly, and it will still result in a perfectly exposed scene.
(Just with more, or less, motion recorded.)
Frame Averaging in the Real World.
So that’s all the theory – but what does it look like in reality?
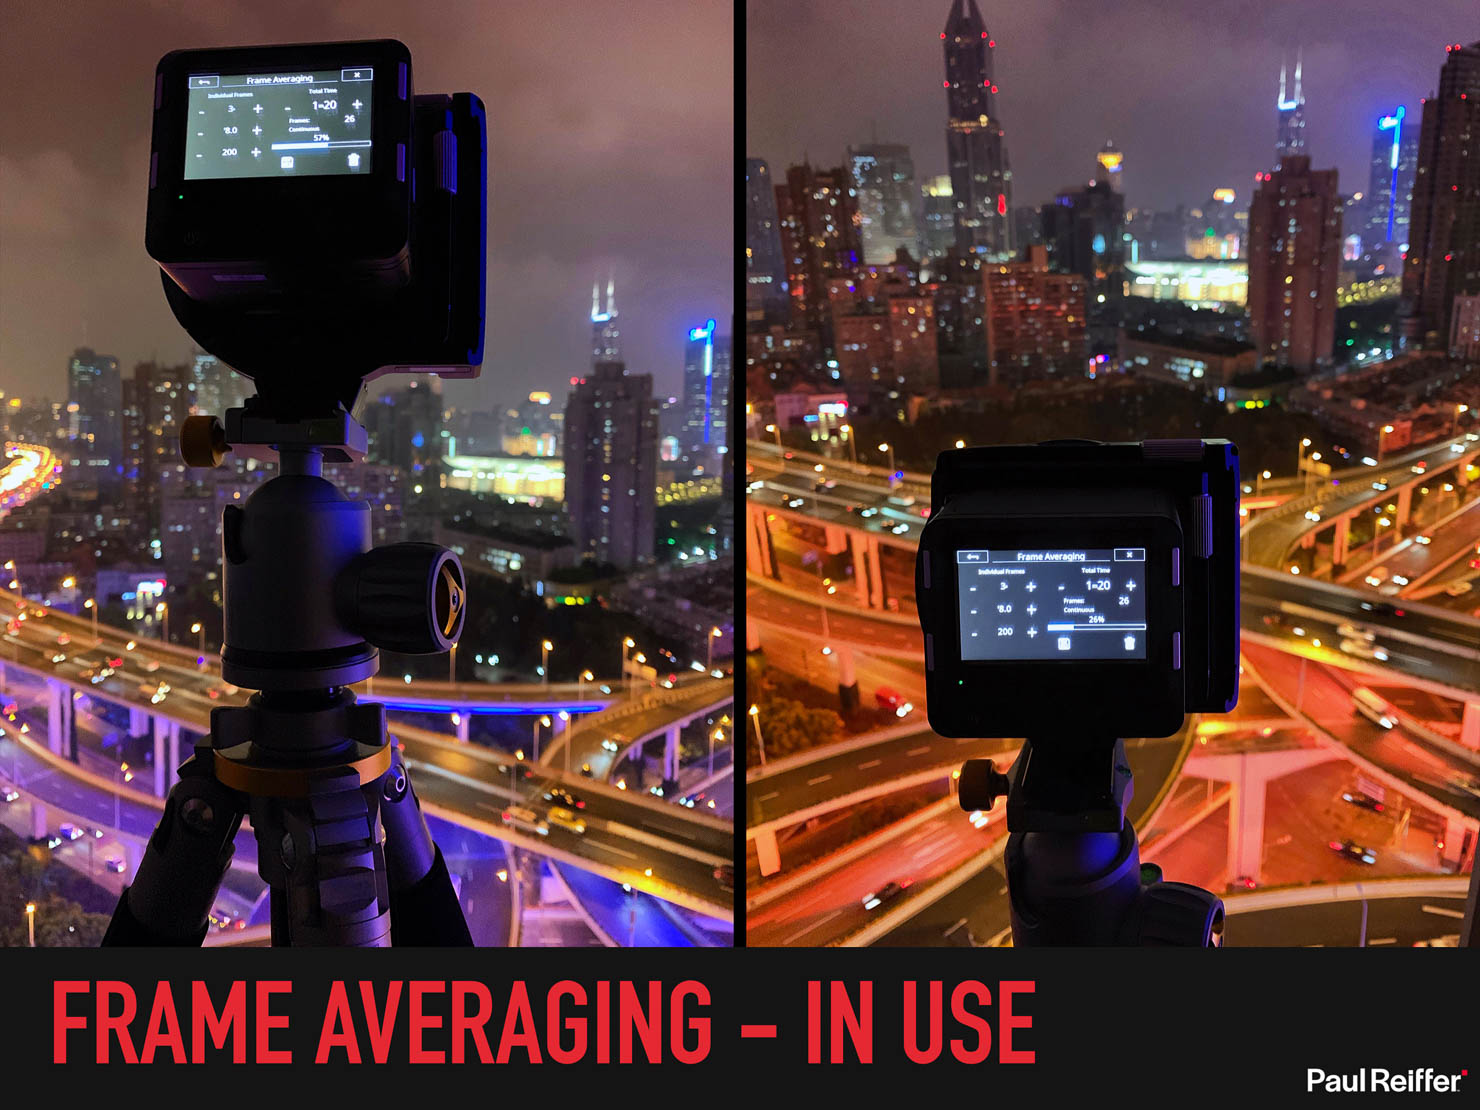
Actually, it’s easier than you’d think (and I can tell you, Phase One put a lot of thought and energy into making it so).
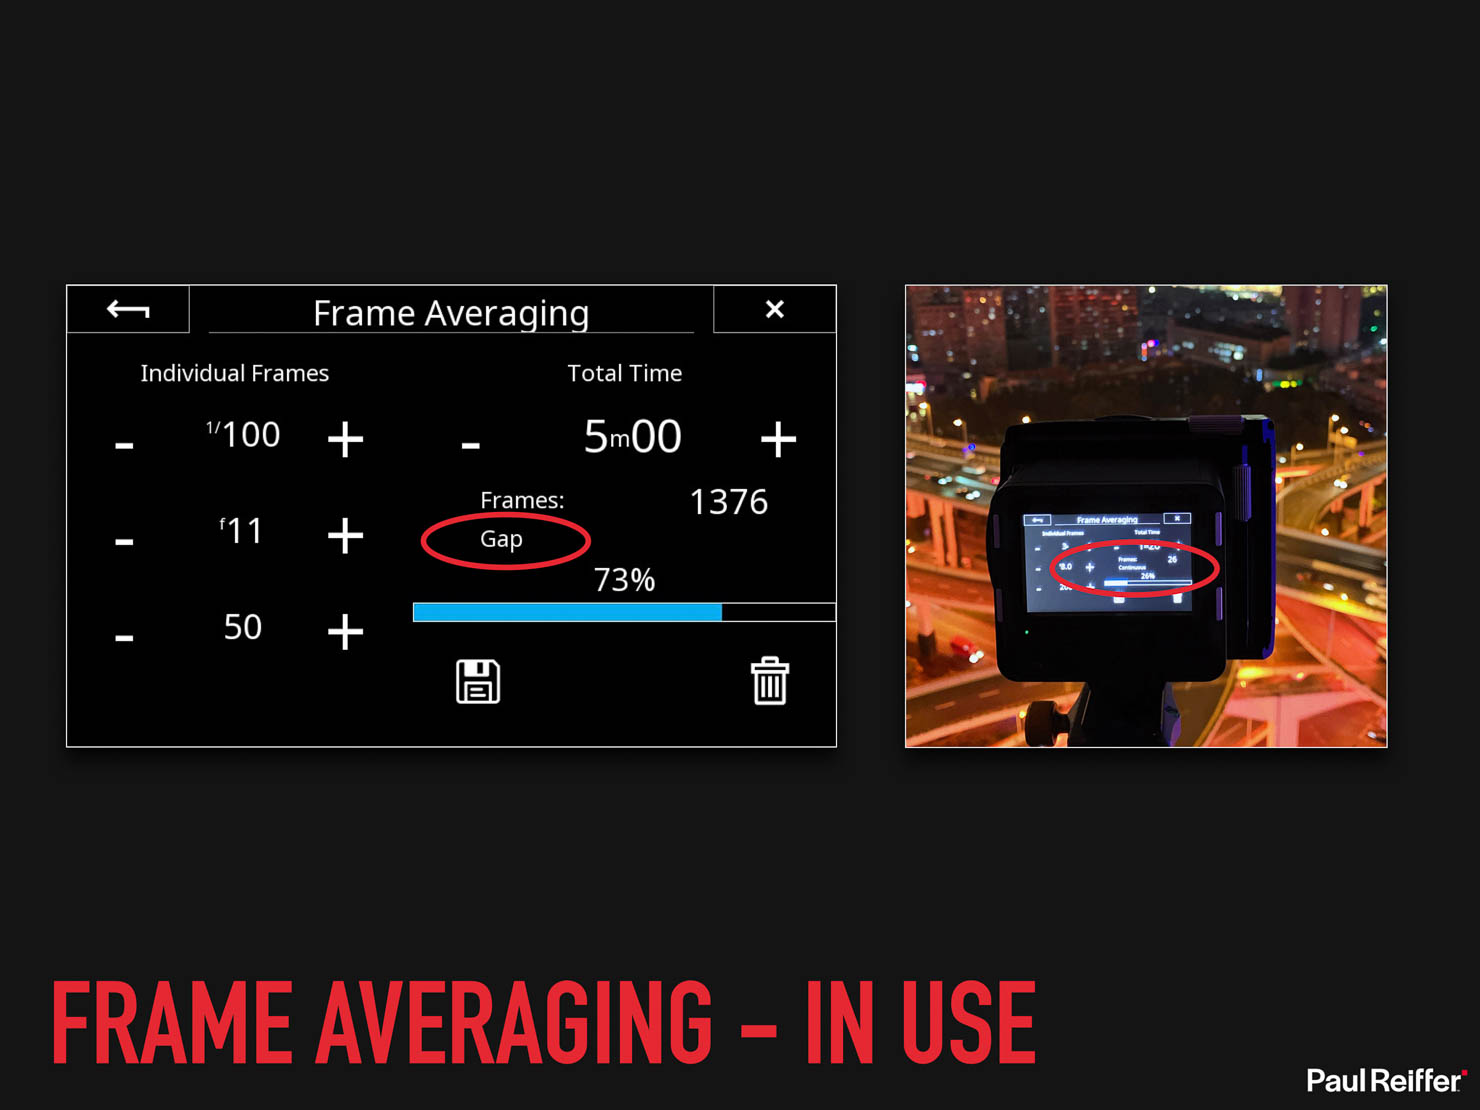
The first step is to work out your “single frame exposure” – ie: for your chosen aperture and ISO, how long you need the shutter to be open for to expose the scene correctly. We’ll talk about noise and dynamic range next, but think of this as the foundation for your long exposure – essentially, if you were to take just that one shot, does it come out with the exposure (not the movement) you were expecting?

Once our base exposure is set, we go into the Frame Averaging function (swipe in from the right on the screen) and tell the digital back how long we want to capture the scene’s movement for. It will tell us how many actual frames it’s going to use for the average. (Don’t be alarmed if the maths are slightly out, that can be due to processing times in the “Gaps” – more on that later.)
And then, we press the shutter button – and wait.
So this was a 2 minute Frame Averaged Long Exposure above Shanghai, taken with a series of 40x 3 second exposures on the Phase One XT camera system, 23mm Rodenstock lens and an IQ4 150MP digital back…
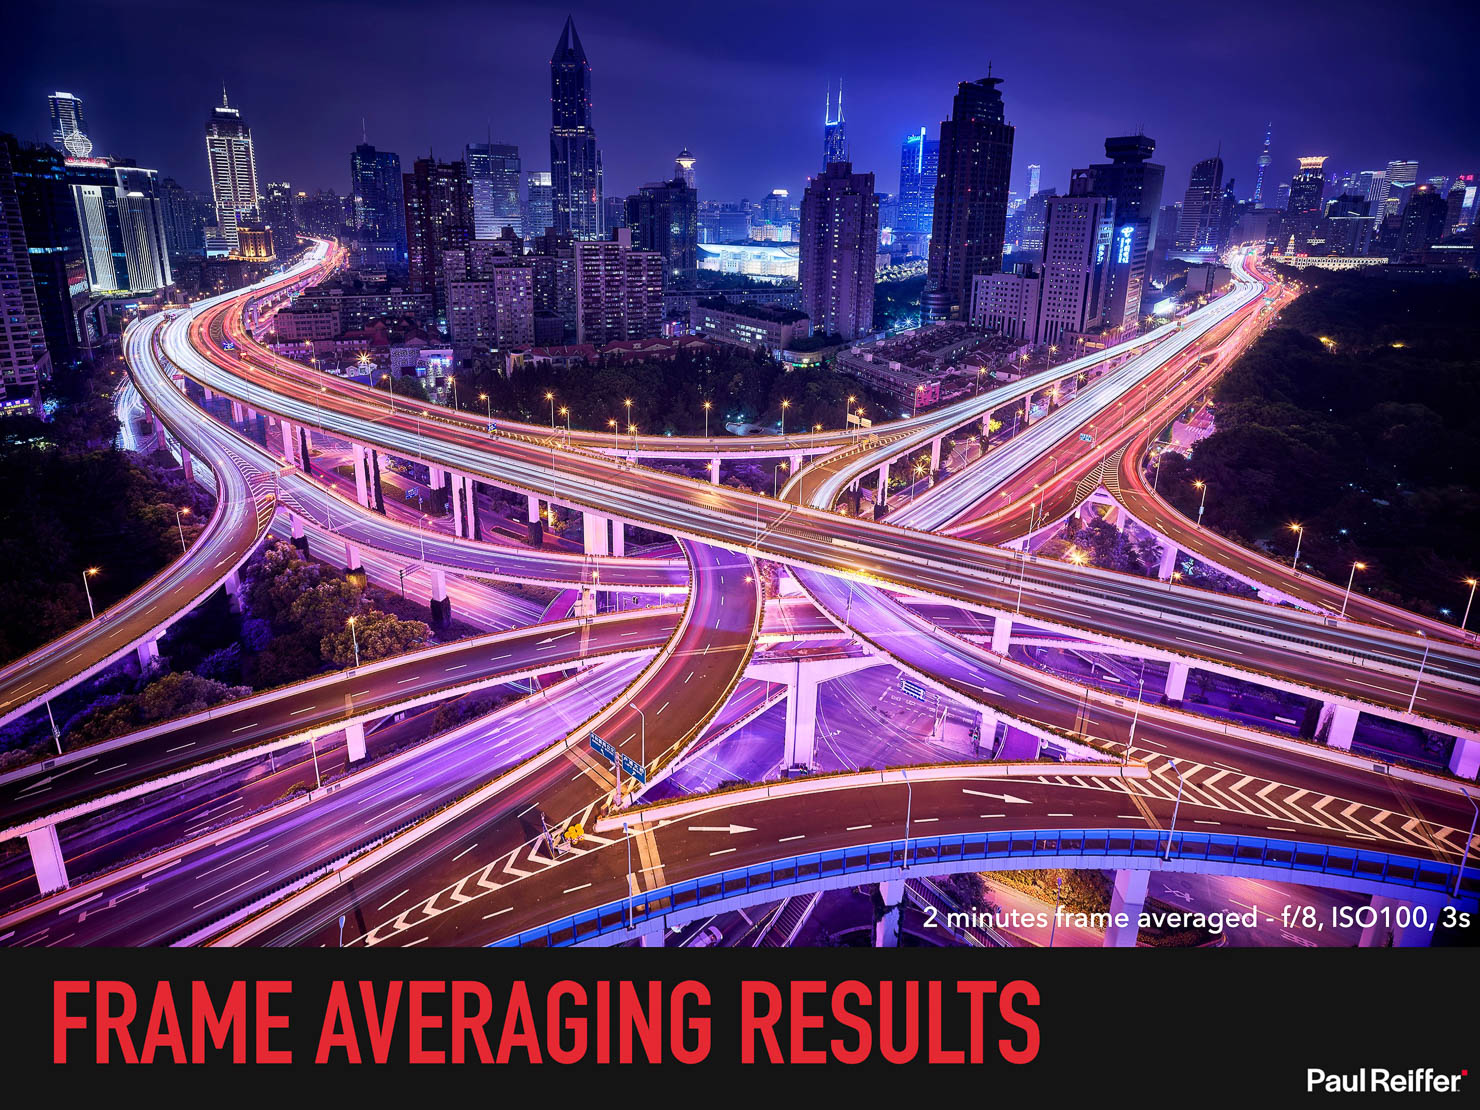
…and no filters.
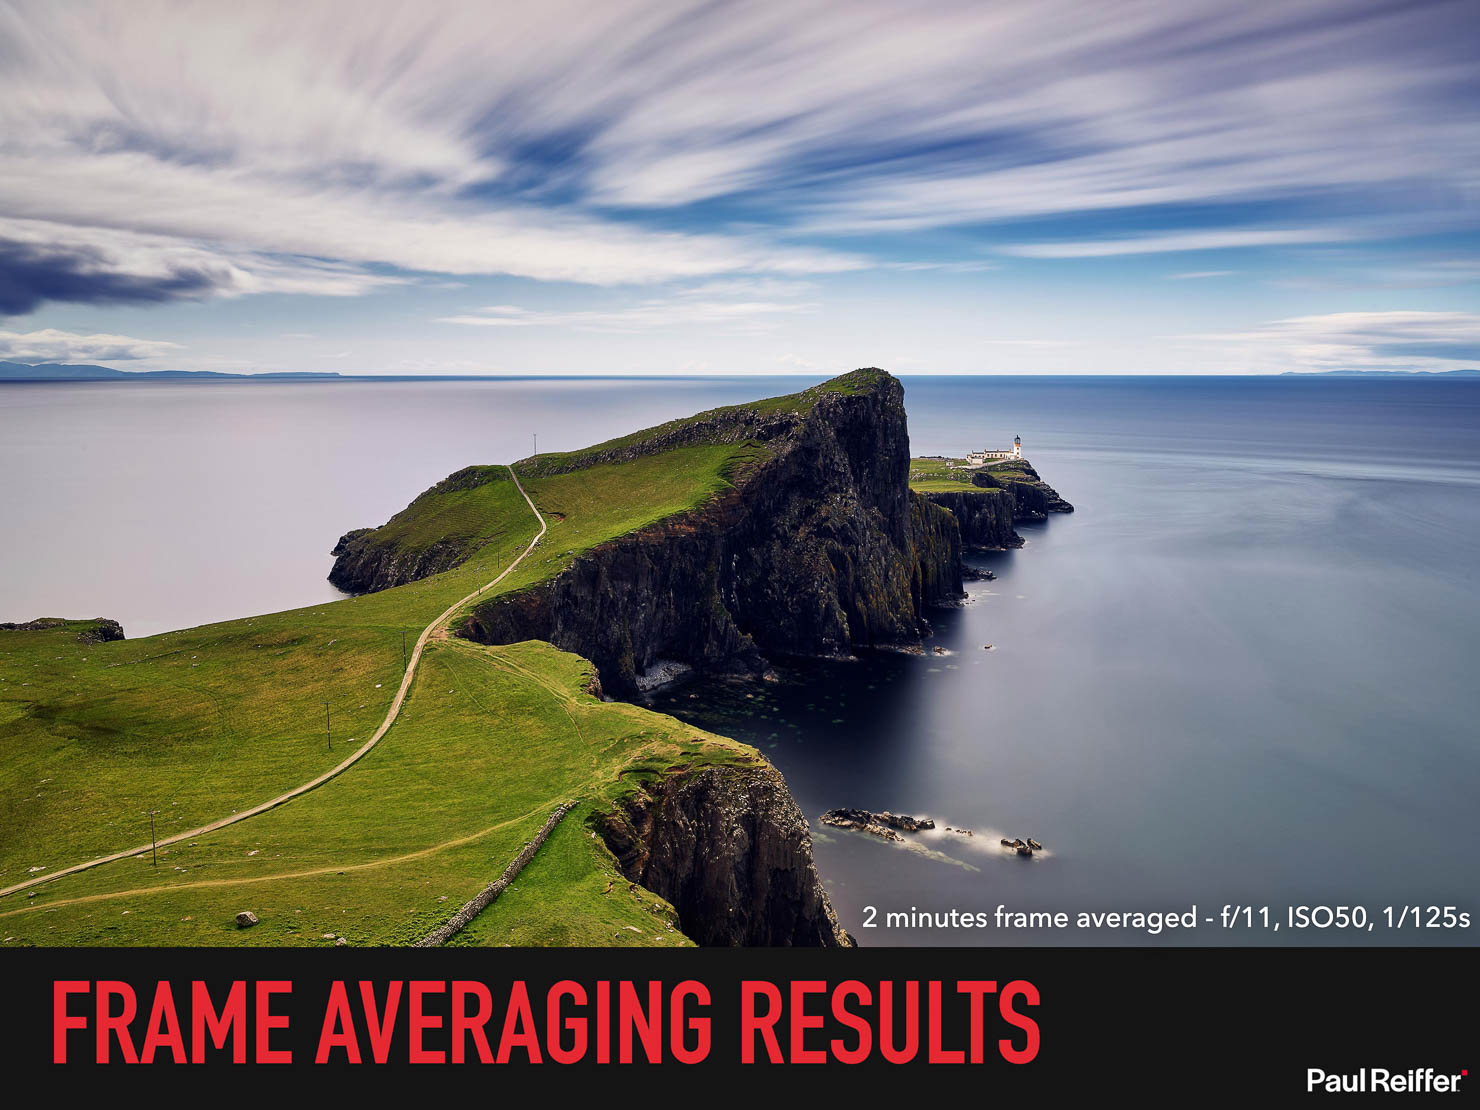
“Ah, but it’s at night!” I hear a few say, and indeed it’s possible to capture night shots using relatively long “traditional exposures” with the right camera – so how about on a normal afternoon in Scotland, at Neist Point?
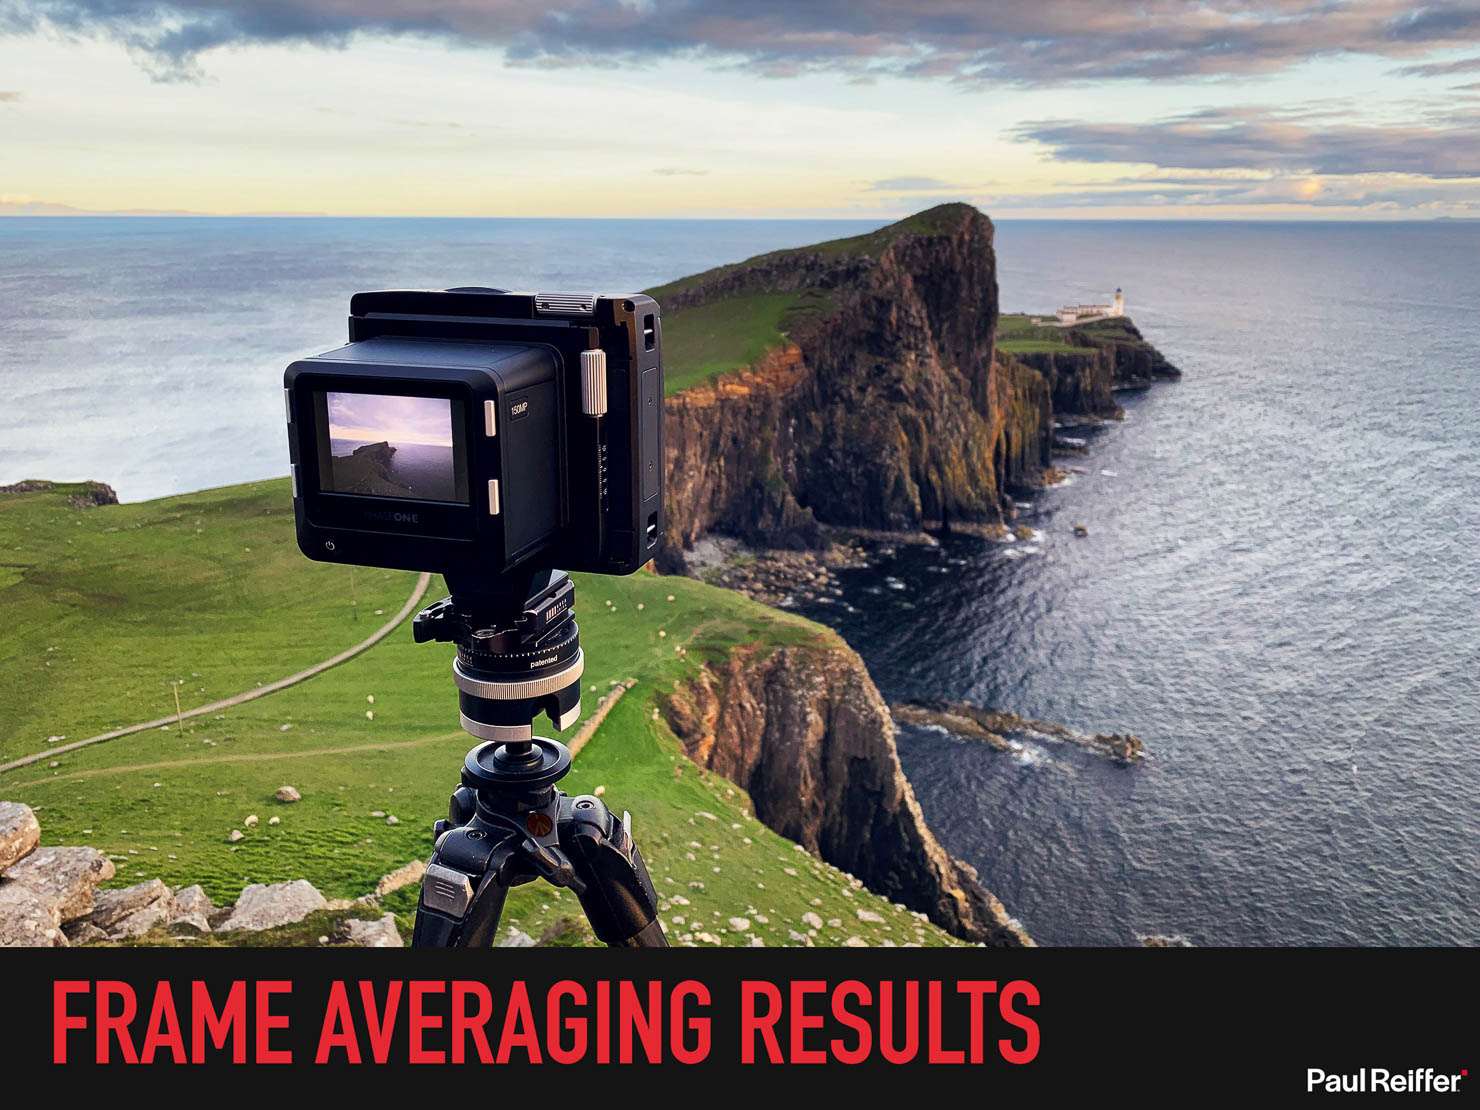
This was actually the prototype system we took around the Isle of Skye for a week.
Bearing in mind these results were from the first “cut” of the in-camera system, I’d say being able to shoot for 2 minutes straight in the middle of the day with no filters at all and get that shot was pretty incredible.
…and since then, the system has got even better.
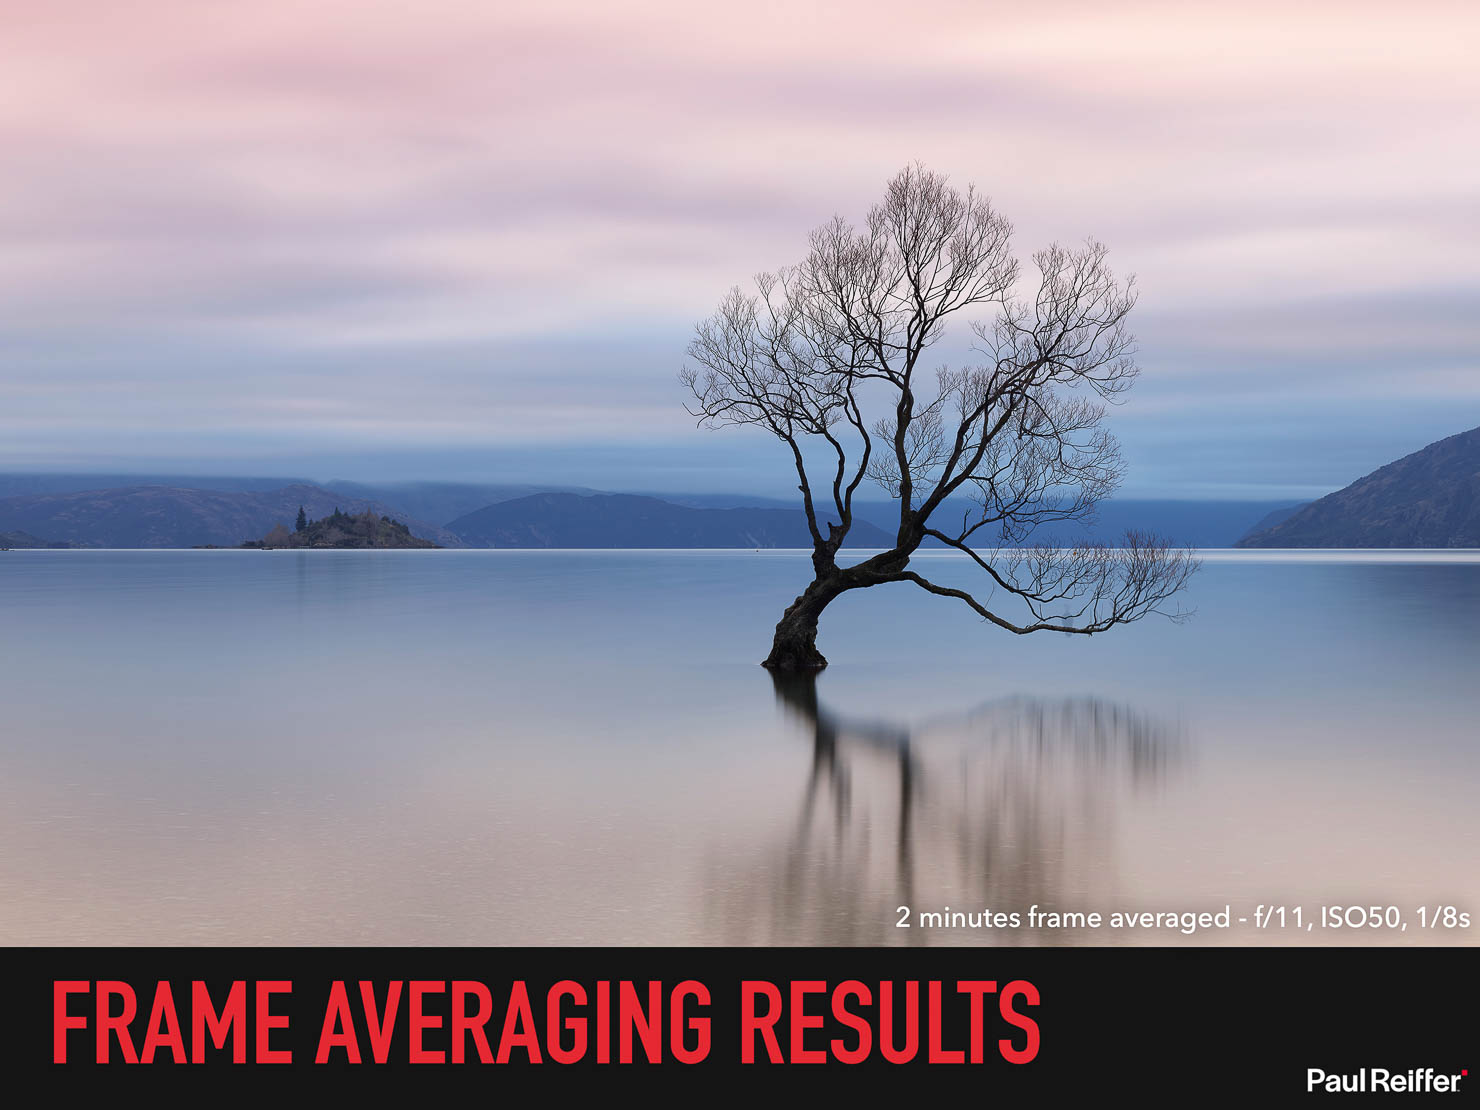
Fast-forward a few months as I headed down to New Zealand, and the ever-popular “That Tree” in Lake Wanaka (which has since been vandalised, but that’s another story.)
Again, the single frame exposure – dialled in at f/11, ISO 50 and 1/8s shutter speed for a wonderfully calming scene as reflected before us that morning.
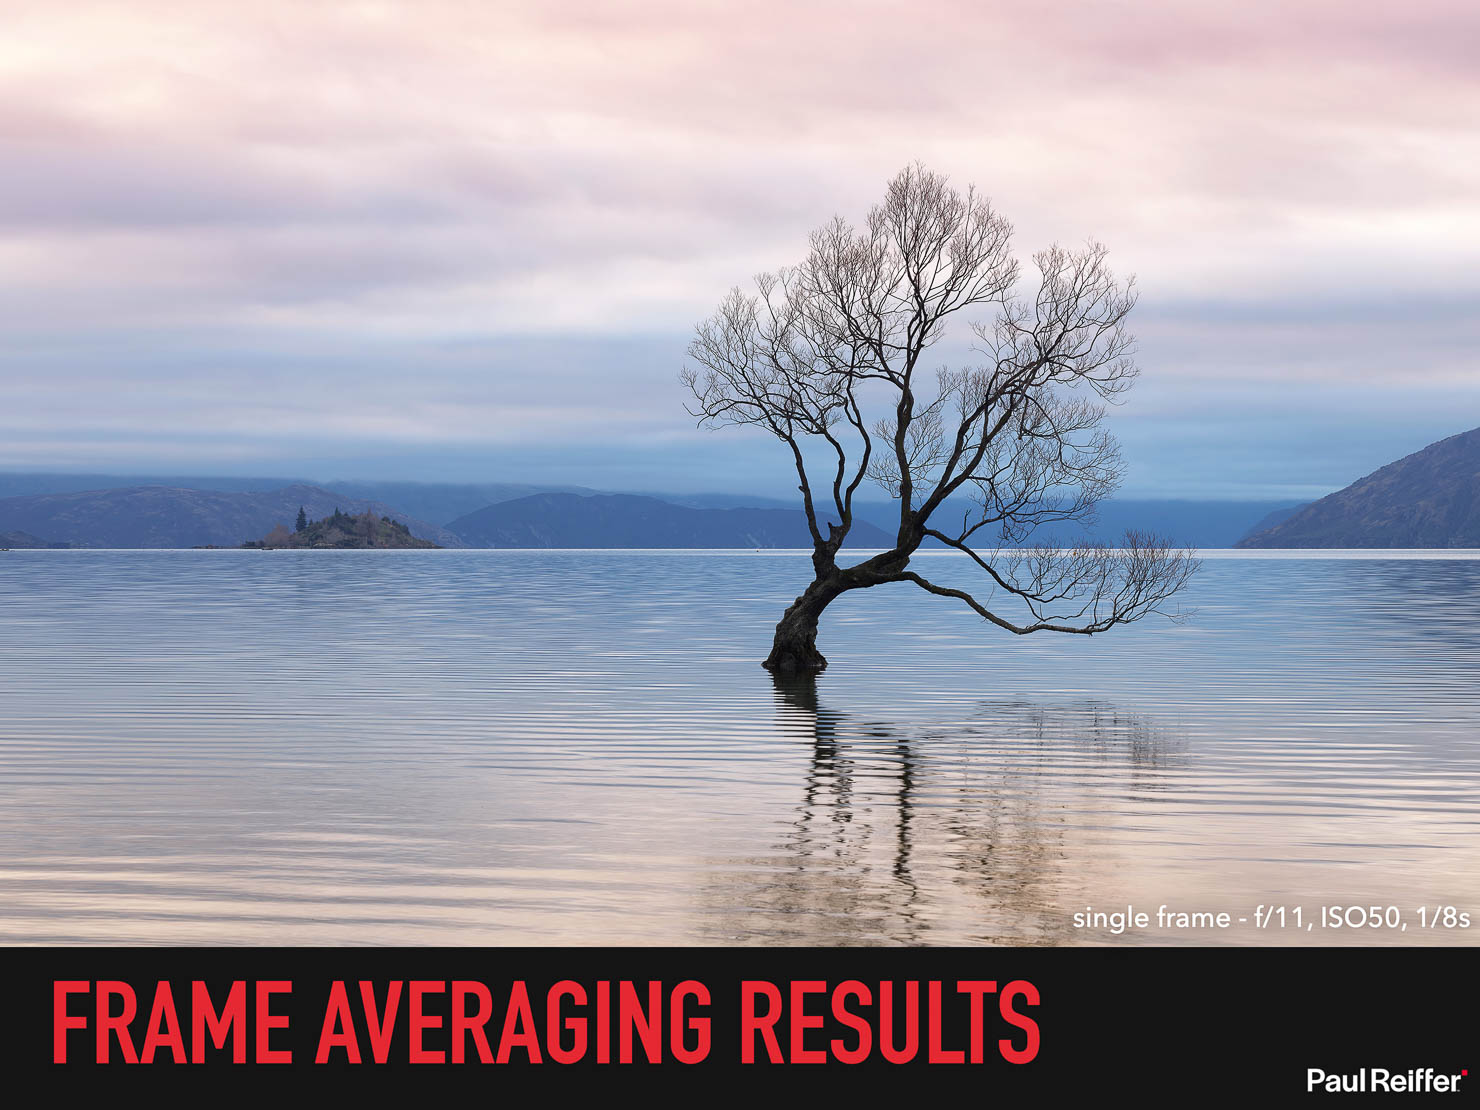
But then load those settings into the Frame Averaging function, and (once again with no filters at all), we’re able to capture the subtle movements of the clouds above along with the milky reflections of the tree on the water.
Of those who know this location well, you’ll likely know that birds and kayakers can be a challenge here – flying/paddling into shot, sometimes landing on the branches (not the kayaks, normally) – and with a traditional long exposure, that would potentially mean I have to scrap the image.
I’d normally have to accept the issue being captured in my frame – or stop the capture short, resulting in an underexposed photograph.
In the case of Frame Averaging, however, no such issue – I just stop whenever I’m happy with how much has been captured and hit the save button. Game-changing, I’d say!
Benefits & Nuances
As with all new technologies, there are a few things to bear in mind when shooting in the real world. Let’s explore these areas in that Shanghai image (using 3 pictures, taken as the colour of the lights changed).
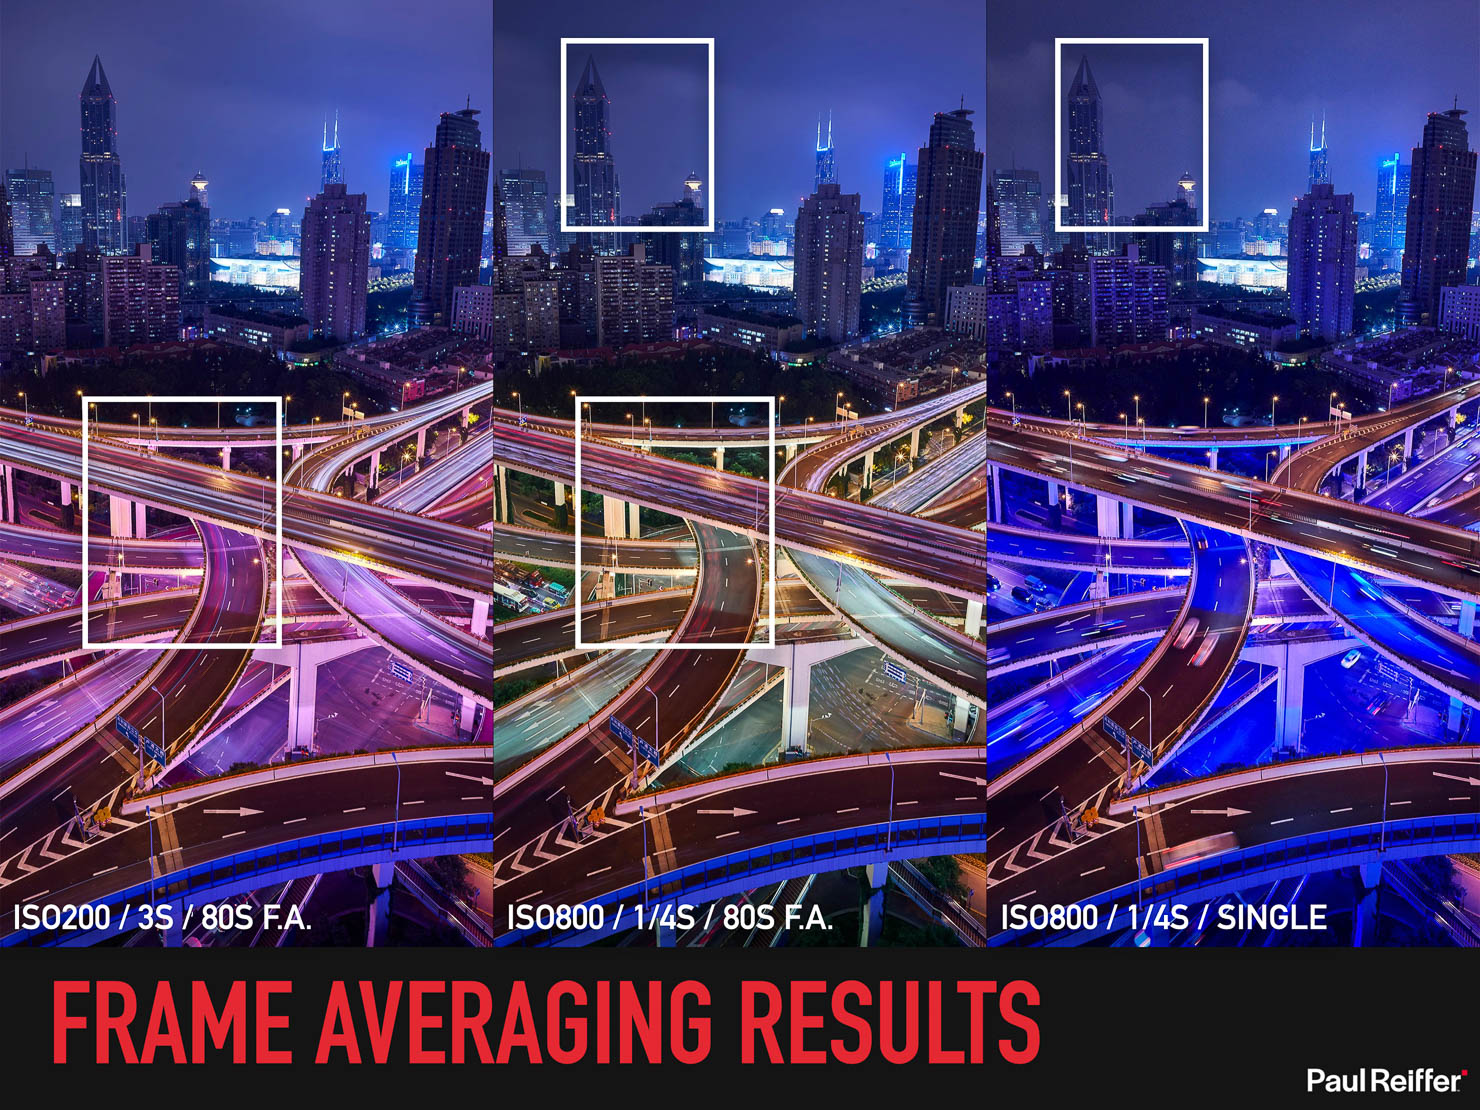
If you look carefully at the comparison between the two Frame Averaged (“FA”) shots, you’ll notice one seems to have “gaps” between the car trails while the other does not:

They’re both Frame Averaged shots, but have delivered very different results – and the reason is down to the shutter speed of that base exposure.
Remember I mentioned the sheer amount of data that needs to be shifted in the digital back in order to average out all the scenes? With each raw frame being 150-180MB in size, if the base shutter speed is too fast, the camera simply doesn’t have time to keep up – so it effectively needs a tiny rest in between each frame.
In organic scenes, you won’t notice it as much (and Phase One have worked on reducing the minimum shutter speed further and further with each update) – but in cases like light-trails which are continuous across the capture time, you’ll notice a gap in those lines. The screen on the camera does actually warn you if you’re likely to experience gaps, but it’s one to note – especially with night lights – and get your shutter speed slower if possible.
Arguably more interesting, however, is the effect that Frame Averaging has on two elements we’re always conscious of in photography – noise and dynamic range.
If we consider that noise is random, and that the actual sensor times are shorter for each exposure within a Frame Averaged sequence, we get three big benefits here over shooting a traditional long exposure or high-ISO image.
- Despite using a higher ISO than I would normally recommend on a full-frame medium format camera, any noise issues are averaged throughout the capture into perfectly smooth areas – whether in shadows, midtones and highlights – effectively removing all that noise.
- Because our sensor isn’t on permanently, it’s also not getting quite as hot – again, we see a reduction in hot pixels and heat noise in the first place…
- …which leads neatly into the deletion of that dark curtain issue we discussed earlier. The camera still does a Black Reference, but it’s doing one for the base exposure (in this case, 1/4s), not for the full 80 second capture as it would have done before.
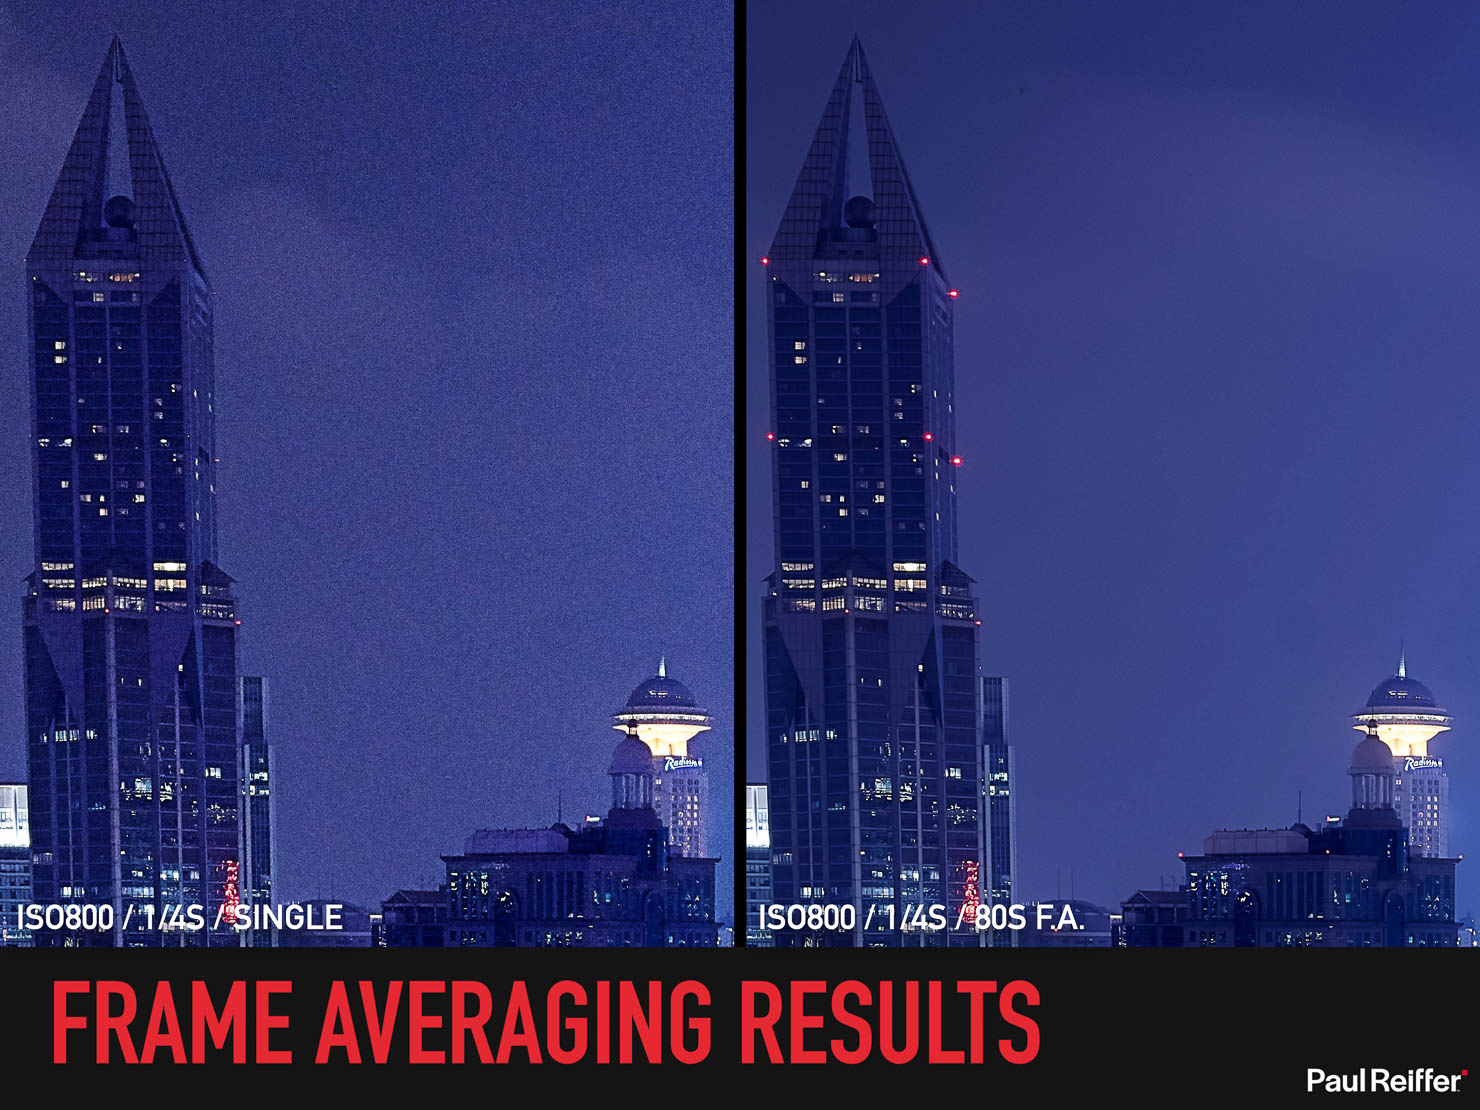
So I have the ability, through Frame Averaging, to avoid the long delay after each shot and come away with a noise-free image. But in image quality terms, it gets even better.
Because of that noise reduction in the shadows, coupled with the relative protection from highlight clipping that the AFA process delivers (remember, it’s delivering the average of all those exposures, topping out at 255) – we actually get a small boost in Dynamic Range, too.
Pretty cool, right?
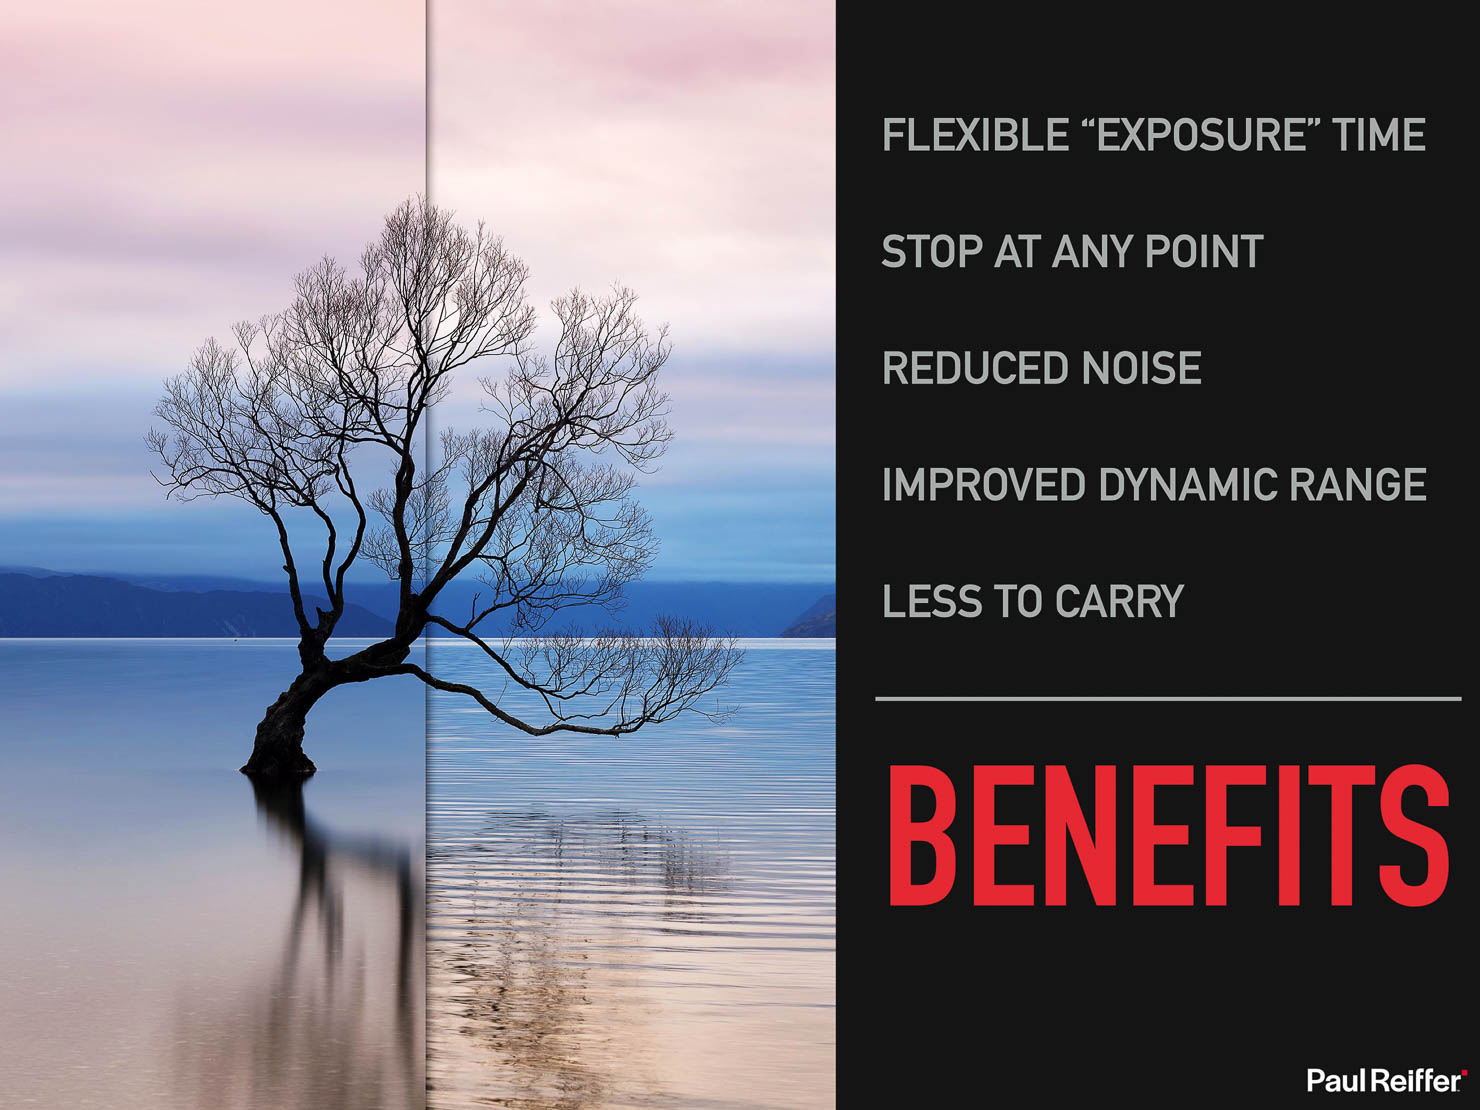
And all of those benefits in a package that’s removed a ton of glass and most of the holders from my bag!
The End of Filters?
Actually, no.
So, while we can remove the need for filters in a lot of situations when it was there to lengthen an exposure time (especially where it was a flat ND that was being used) – there are still some situations where we’ll need to use optical filters for now.
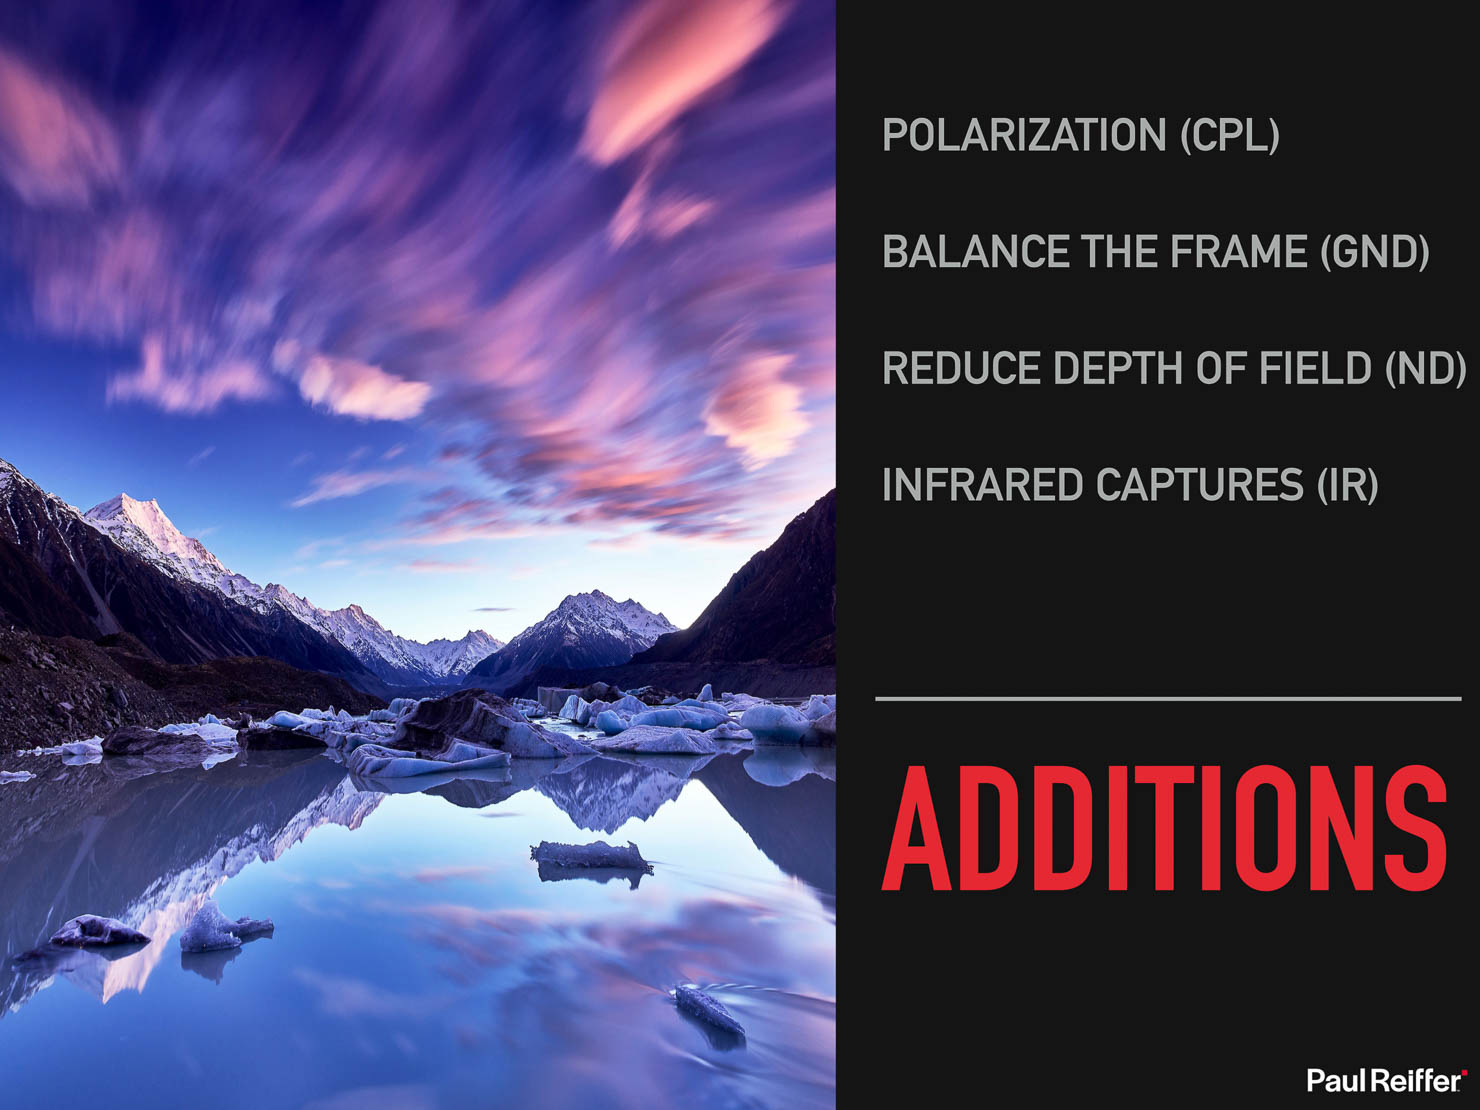
We can’t polarise (and no, despite their claims, software companies cannot do this after the fact). It’s impossible to remove a reflection and see through the water or glass after you shot the scene – so you’ll want a CPL filter for that.
If you have a huge variance of light across a scene, beyond Frame Averaging’s ability to protect the highlights and shadows at the same time, you might still want to pack a simple 3-stop soft GND filter to help.
Likewise, if you’re using an ND filter to allow you to open up your aperture for a tiny depth of field, then Frame Averaging isn’t going to replace that – you’ll still need to bring it.
And finally, for specialist applications such as Infrared shooting – you’re going to need those pieces of glass to block certain wavelengths too.
But with all that said – I’ve now shot on quite a few occasions with absolutely no additional glass in front of the lens – and the quality of my images has gained from that.
And if you do see me out and about with a filter holder on the front, it’s typically just my 3-stop GND (for now), to balance the scene. Just that and one holder – a much better accessory pack than the 4-5kg of assorted glass and metal that I used to carry.
The New Exposure Triangle+
Let’s ask that question again:
As before, my EXPOSURE was only 1/30th of a second…
…but by using Frame Averaging, separating out the time captured from our shutter speed (using my new “Exposure Triangle+”) – it was a scene that was captured for nearly a minute.
And I dare say, we’re only just getting started.