My phone buzzed – “are you going anywhere with bright lights and deep shadows soon?” was the question.
It was the guys at Phase One, with a new “toy” for me to play with – an incredible enhancement to the IQ4 medium format digital back which would allow for shadows to be recovered, virtually noise-free, with a 3-stop difference to the highlights in what appears to be one single shot.
In other words, the “natural HDR” that so many of us are looking for, where we’ve been disappointed by the cartoon-like results of traditional bracketing to date.
It’s part of their new “Lab” initiative – giving their photographers around the world access to exciting new features that may still need a few “tweaks”, but are ready for real-life feedback – and here was the beta of the beta to play with.
Well, I was heading to Miami – and South Beach is known for its neon lights…
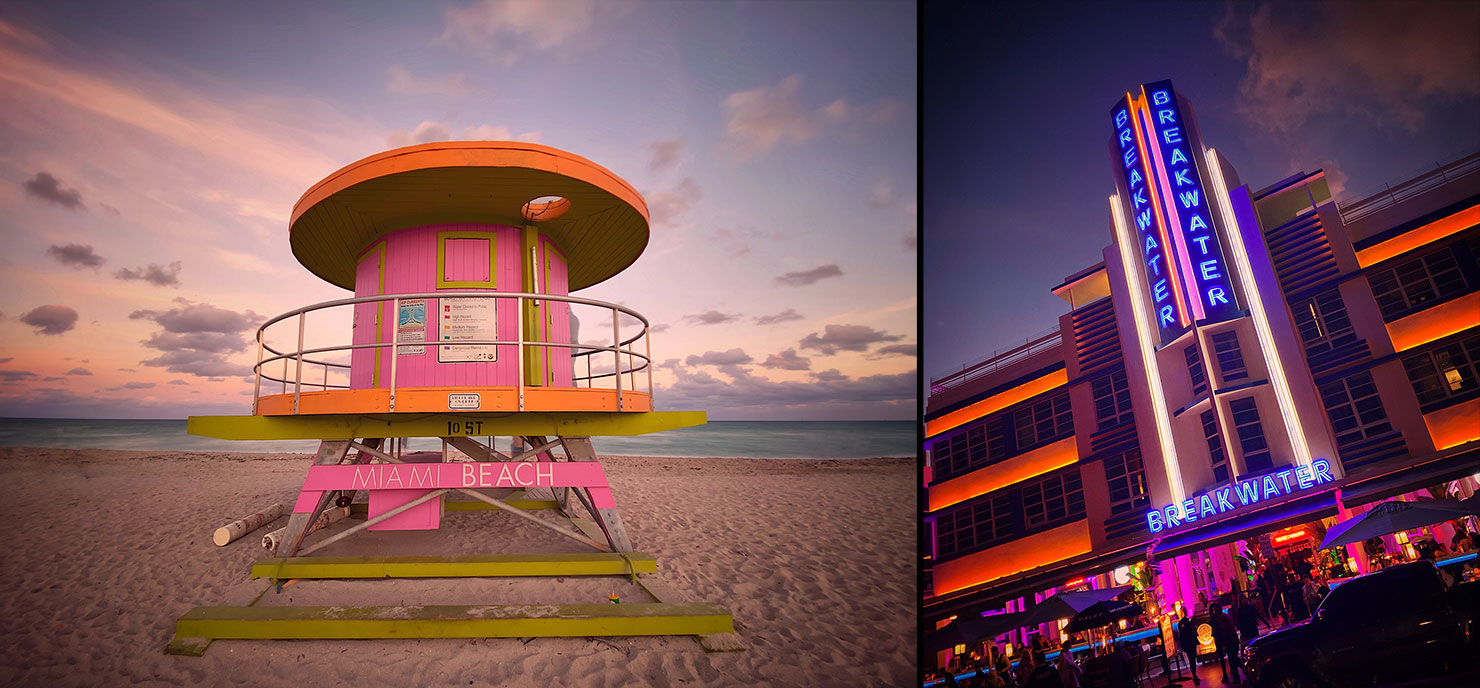
After a stroll along the selfie-swarmed Miami Beach – and a quick Cuban bite along (what appears to be) the place to visit if you feel the need to compensate for something by revving your engine up and down Ocean Drive all night – I grabbed the camera with the latest “Lab” product from Phase One fully loaded.
Accessing the new Lab features requires the latest Firmware update (officially released today), and then enabling it in the “About” menu of the IQ4 series digital back. Once enabled, you activate it on a shot-by-shot basis with a swipe from the right, in just the same way that Frame Averaging is activated.

The next step is to dial-in the base exposure for the highlights and the tool will automatically calculate the shadow frame exposure to be 3 stops longer in time. You’ll need to set a fixed white balance value (AWB isn’t your friend here) but otherwise, everything else is automated.
So, what does this thing actually do?
Put simply, once activated, the camera produces a raw file that actually contains two recordings, captured at virtually the same time. One exposed for the highlights (in my case, a 0.8 second exposure was about right) and another, 3 stops longer, for the shadows (so in this case, 6 seconds).
Once stored, Capture One is then able to read this complete file and use the dedicated shadow information for recovery, instead of simply pushing the exposure and dynamic range of the single, original, shot.
The result?
Virtually noise-free, detailed, shadows, while still capturing all the information from those highlights in every shot.
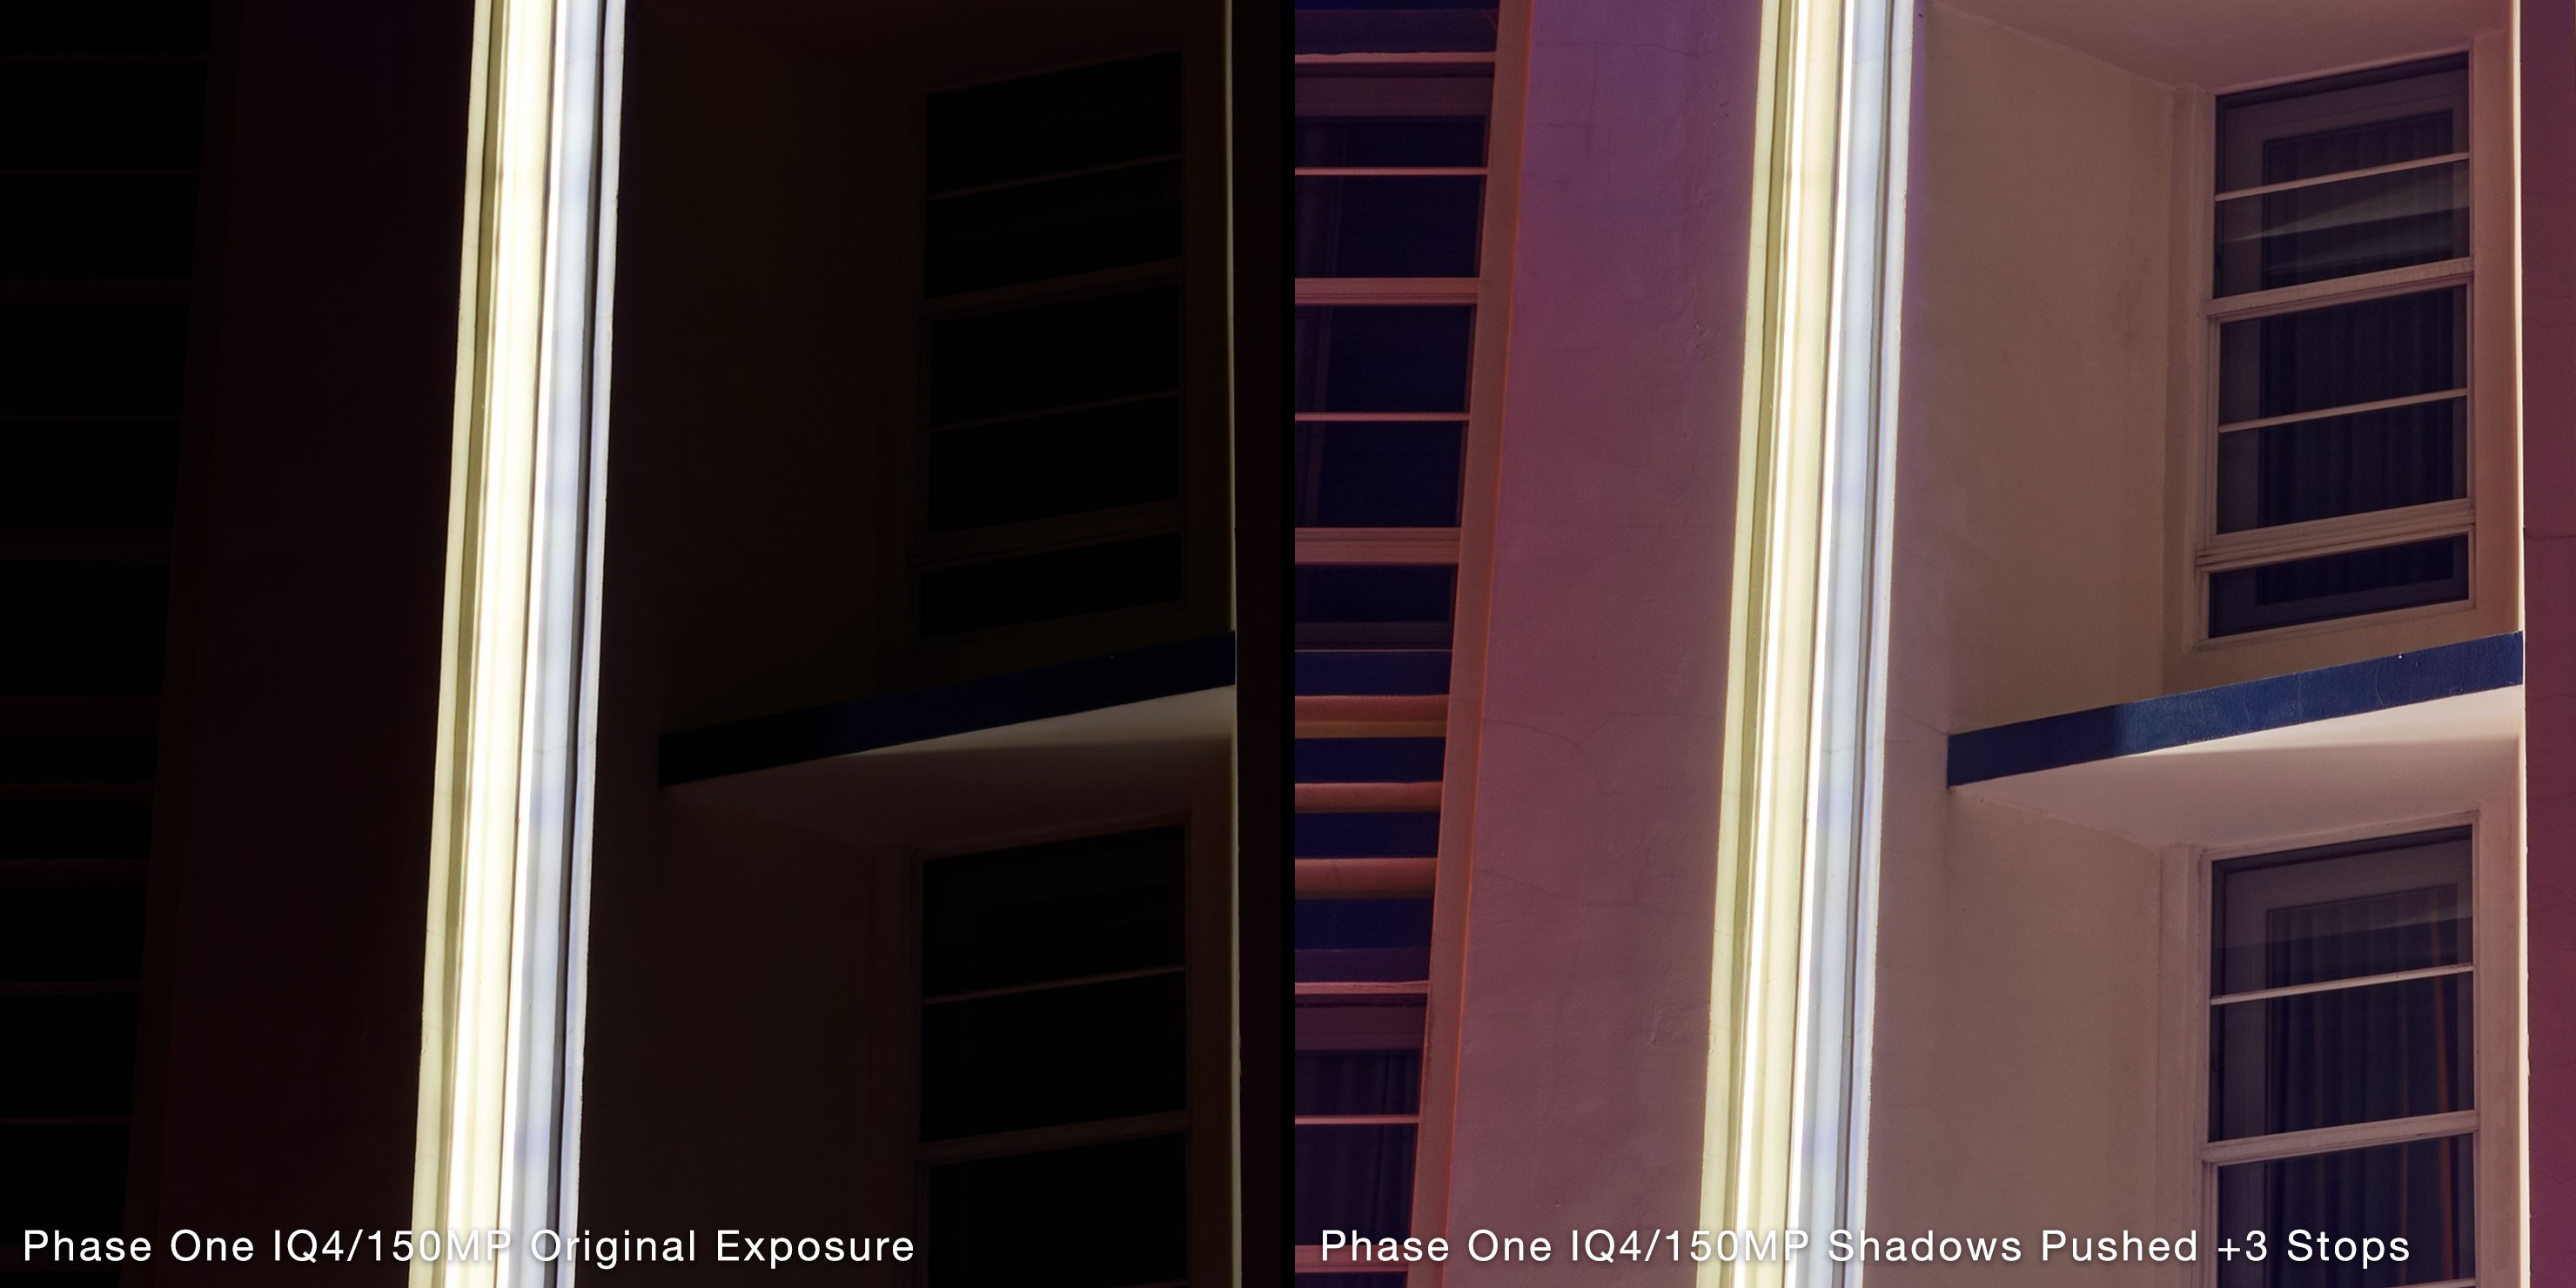
Remember, we’re talking about an original image here that is ridiculously dark in those underexposed shadow areas when dialled-in correctly for the highlights alone.
Increase the dark areas of the image on a standard exposure and we’d expect to see huge amounts of noise creeping in to the image. The promise here, however, is that by using the Dual Exposure+ Lab function we’re able to pull another 2-3 stops up from the shadows with no significant increase in noise.
I’m sure, over the coming weeks, you’re going to see some extreme examples of shots which have been “rescued” (saved from ‘death by noise’) to prove how good this technology is – but to me, this isn’t about saving a badly shot image.
This is about getting even more dynamic range out of a single click of my Phase One camera, without the need to resort to traditional HDR techniques.
So, with all that said, let’s see how it did in detail that night…
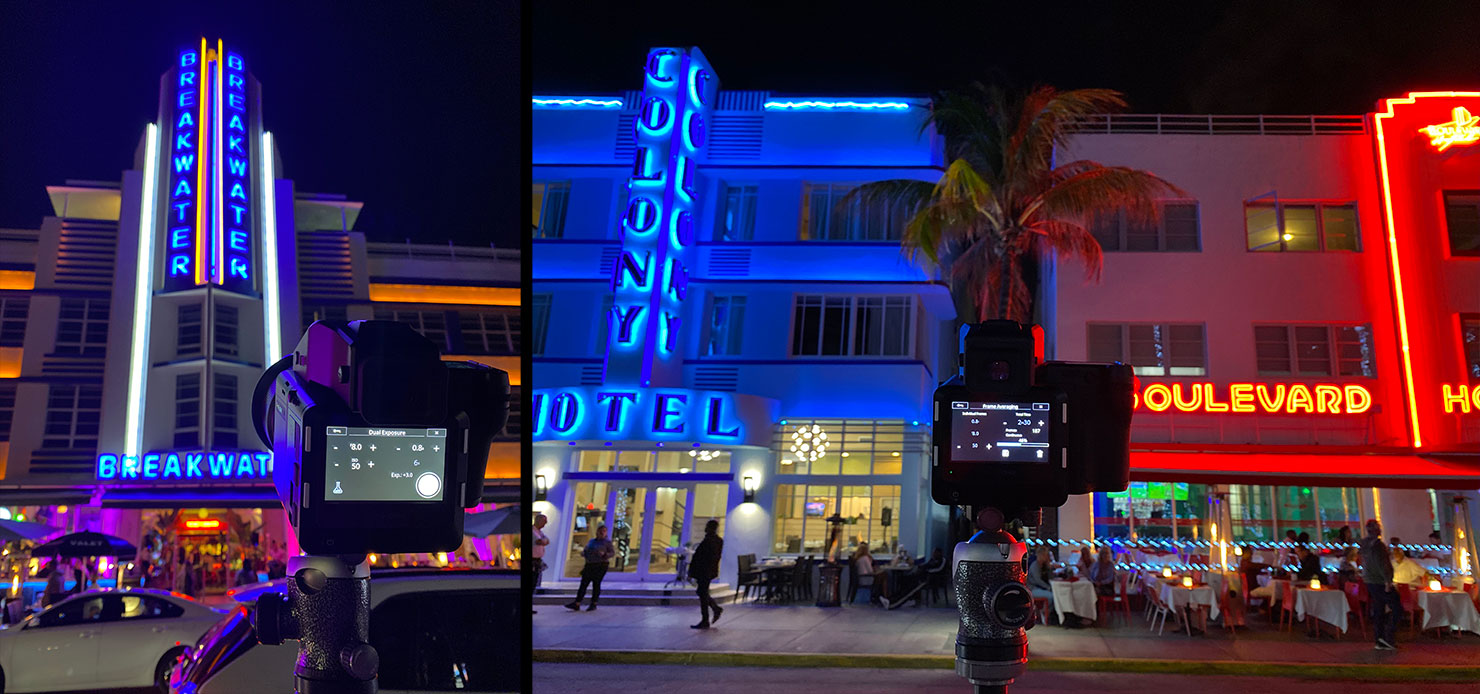
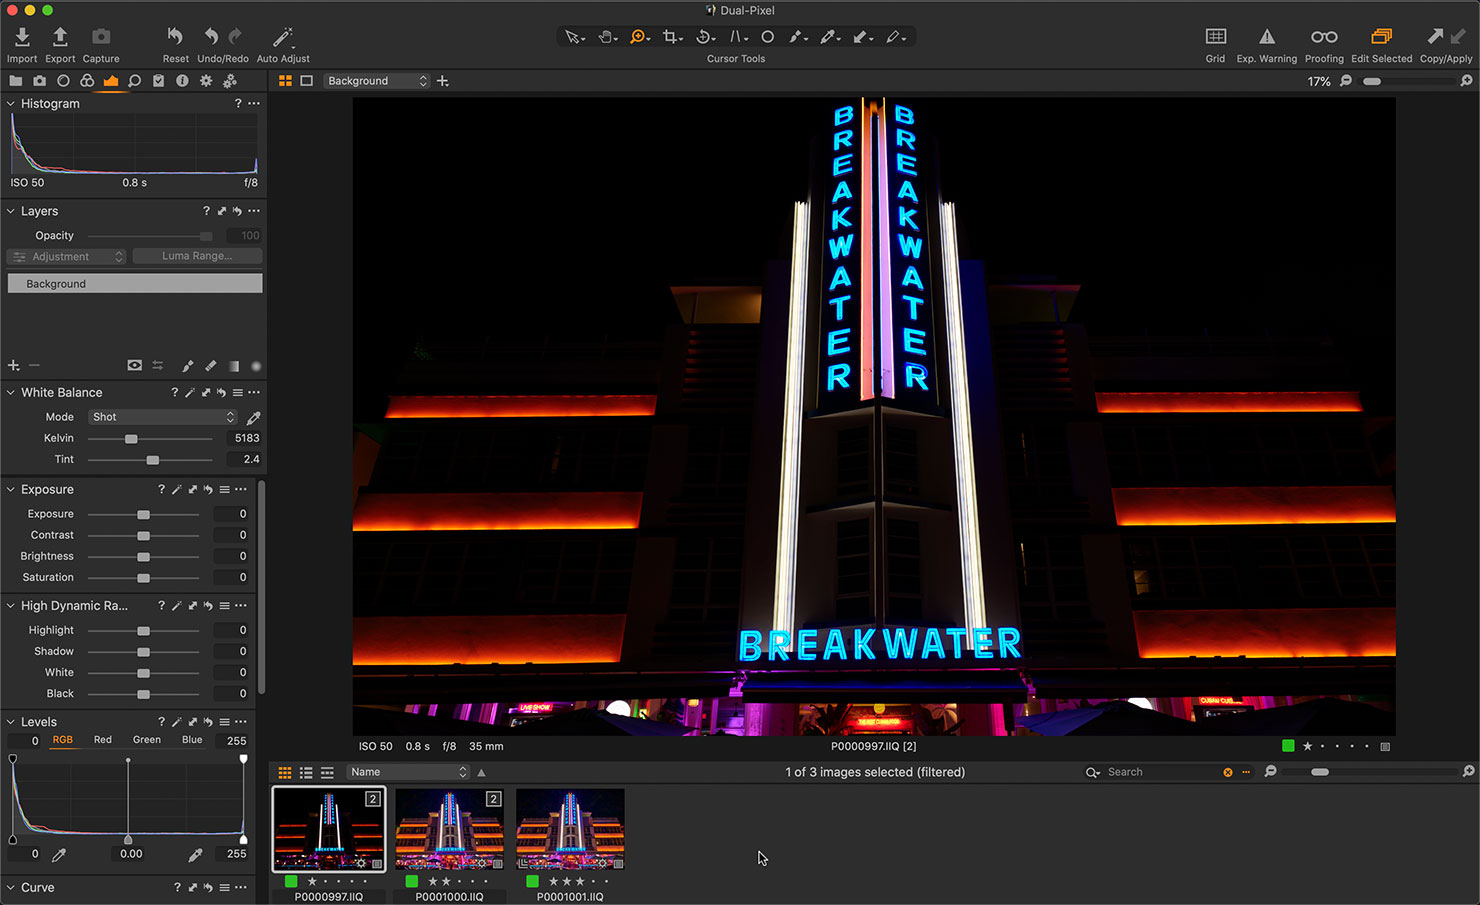
First up was the Breakwater – an iconic oceanfront building, with a lot of contrast challenges for the camera. Normally, we’d have to choose to either blow out the highlights, underexpose the shadows, or bracket the exposure and blend 3 or more separate images together later on.
But not this time.
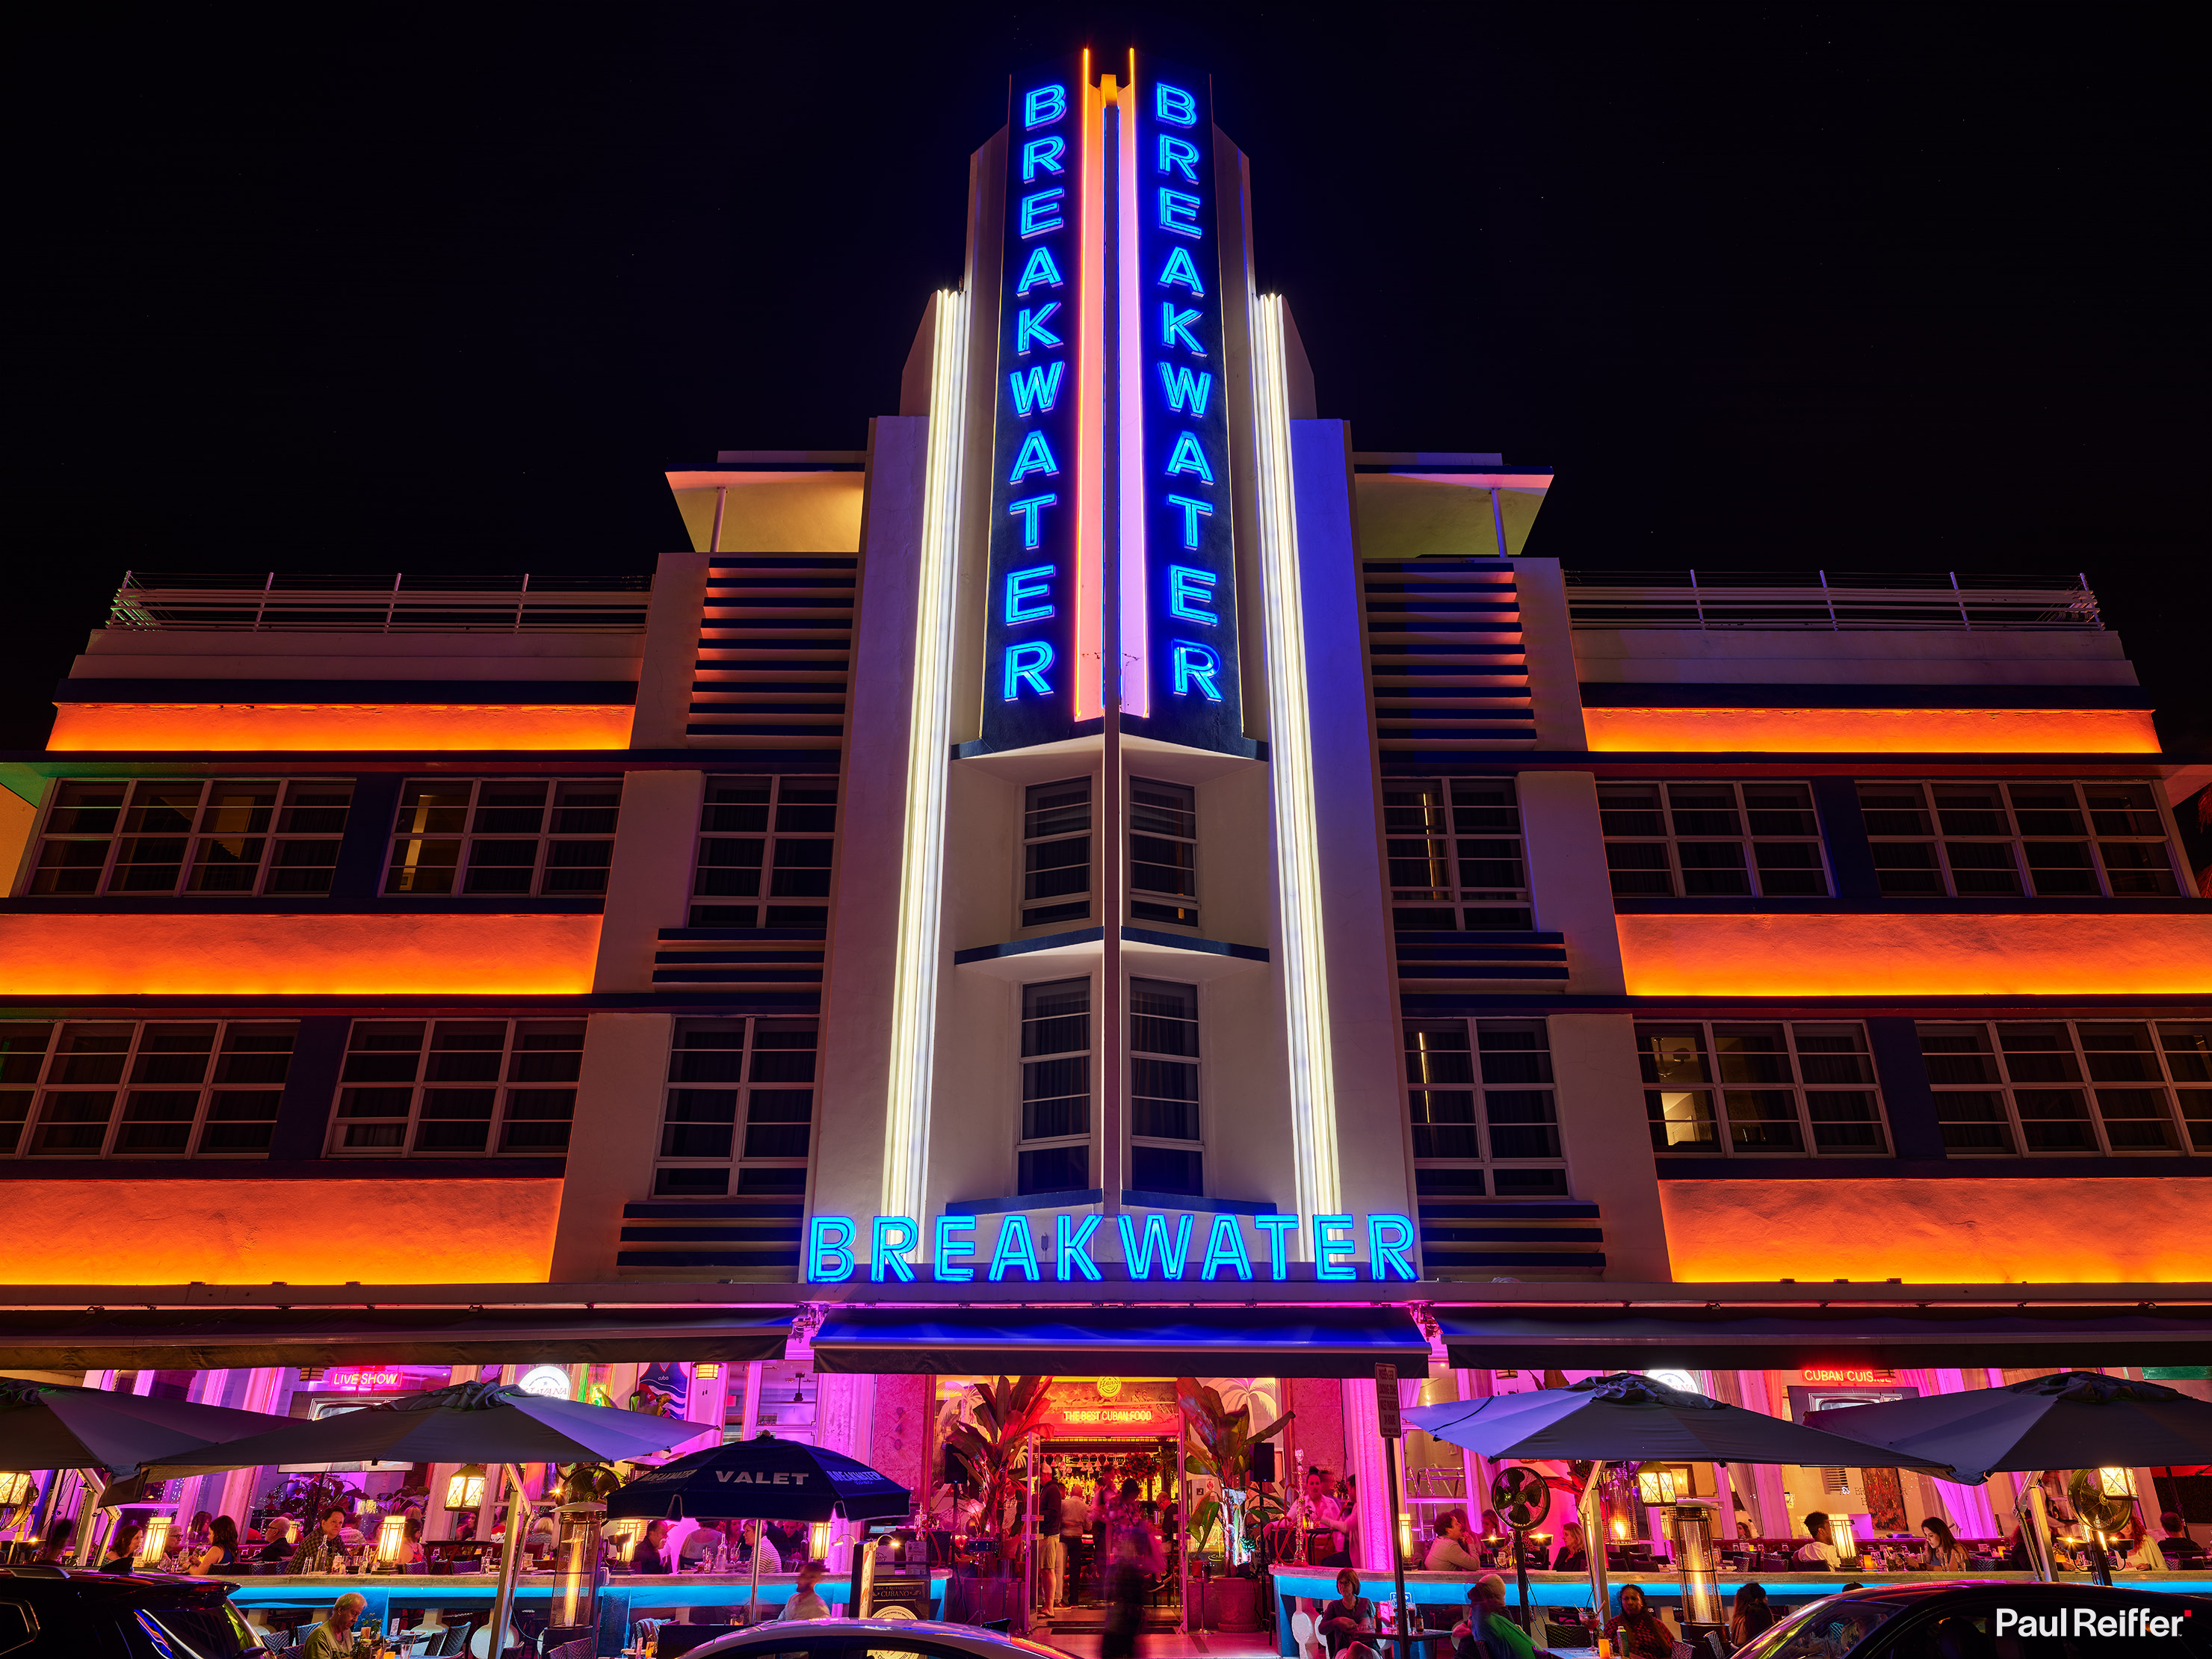
This was the first “Dual Exposure+” shot I took with the camera, and to be fair, it does exactly what it says on the tin, and I’m impressed.
As a huge fan and advocate of the Frame Averaging tool that Phase One delivered last year, this feature sits nicely in-between a standard “single-exposure” shot on the left, below (with all the issues of dynamic range, noise, highlights and shadows that it brings) and the “frame averaged” equivalent on the right, below, which gives us far better noise control than a standard exposure, but forces us into long-exposure territory to do so.
(For the purposes of inspection, clicking any image will take you to a higher-resolution, 150% version of the shot for comparison.)

Let’s take a look at some of those details up-close – first, the top left of the roof:
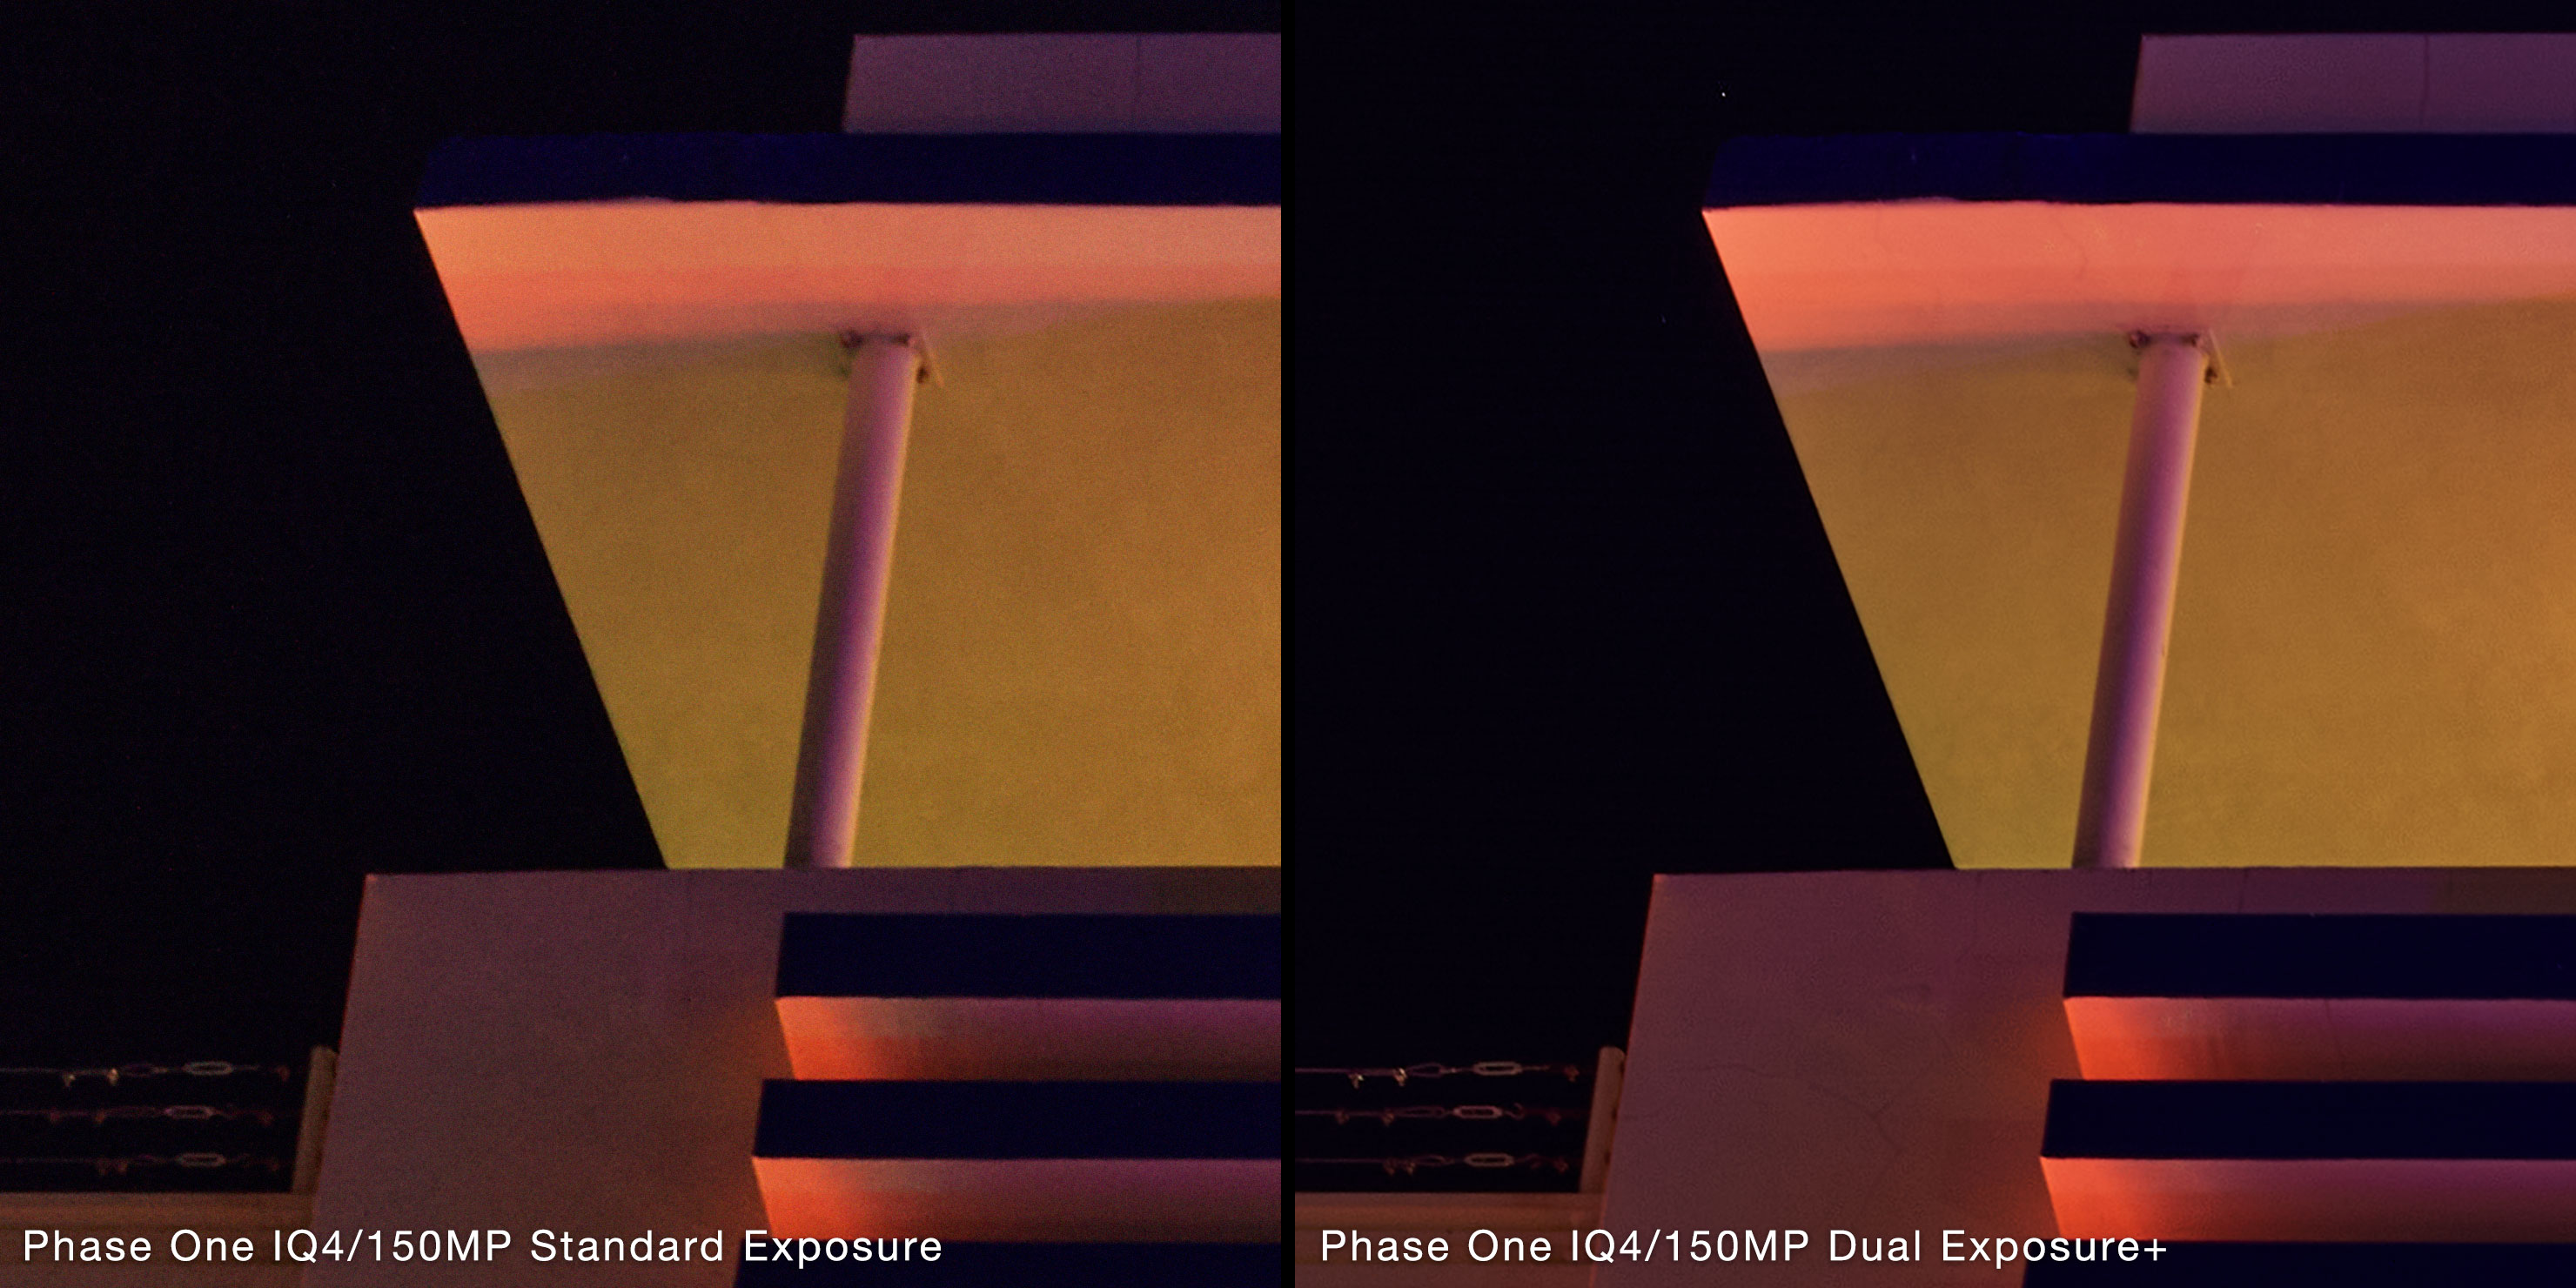
I’ve blown this up to 150% of reality, just so the difference in noise is more obvious and the difference is staggering.
Remember, I haven’t had to “blend” anything here, or do anything clever in the camera – I’ve simply pulled up the shadows in Capture One, on both images, but the RAW file from the Dual Exposure+ shot has all that extra information stored in the darker, longer exposed, parts of the shot.
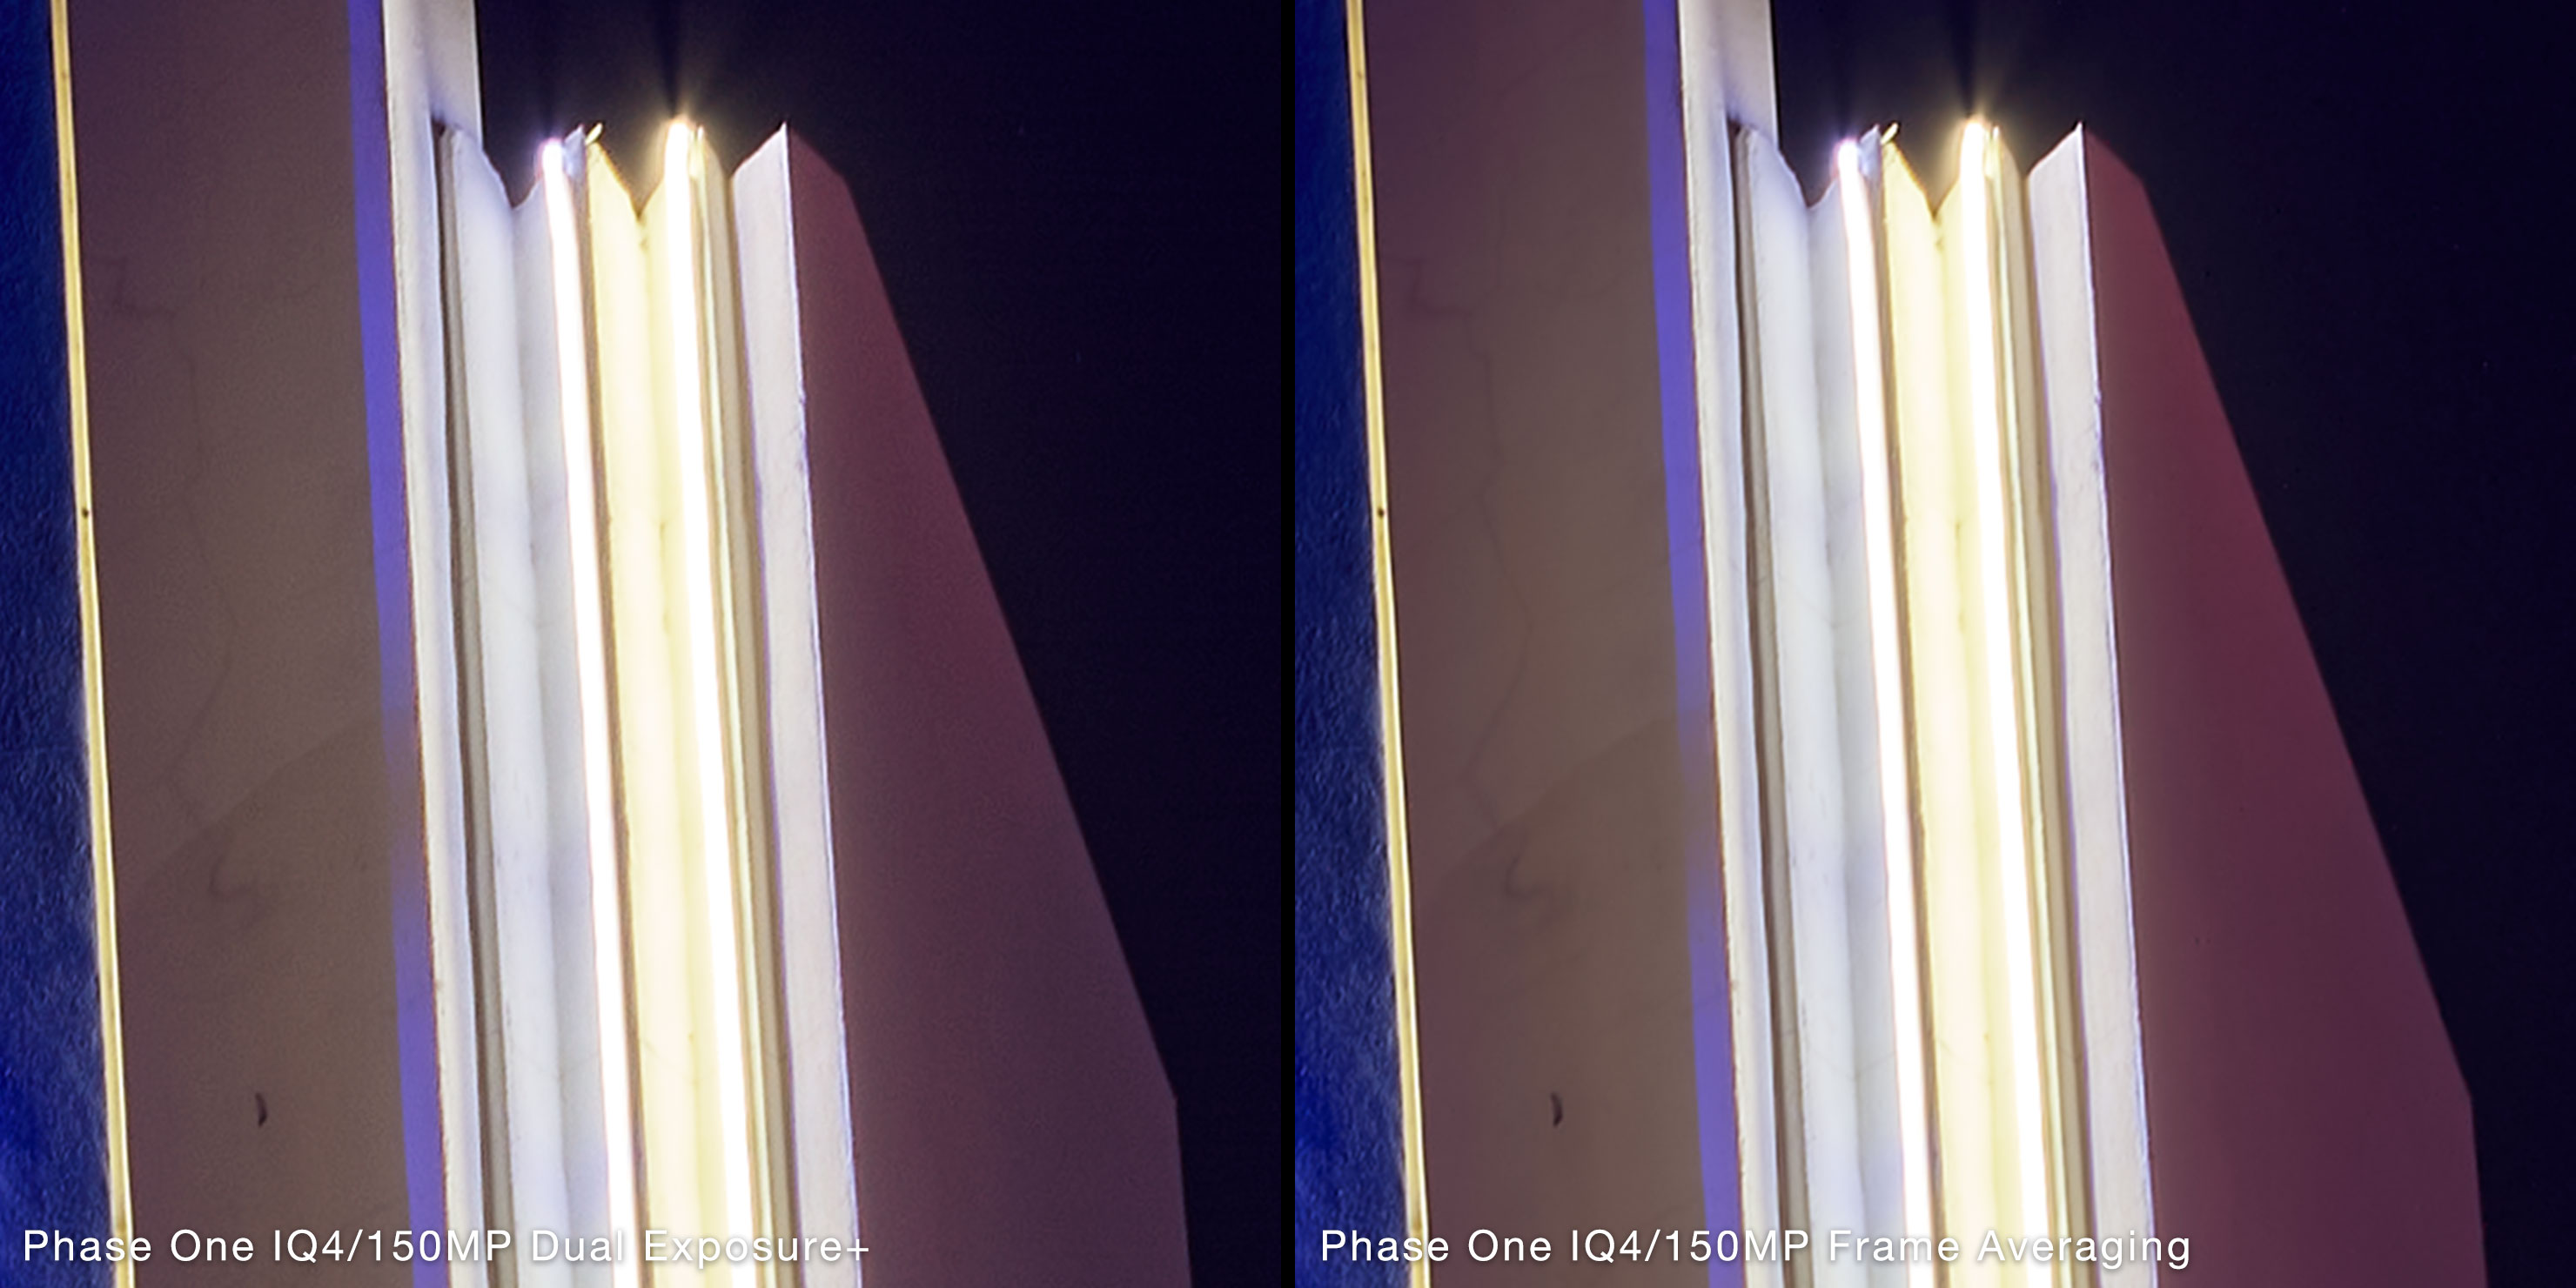
Now it would be unfair to point out that, of course, Frame Averaging is able to produce a cleaner shot too – and here’s a side-by-side example to demonstrate that, but also show one of the downsides to longer exposures – camera movement.
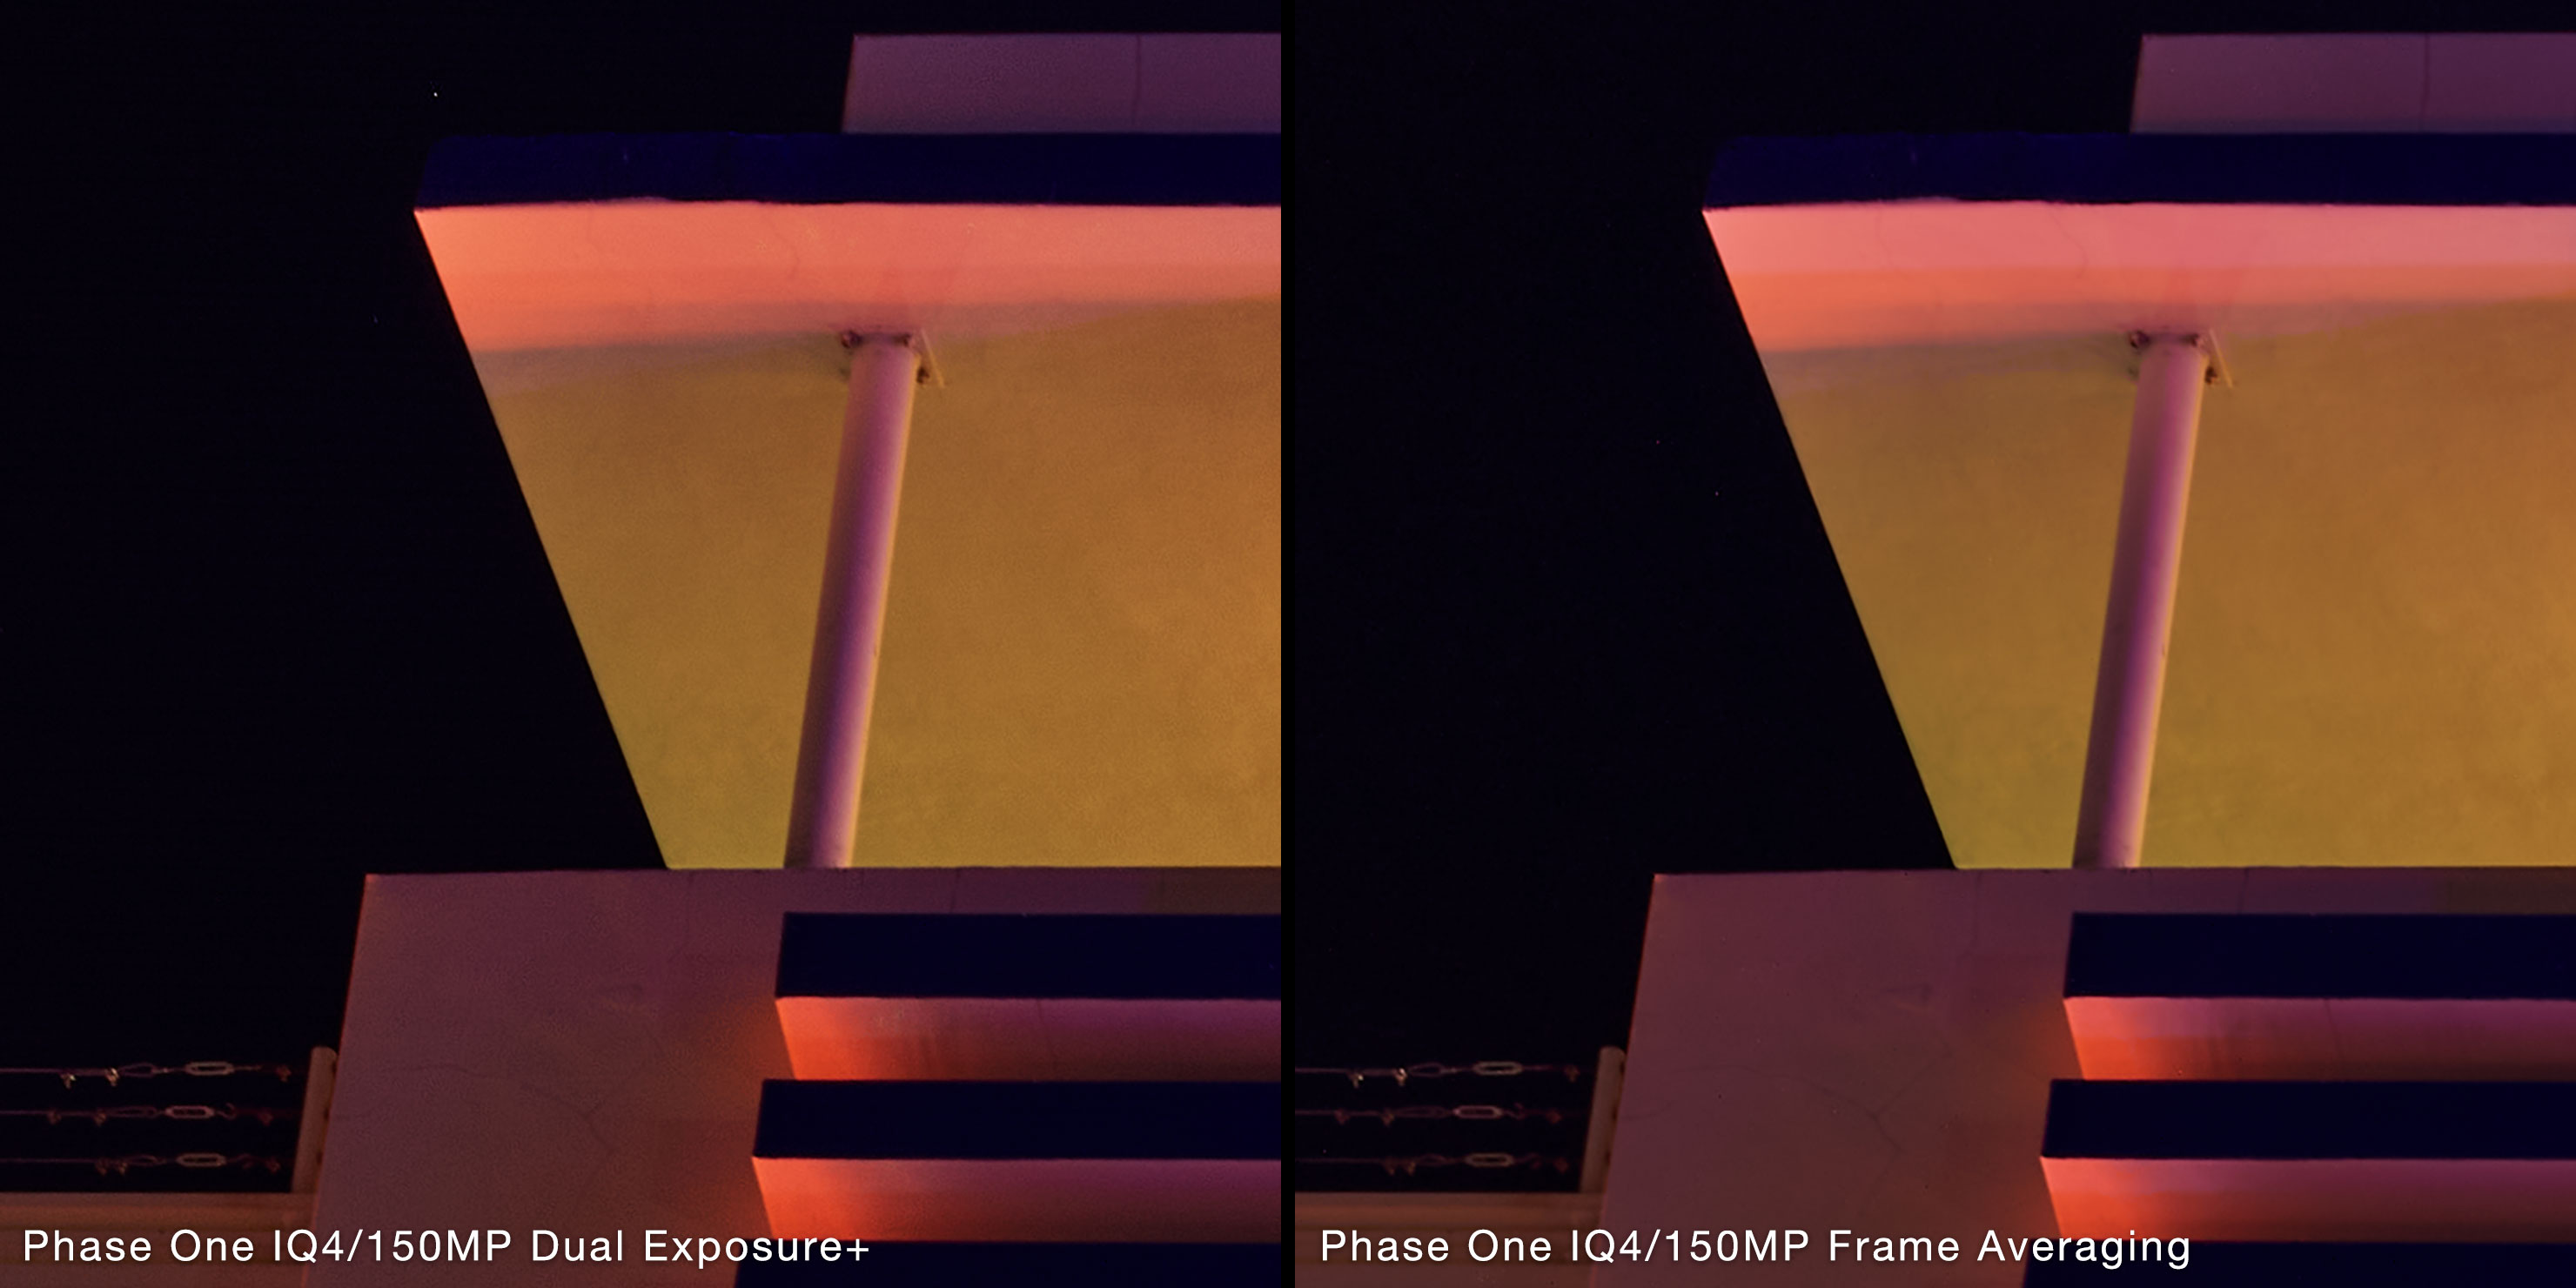
We see the image to the right (the Frame Averaged shot) is slightly softer – so while it’s avoided the noise problem of a standard shot, it has lost some definition, likely caused by the vibrations from the self-congratulating boom-box owners in their cars driving in loops up the road…
Let’s take a look at part of the awning, and the fabric of the umbrellas outside:

That’s quite some improvement in the noise control on the right – especially as it allowed me to bring up the shadow detail even more without those standard artefacts creeping in to the result.
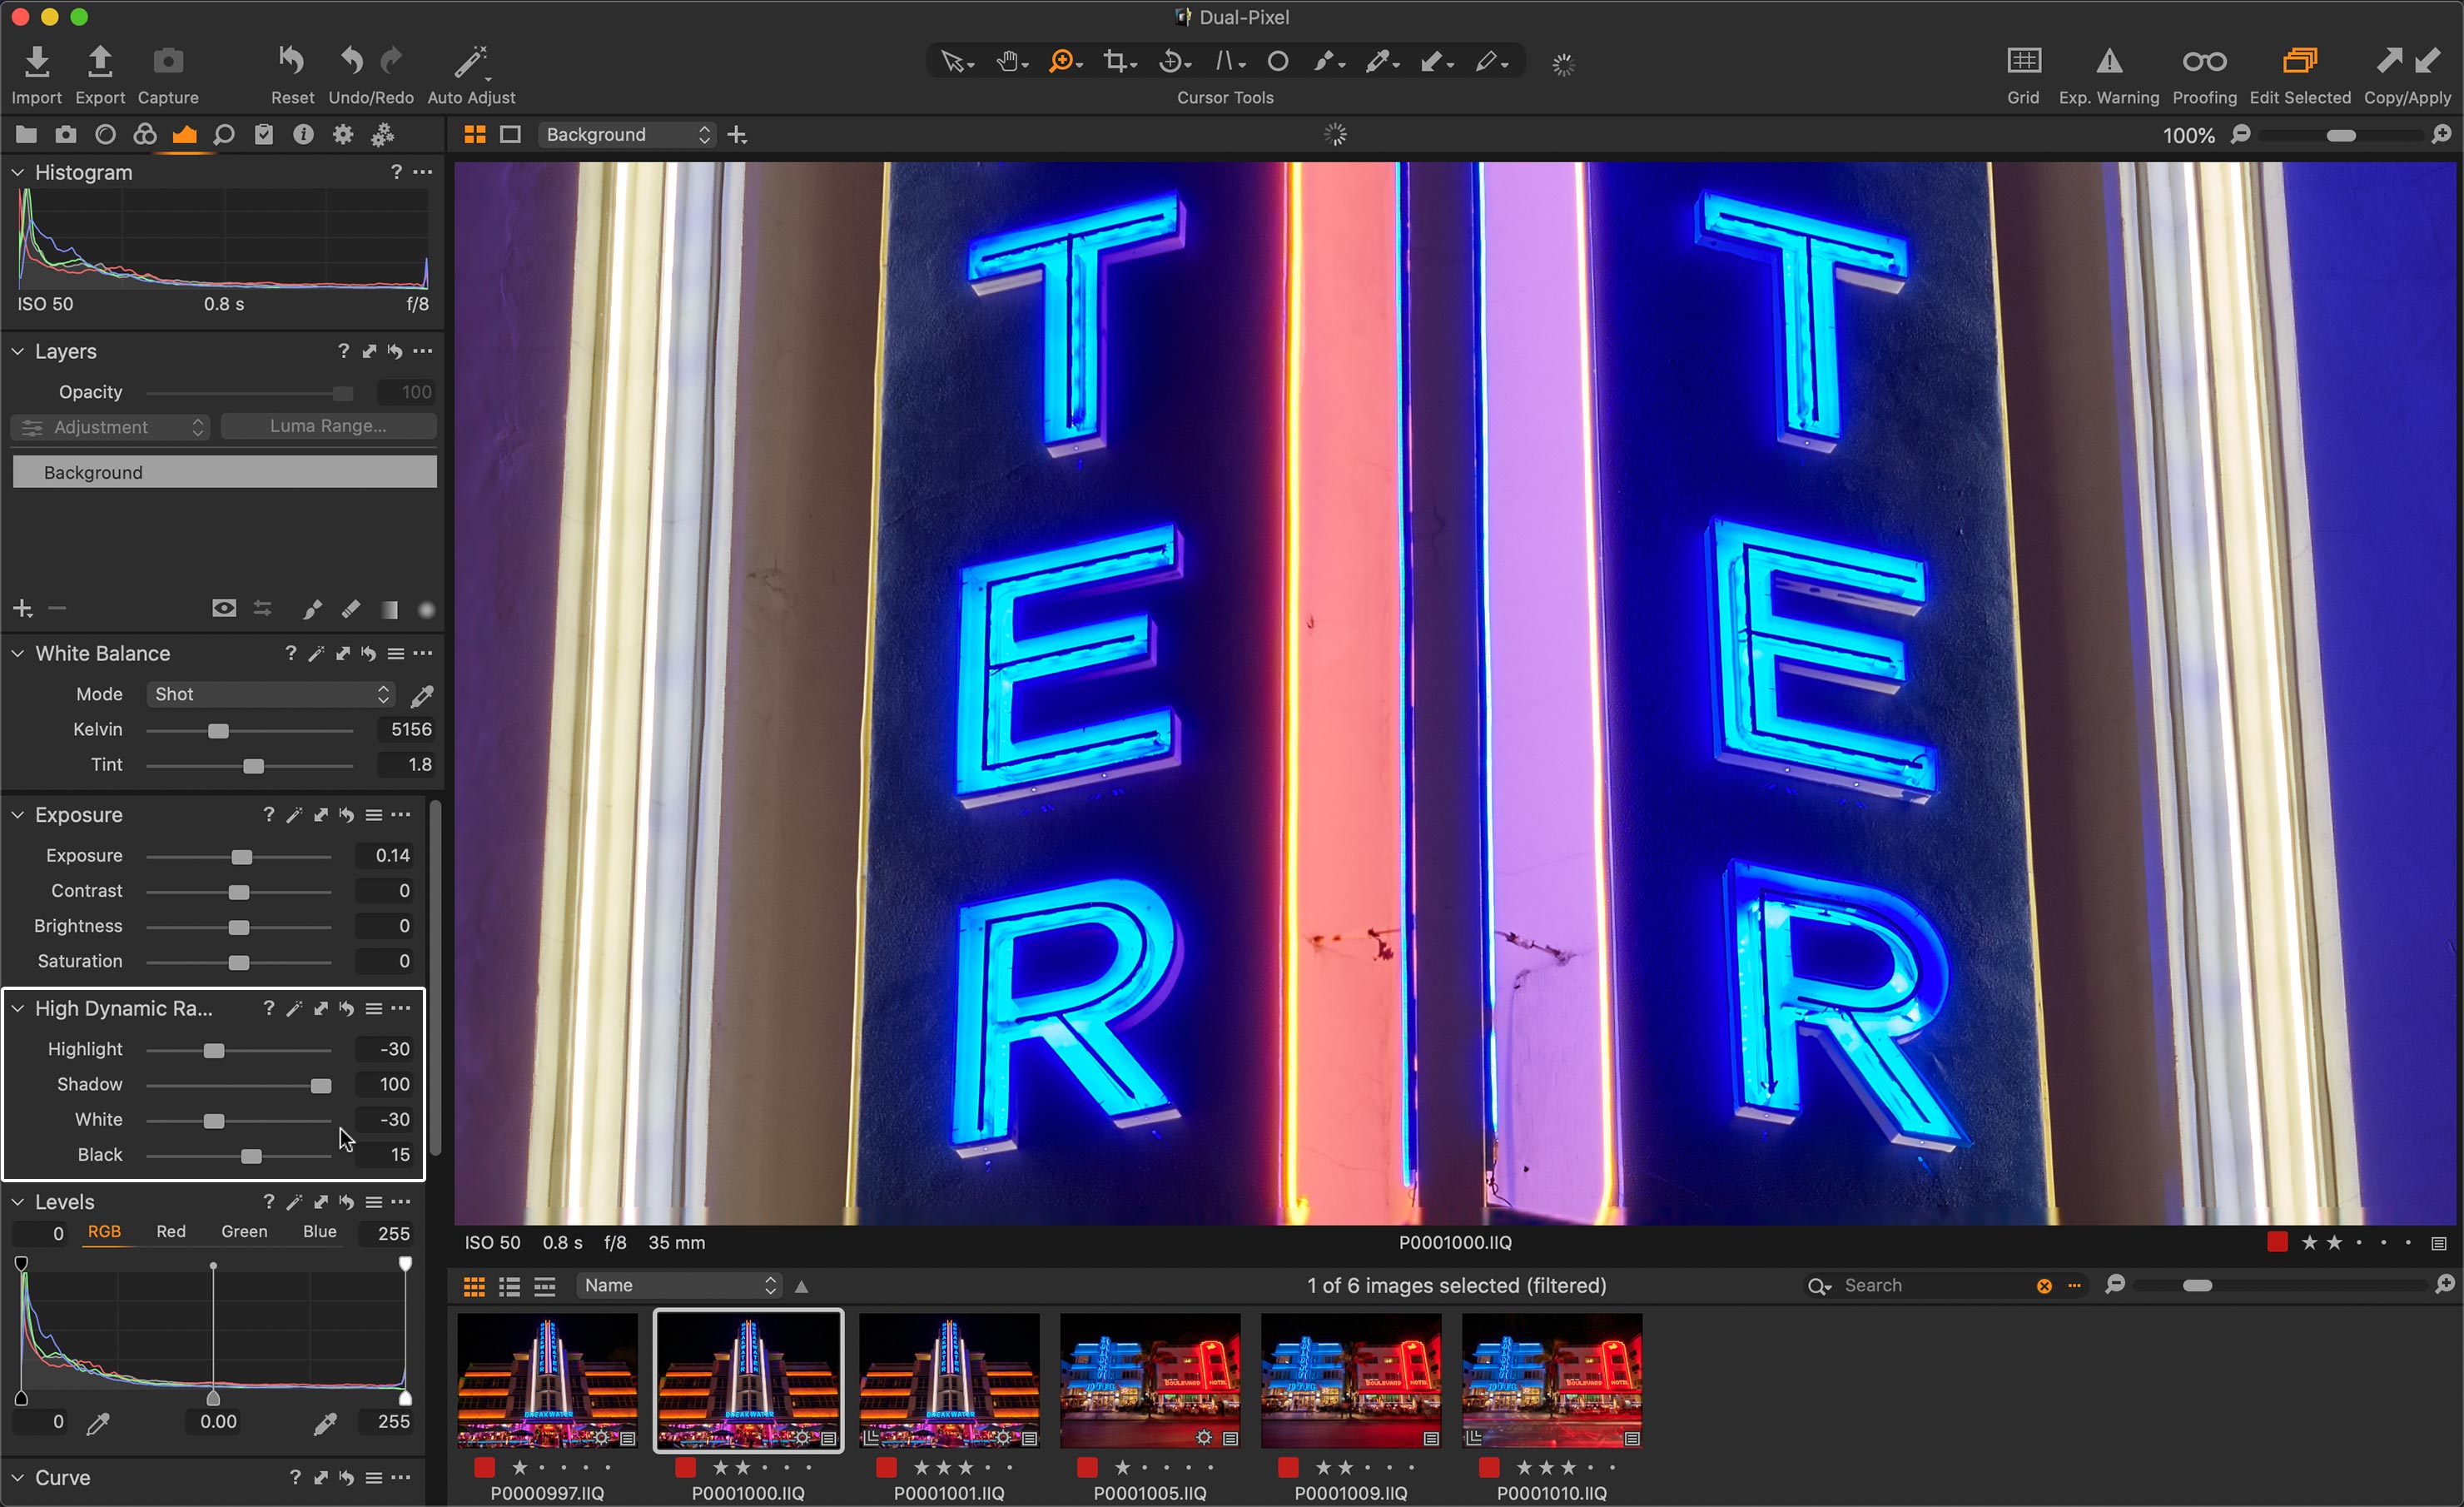
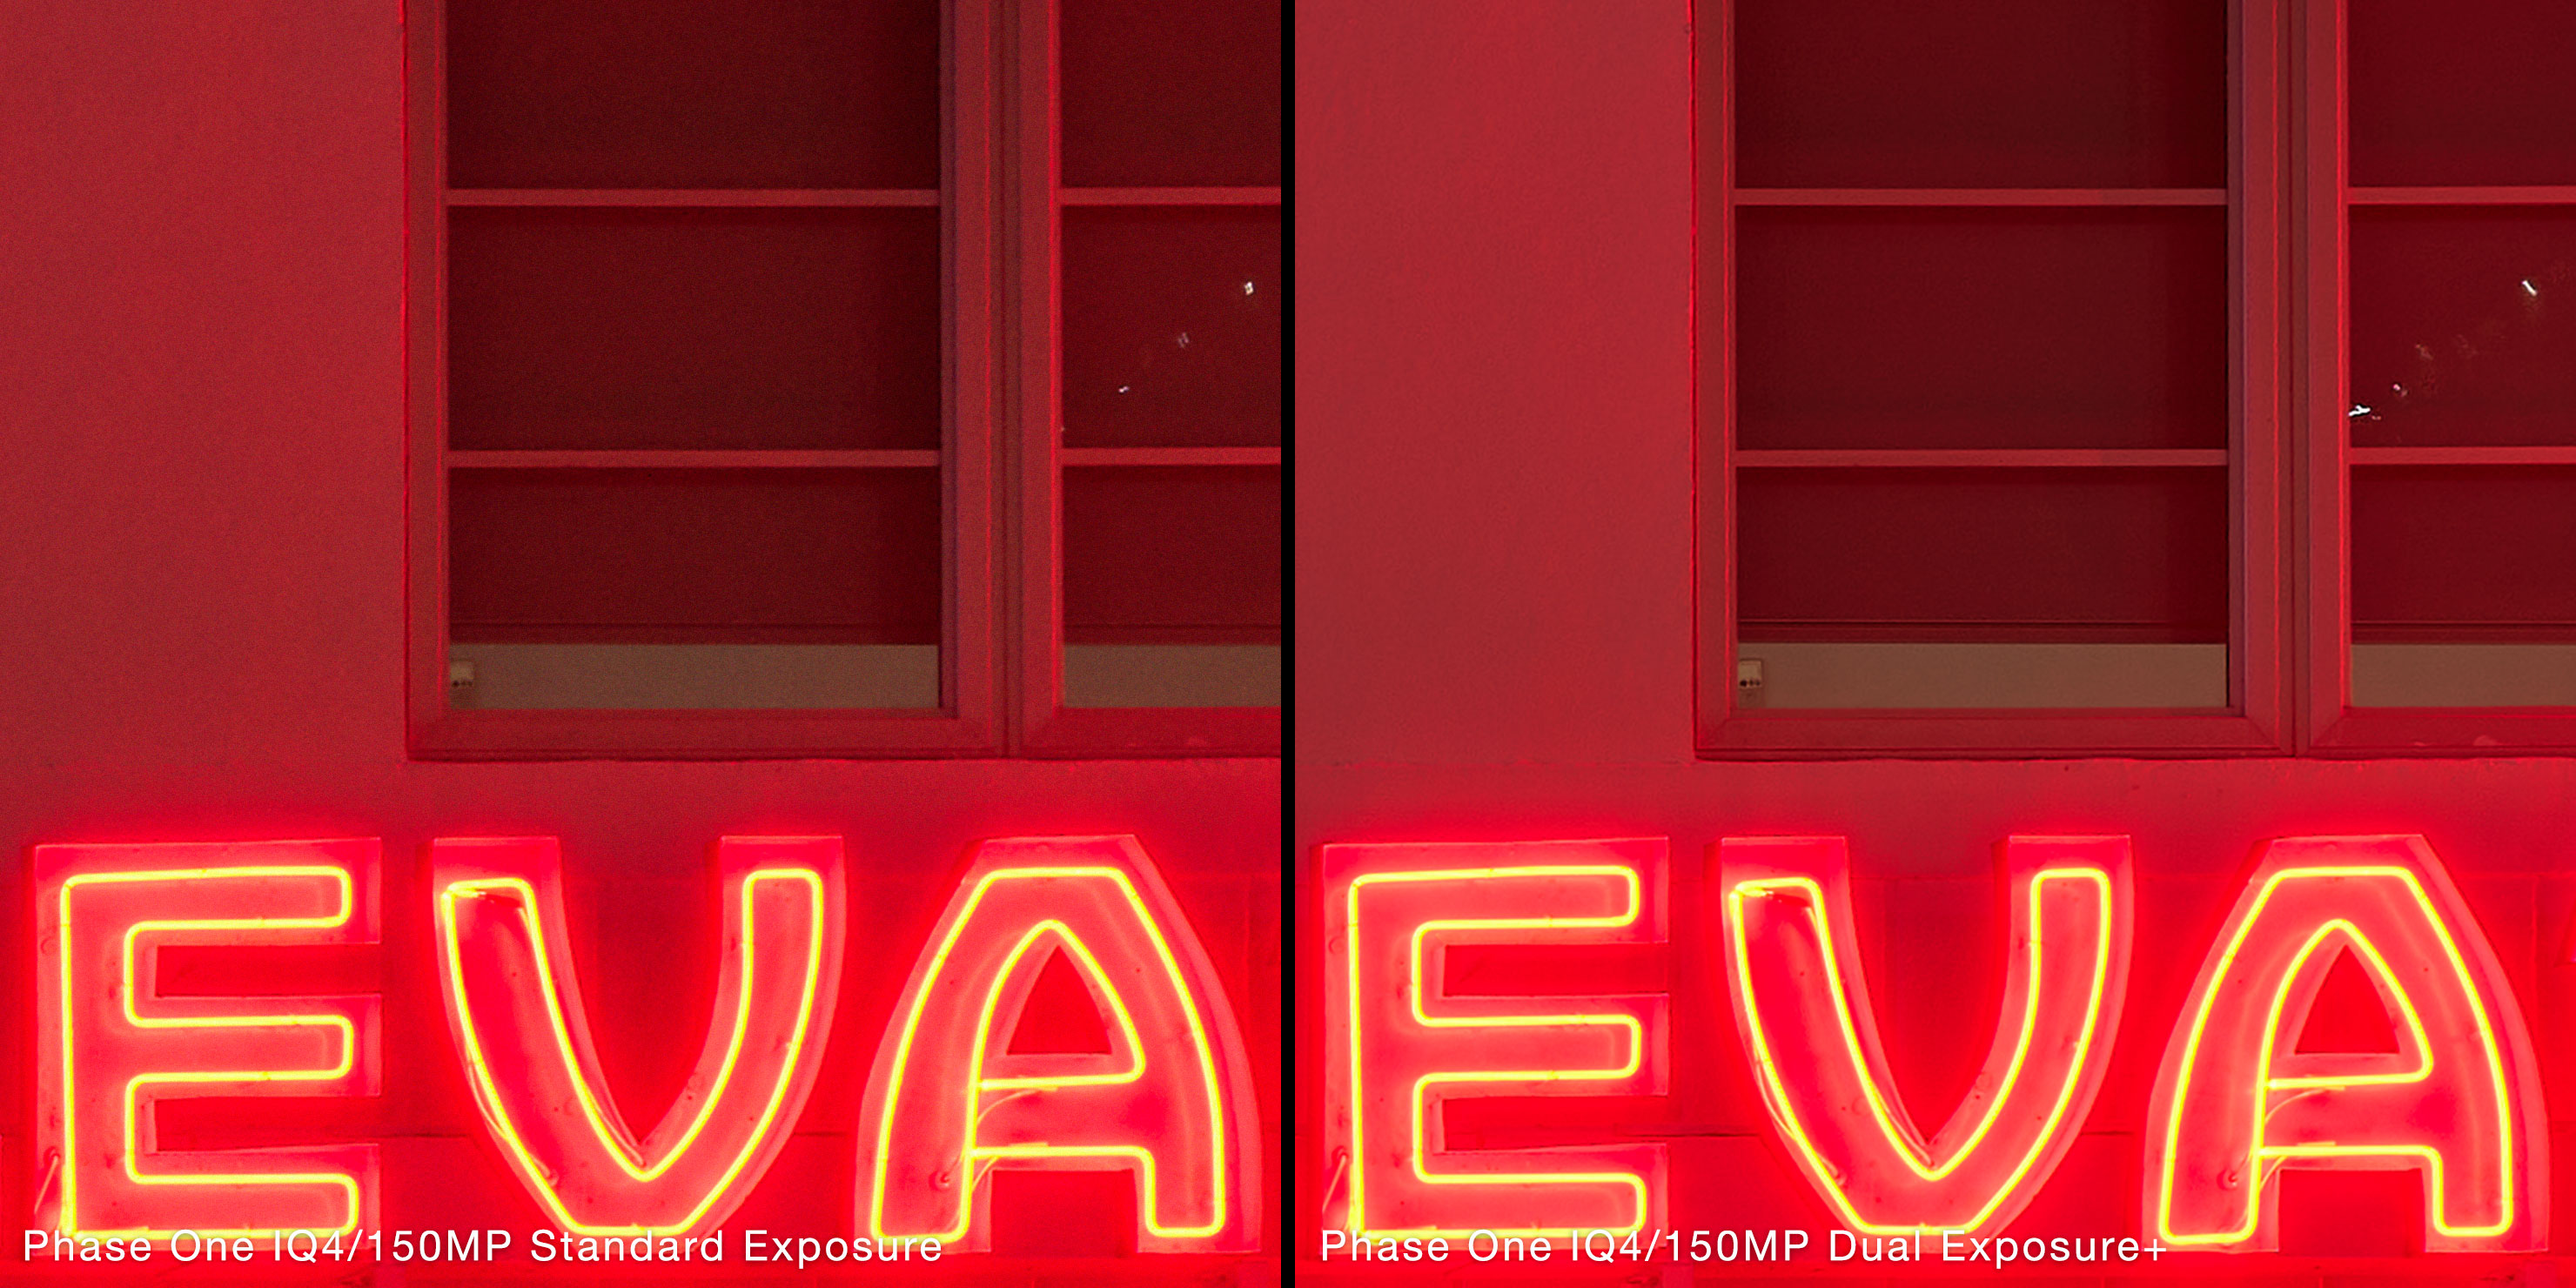
Moving to the harsh contrast areas, here’s an area of the neon sign from the vertical name:

There’s a clear improvement in the noise control here, but let’s go even further (to 200%) to see what’s really going on:
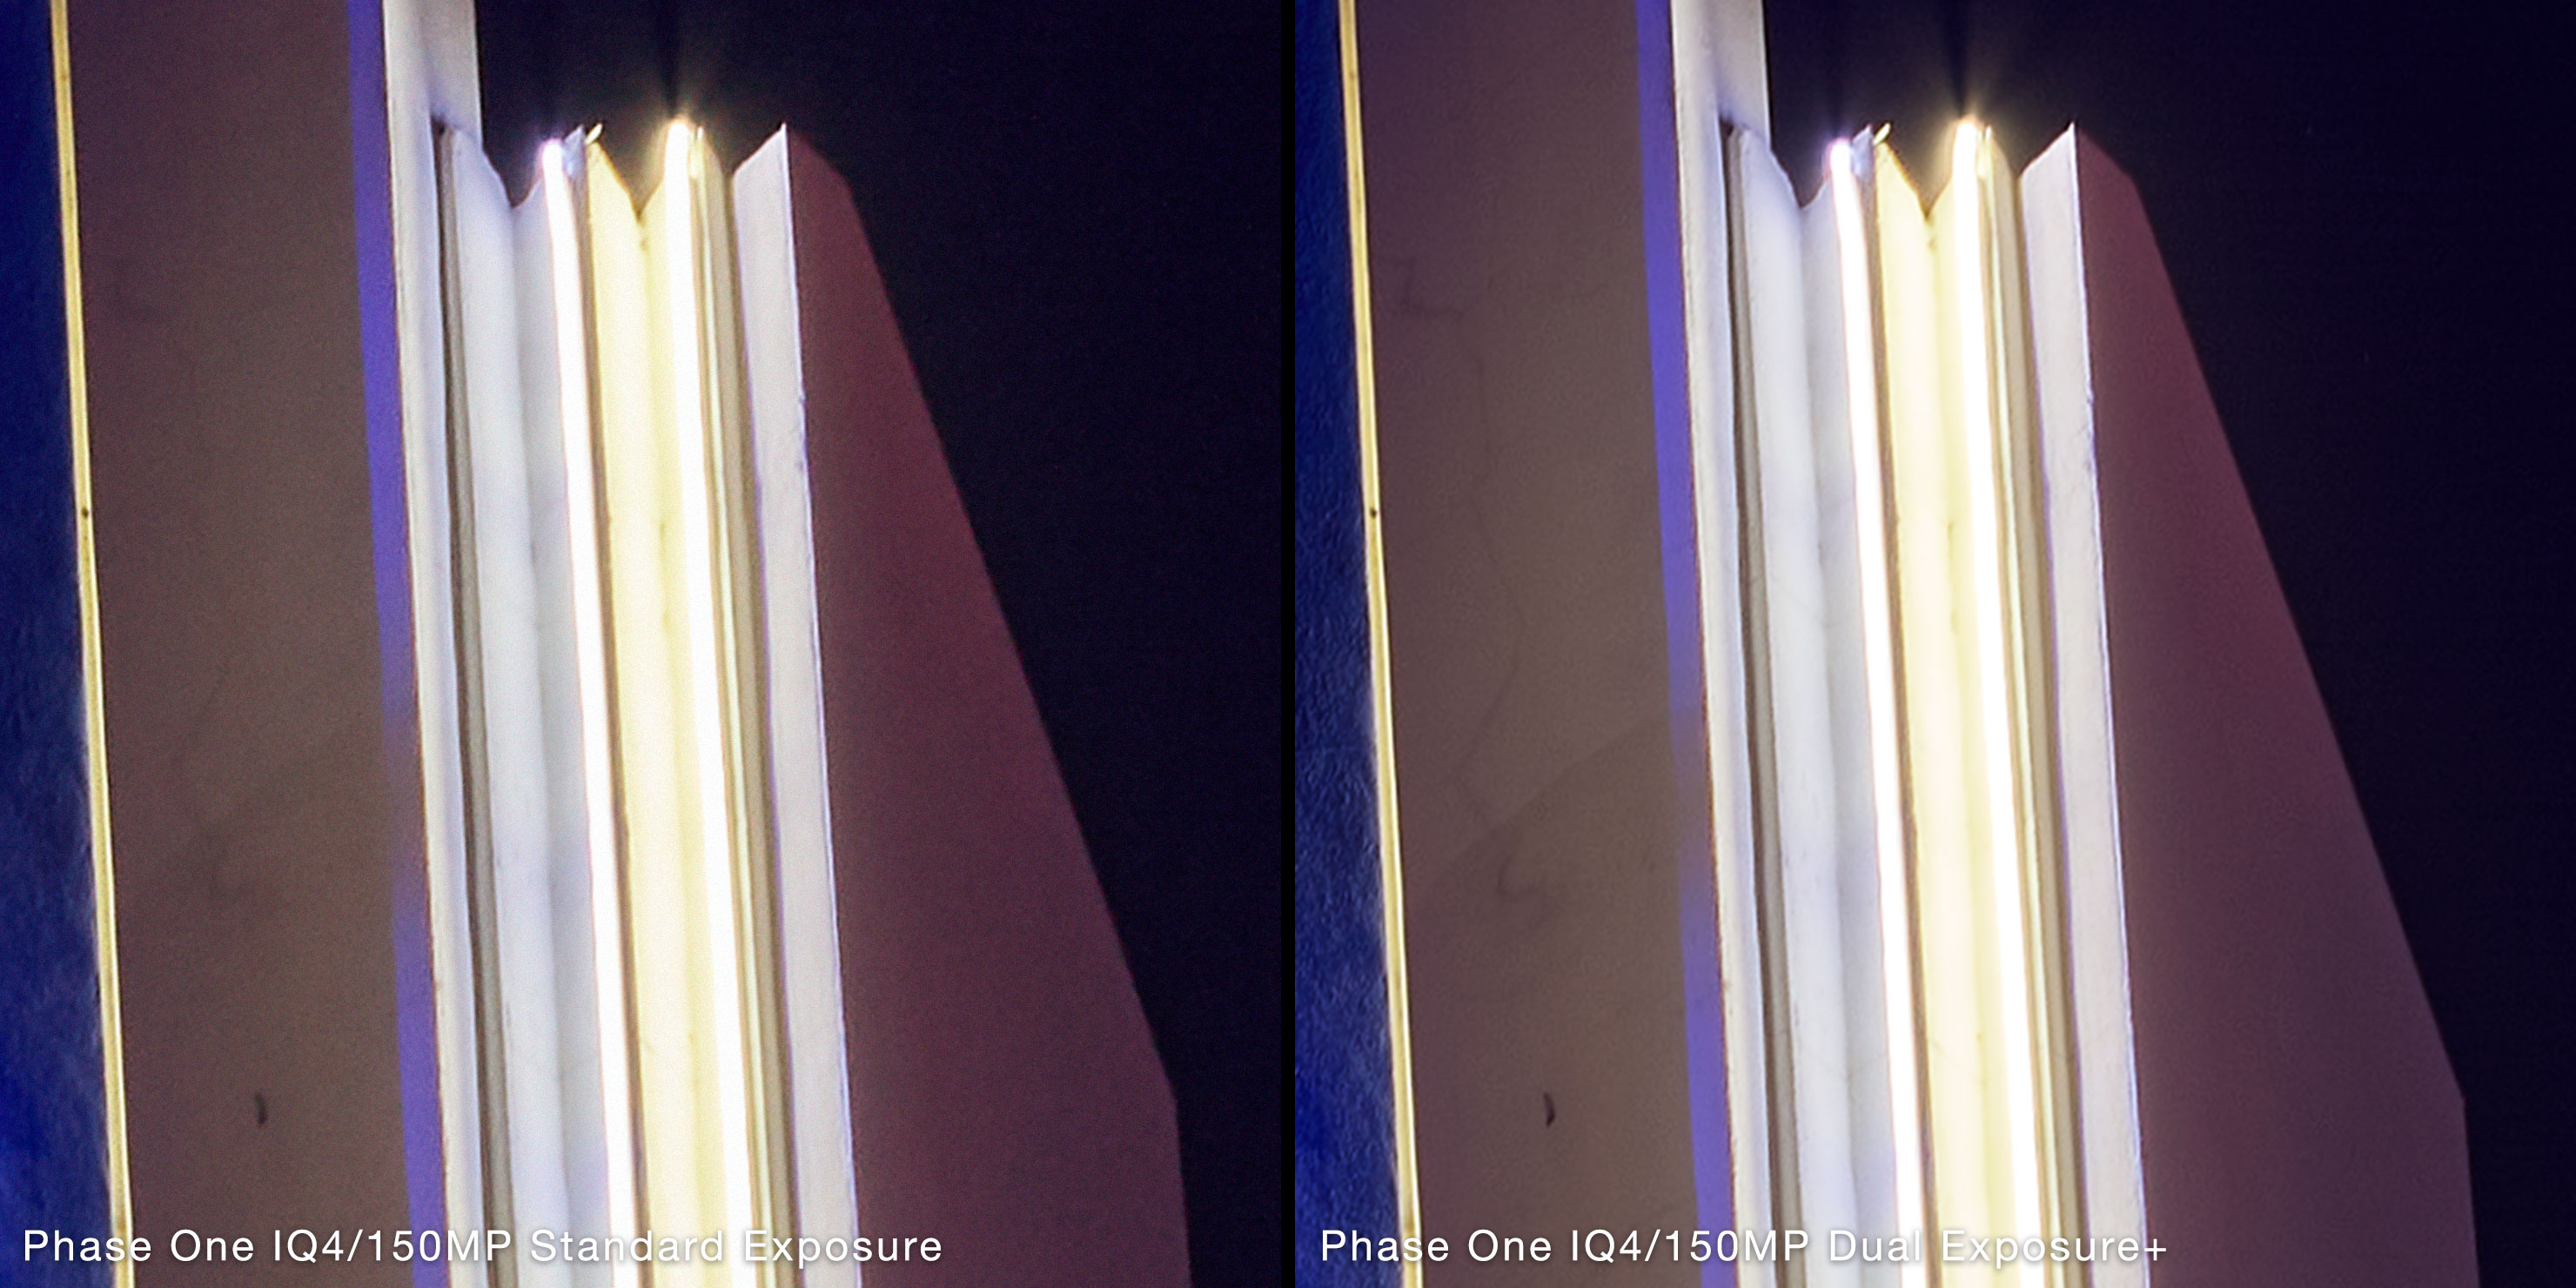
The difference is quite staggering, really.
For clarification, all of these shots are captured at ISO50 – a low-noise ISO to begin with – but in each case, the shadows have been pushed to +100 on the Capture One slider, resulting in that small amount of noise in the standard shot becoming more obvious as we inspect things more closely.
But then, look at the control of that same area on the right-hand shot (the “Dual Exposure+” image). It’s sharp, but it’s also immaculately clean, even with that same shadow push.
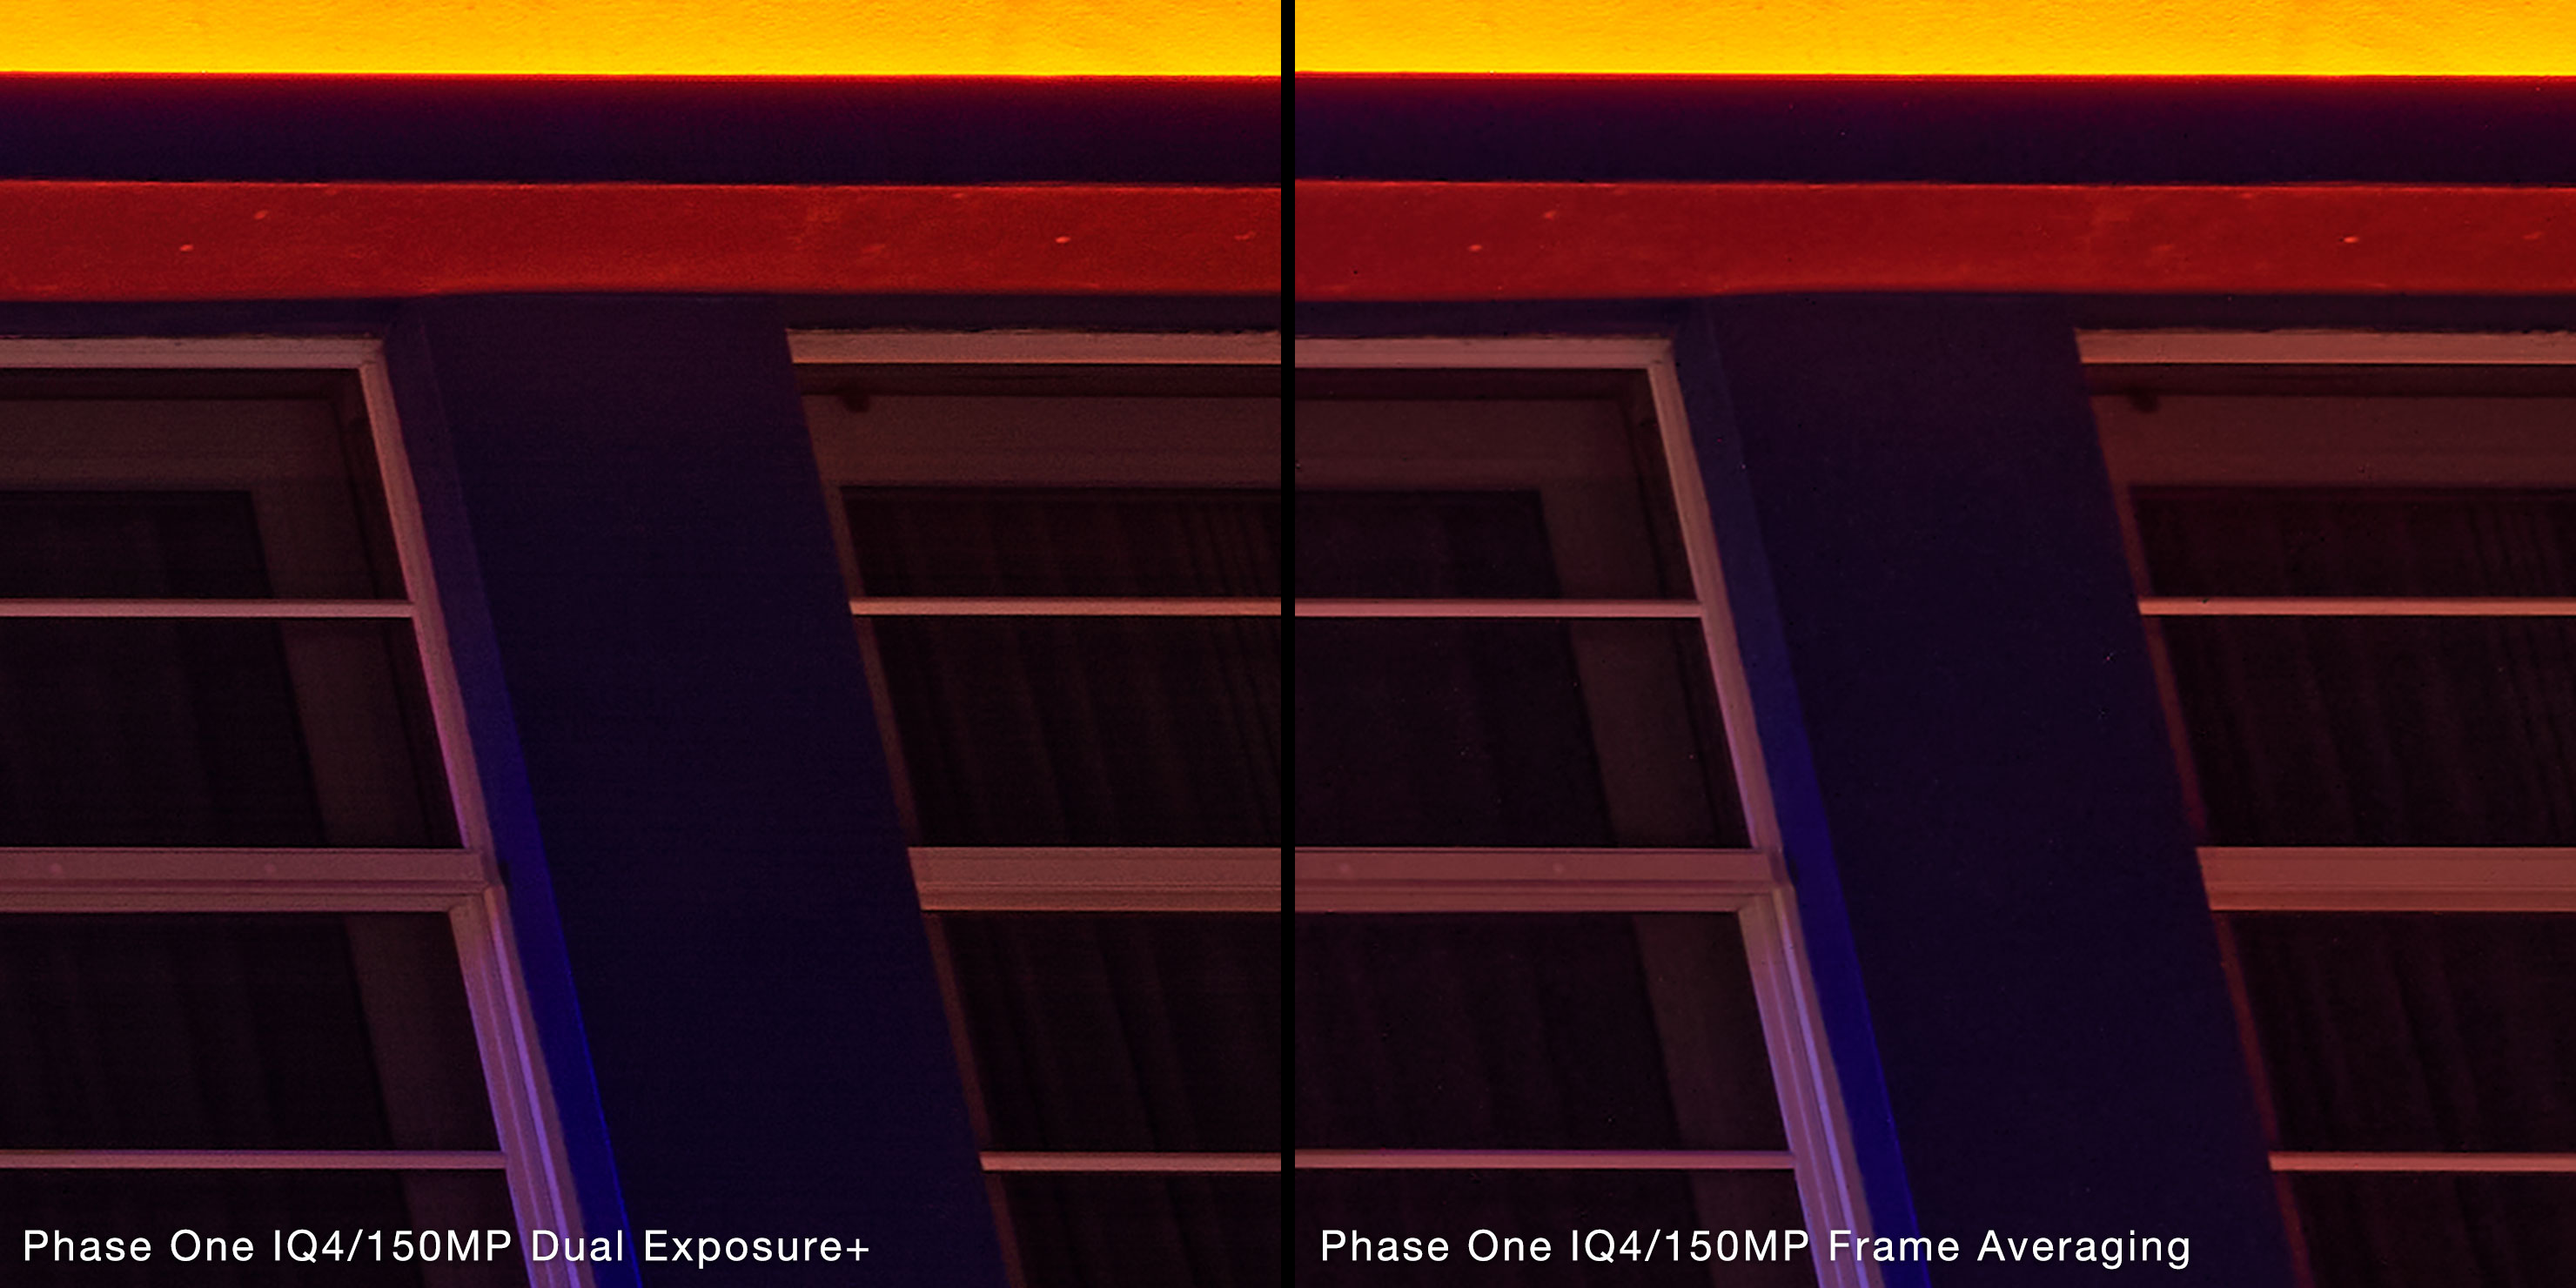
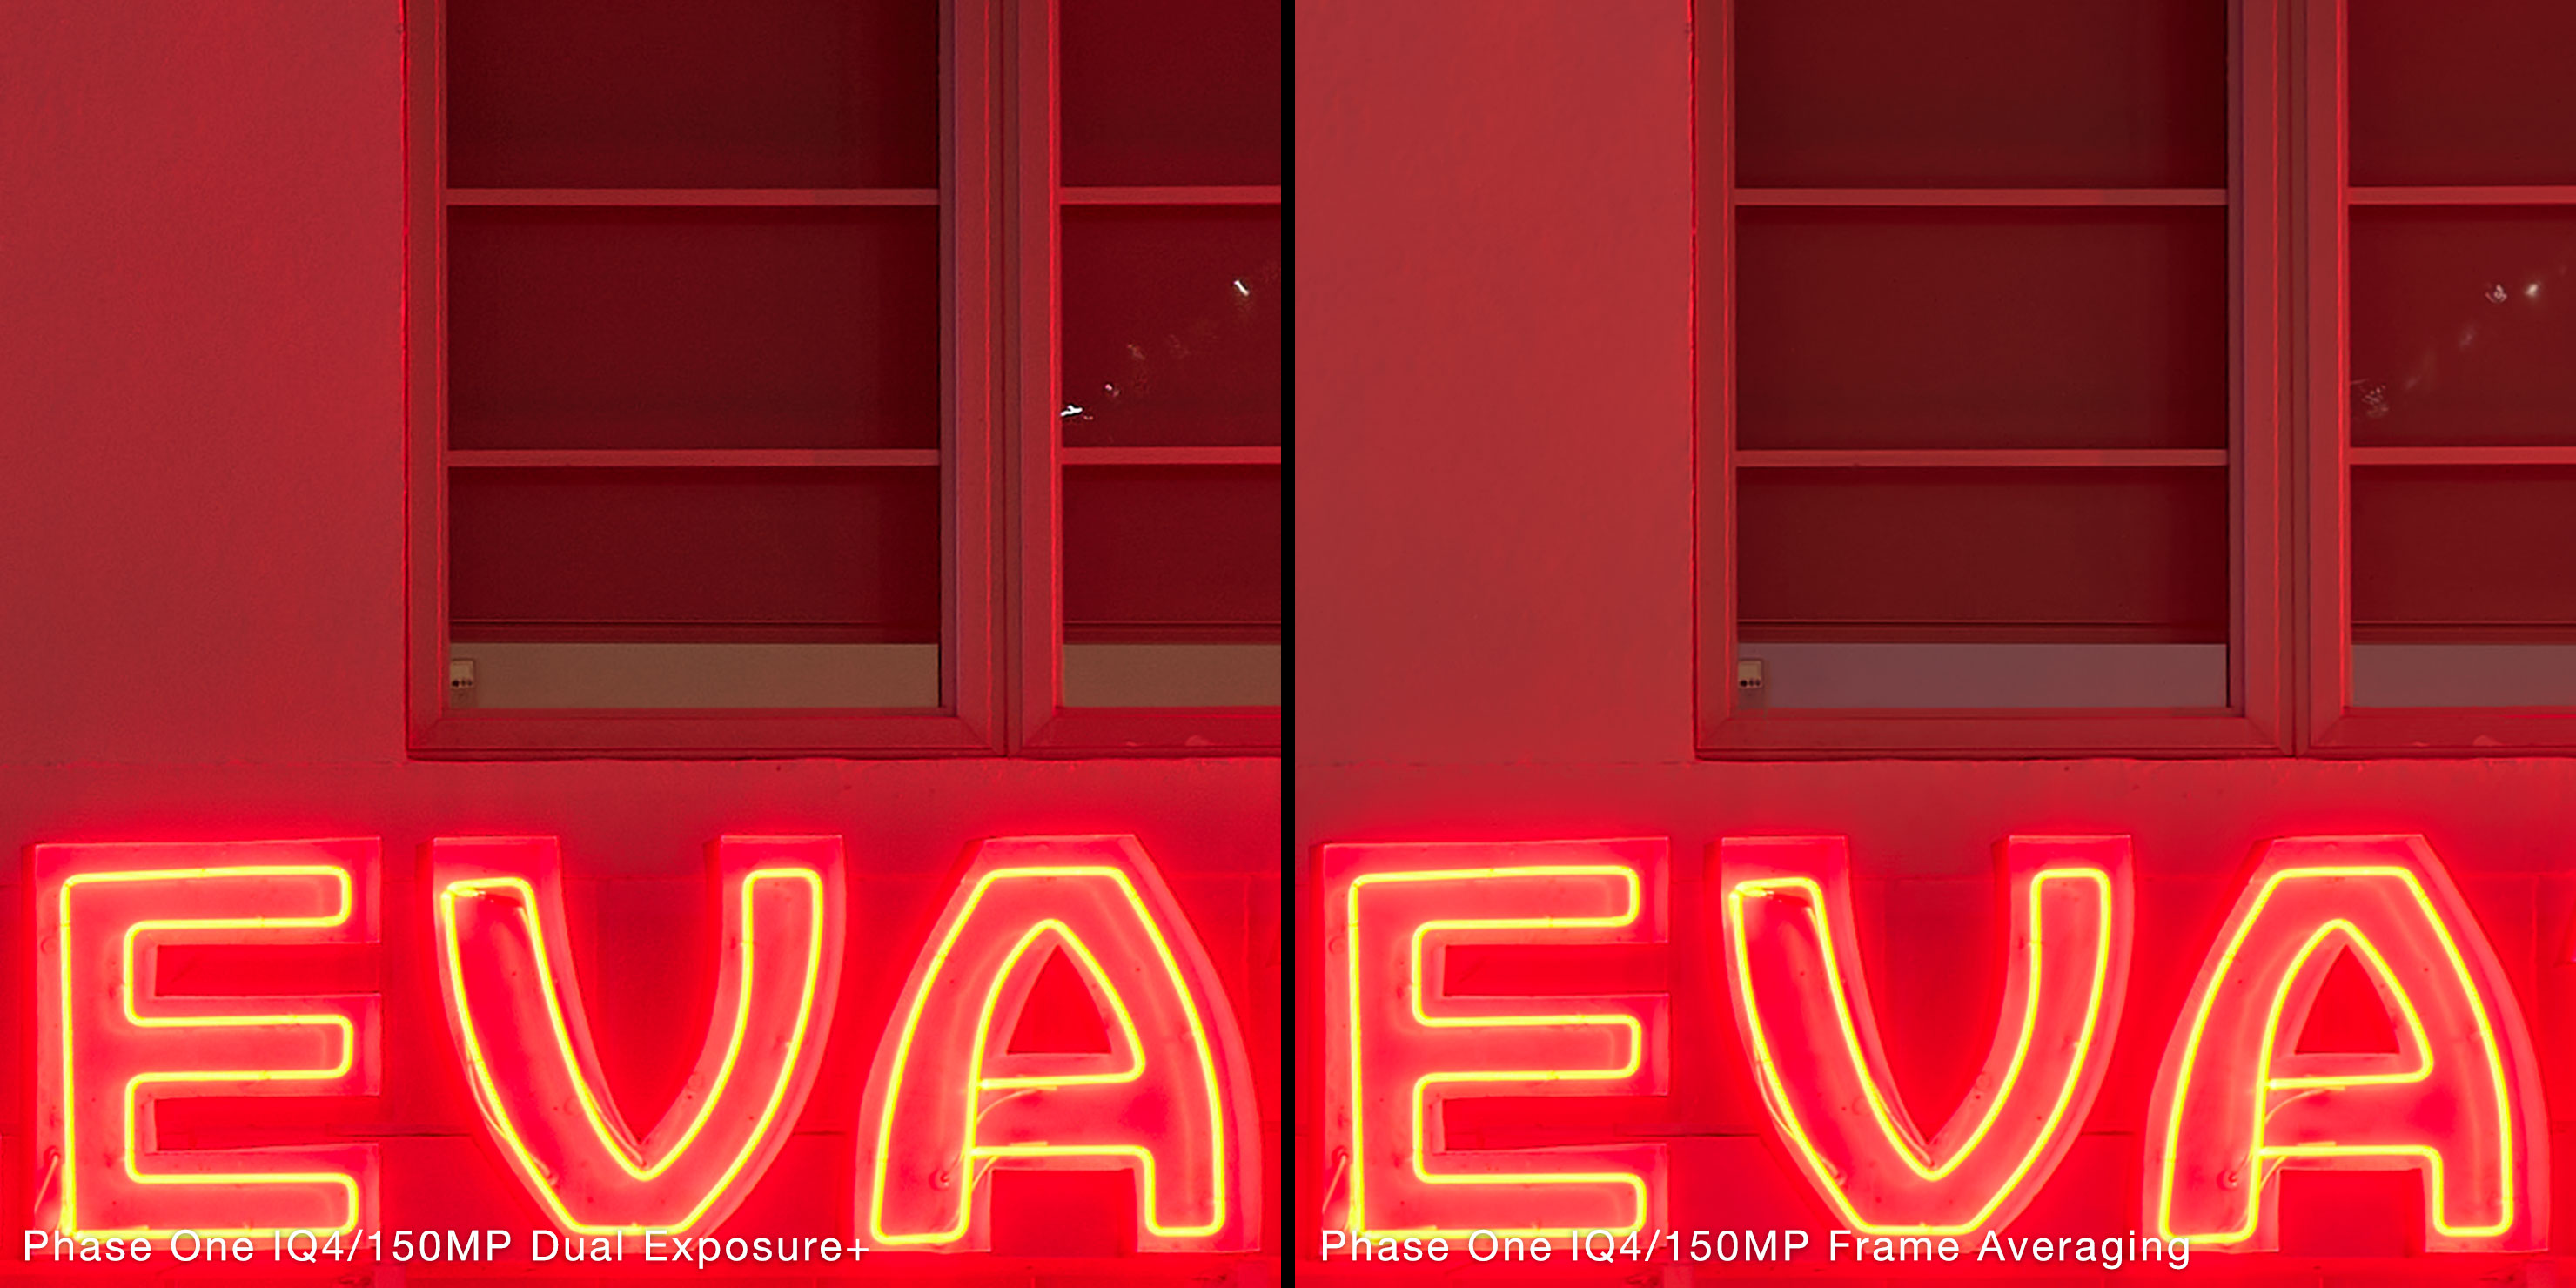
Of course, as before, a Frame Averaged shot is equally capable of reducing noise, but with even the most subtle of movements or vibrations, we’re losing a tiny amount of sharpness over the 2.5 minute exposure, as you can see below:
In testing, there are a few things that came up, which we can either use to our advantage or need to be aware of when shooting – the first, anti-flicker.
You see, when you shoot into artificial lighting, you can end up with an “interlace pattern” as the 50Hz or 60Hz frequency of those lights plays against the camera’s sensor. We don’t notice it when capturing a traditional long exposure (2+ seconds), but where the base image here is currently restricted to 0.8 seconds, I didn’t have the anti-flicker mode of the IQ4 150MP switched on, resulting in these bars:
(You may have to click through to see them in detail on the blue pillar).
Again, Frame Averaging (well, anything which exposes an average over a longer period of time) removes these artefacts, but in future, it’ll just be a case of turning on the anti-flicker function in the camera.
Then we come to a huge positive – Stars!
You see, capturing stars in the night sky is always a challenge because the noise in the shadows surrounding them can make the entire image look messy.
A long exposure doesn’t help us, because the points of light turn to lines – if only there was a way of capturing the stars as a highlight, while also capturing the dark night sky with less noise, all at the same time…
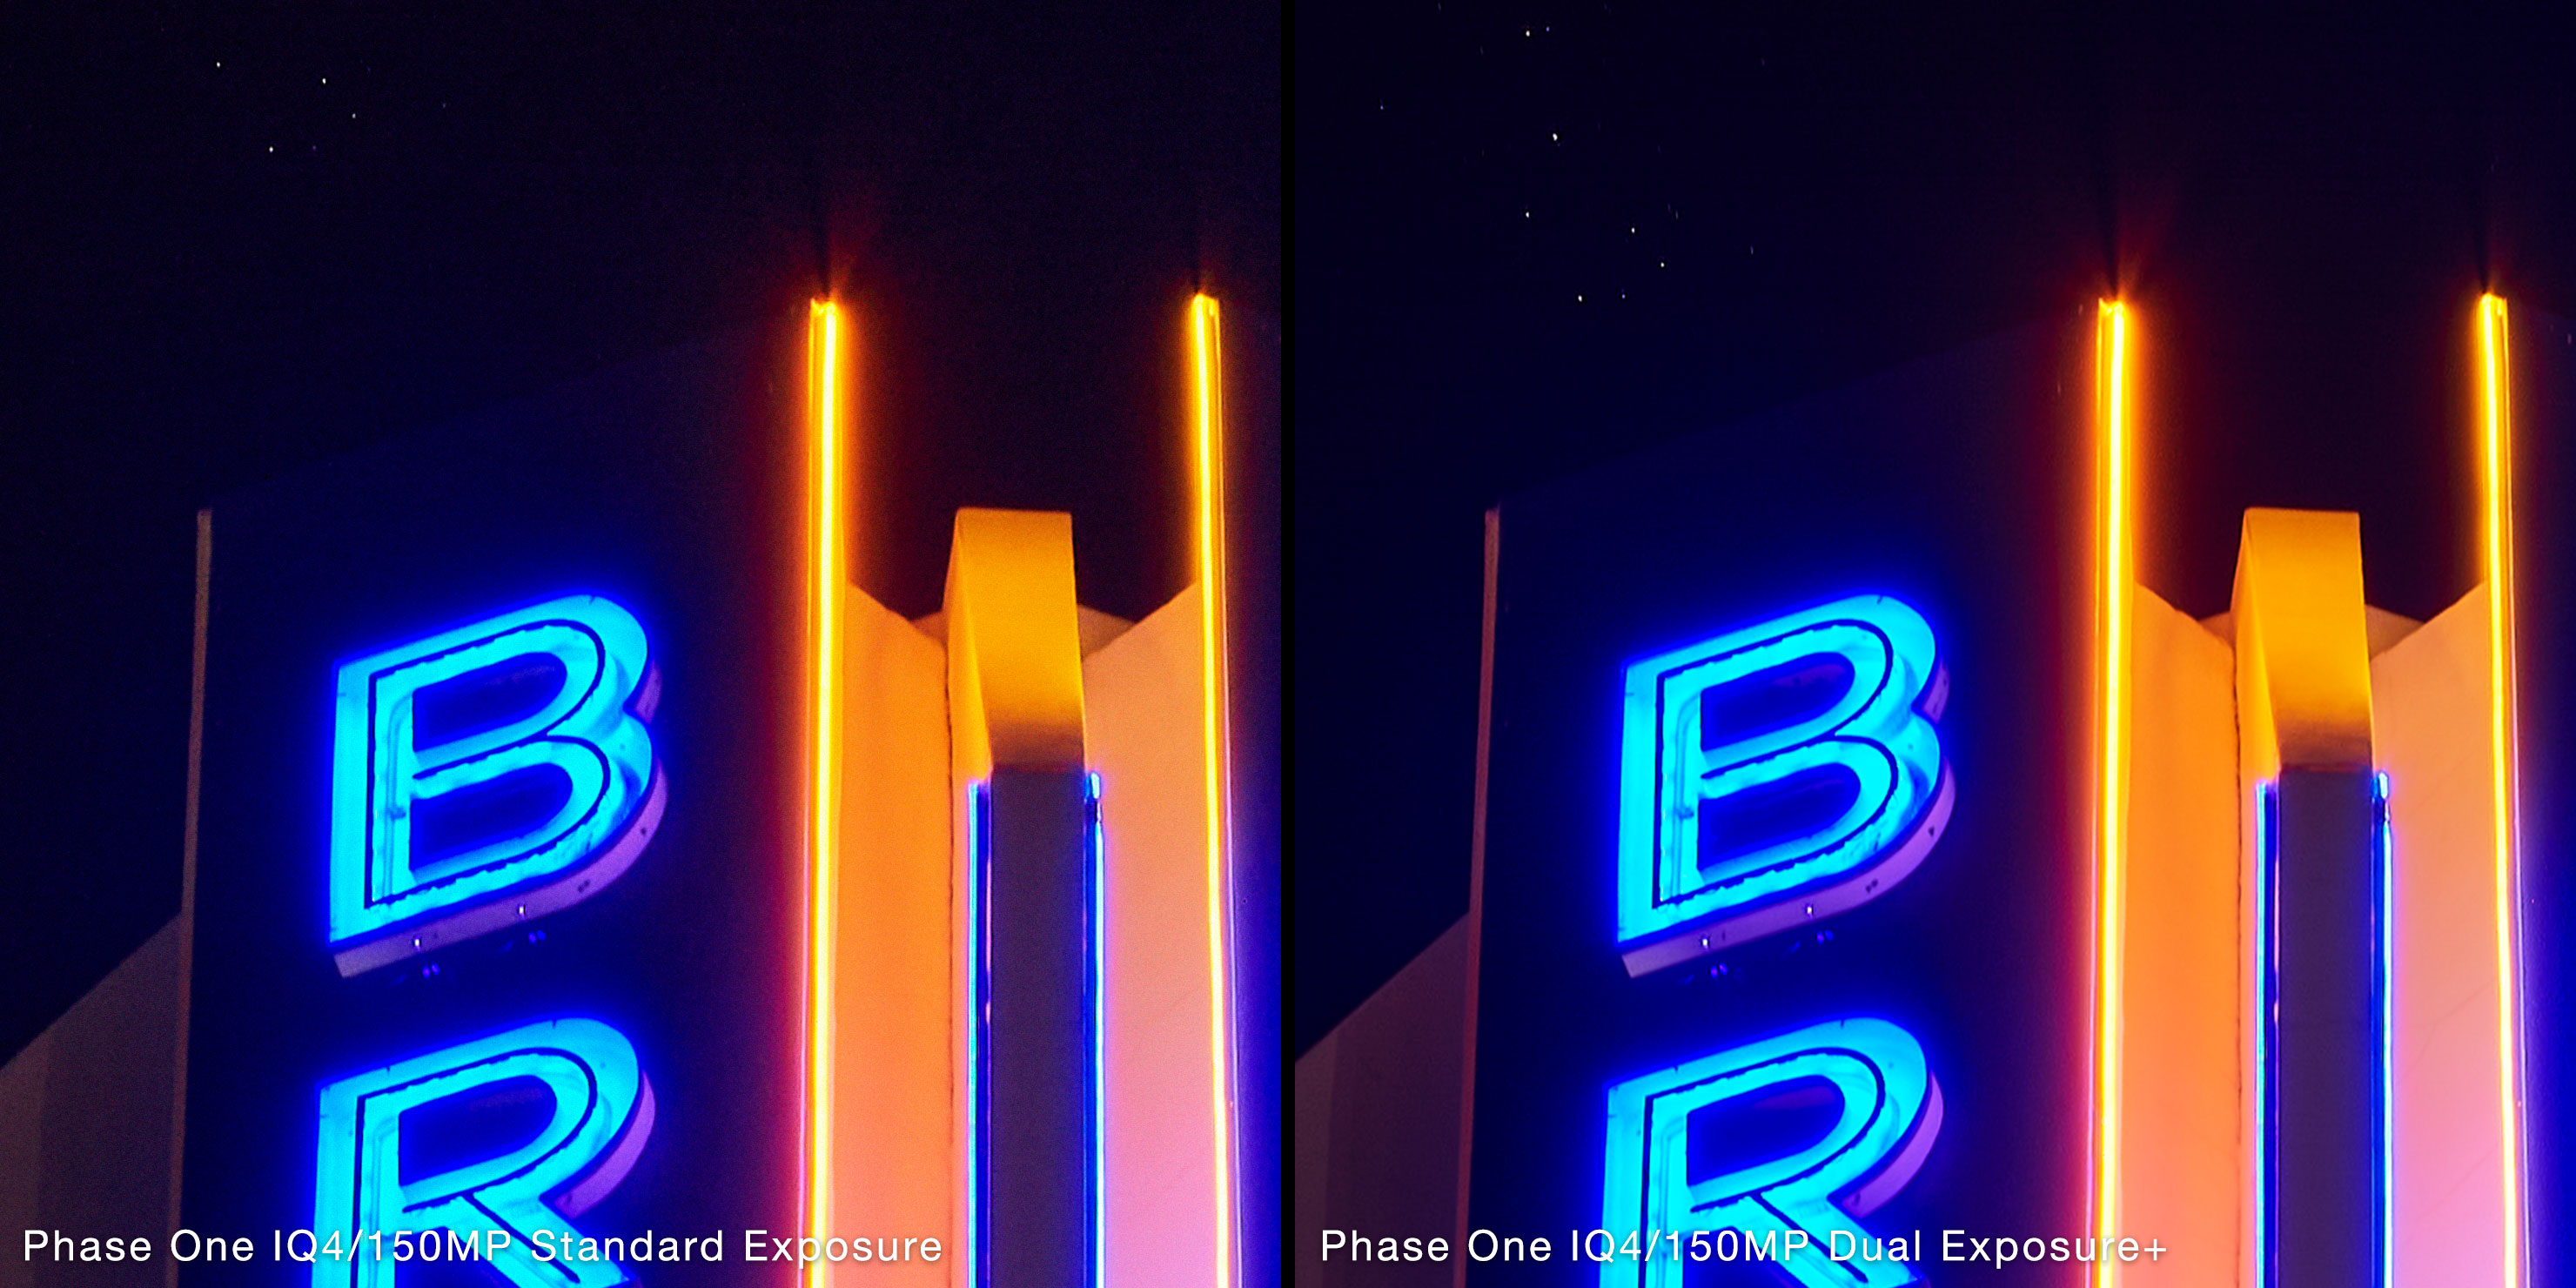
I’ll be doing more testing of this over the next few days in somewhere a little less light-polluted than Miami’s South Beach, but it’s fair to say the early indicators are extremely positive.
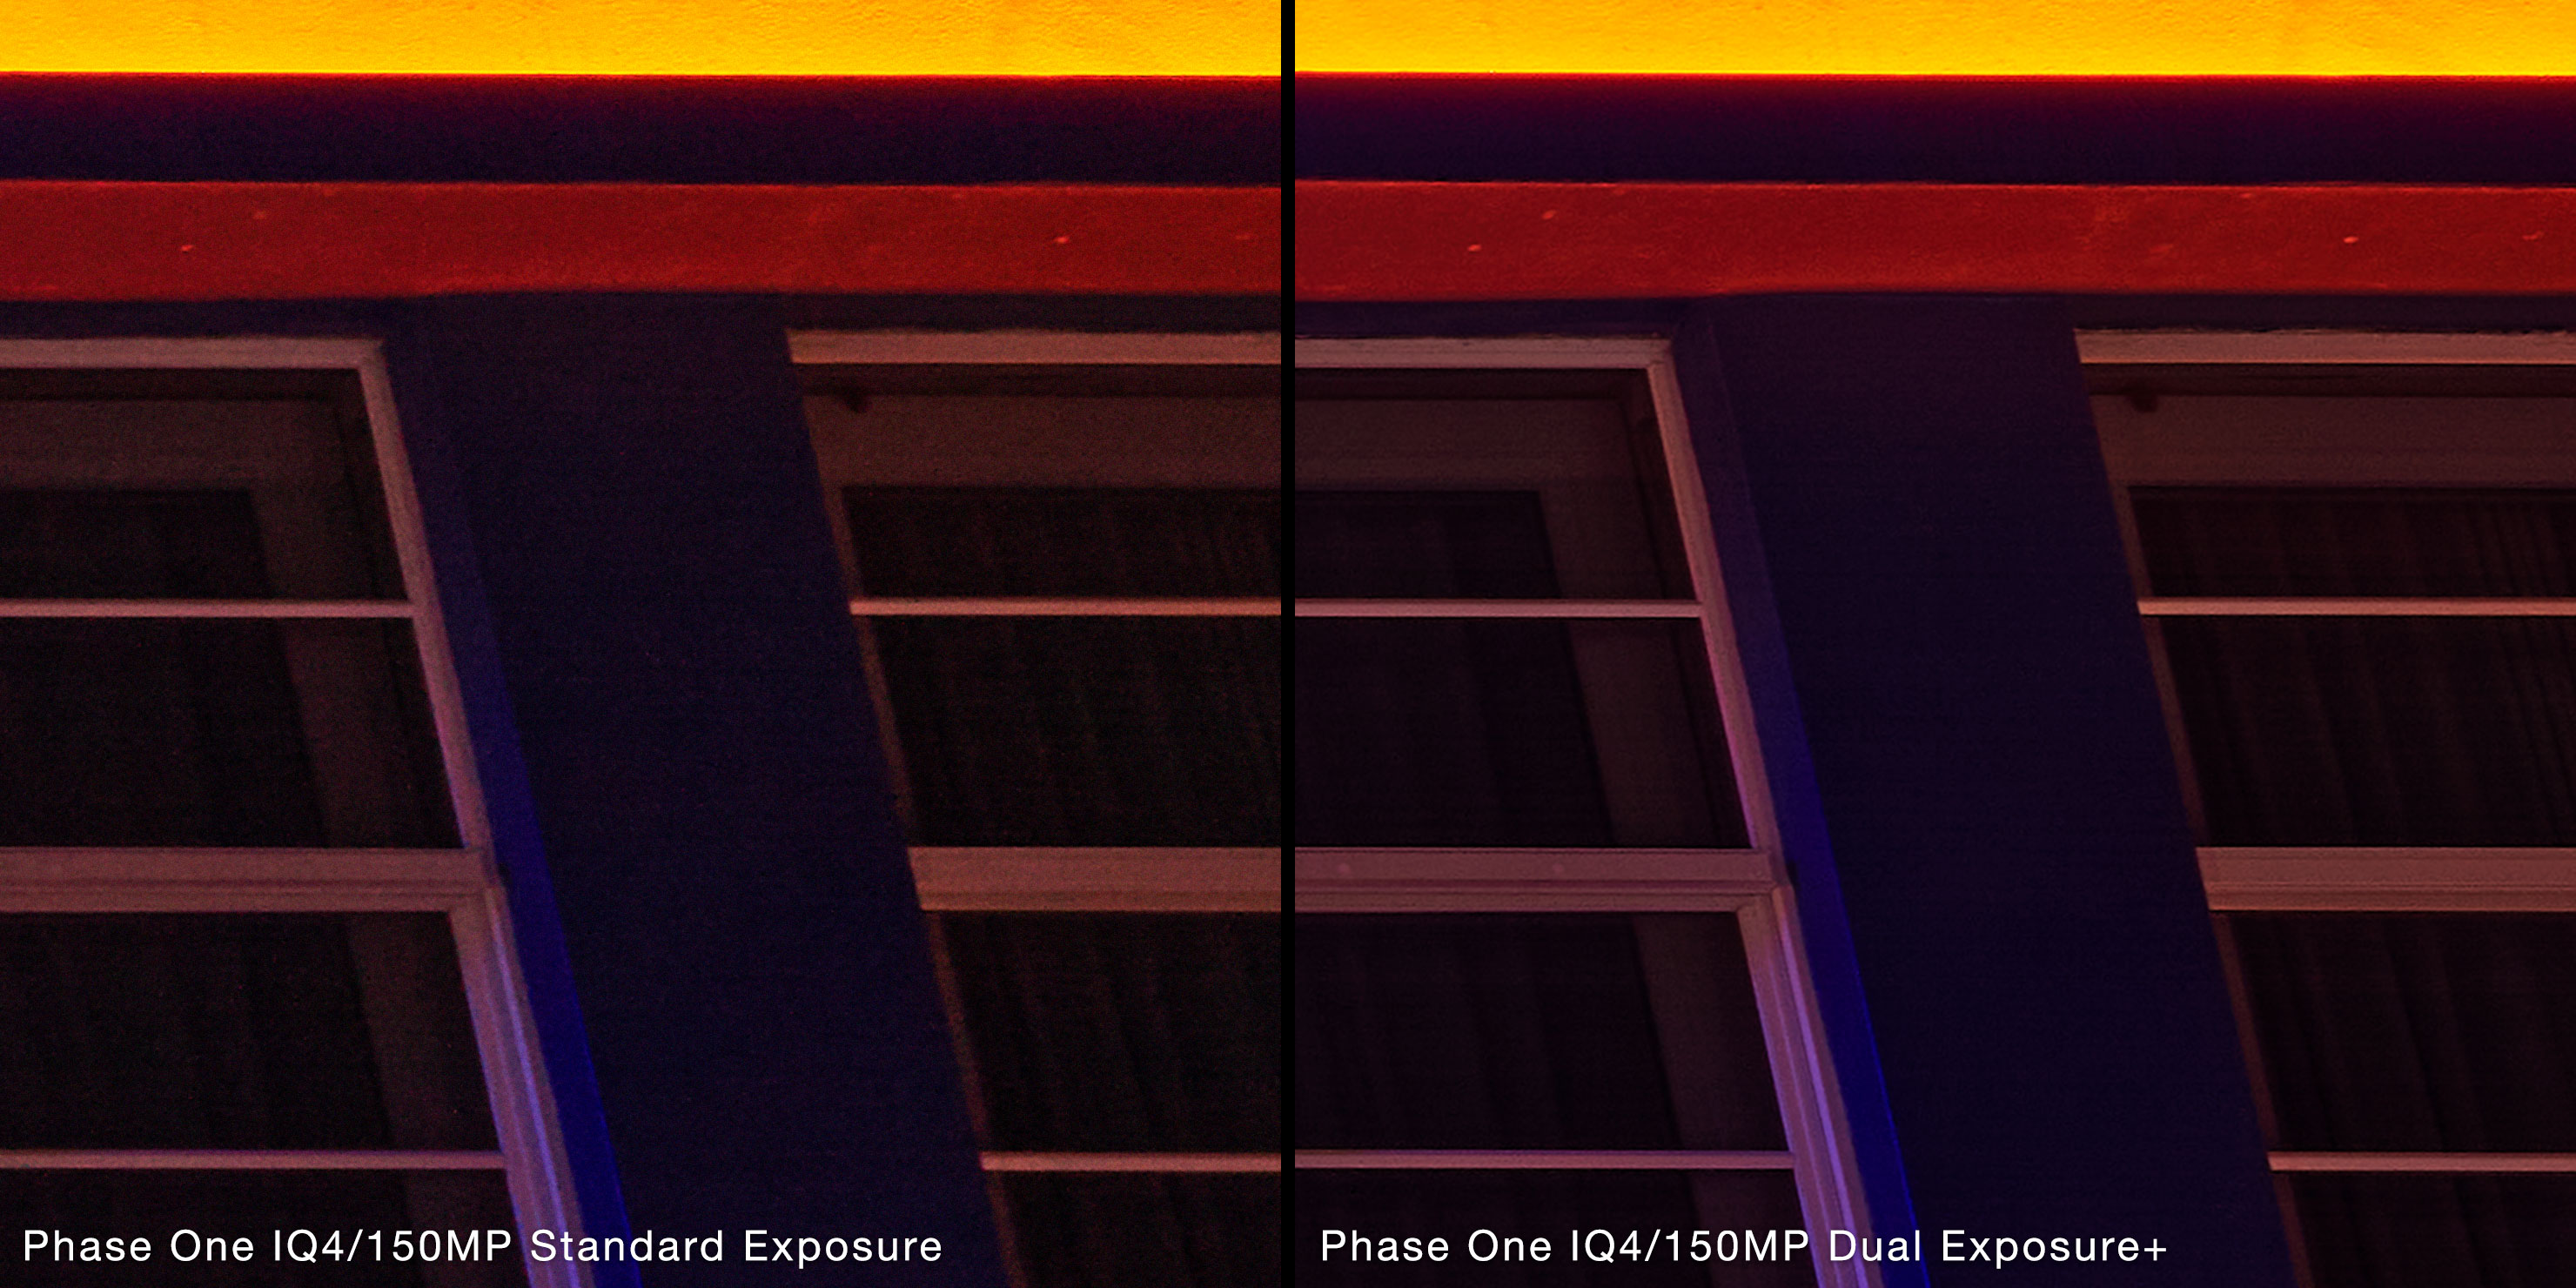
And for those of you curious as to the difference between the stars to the top left of the sign in a Dual Exposure+ shot vs a Frame Averaged/Long Exposure equivalent, here you go:
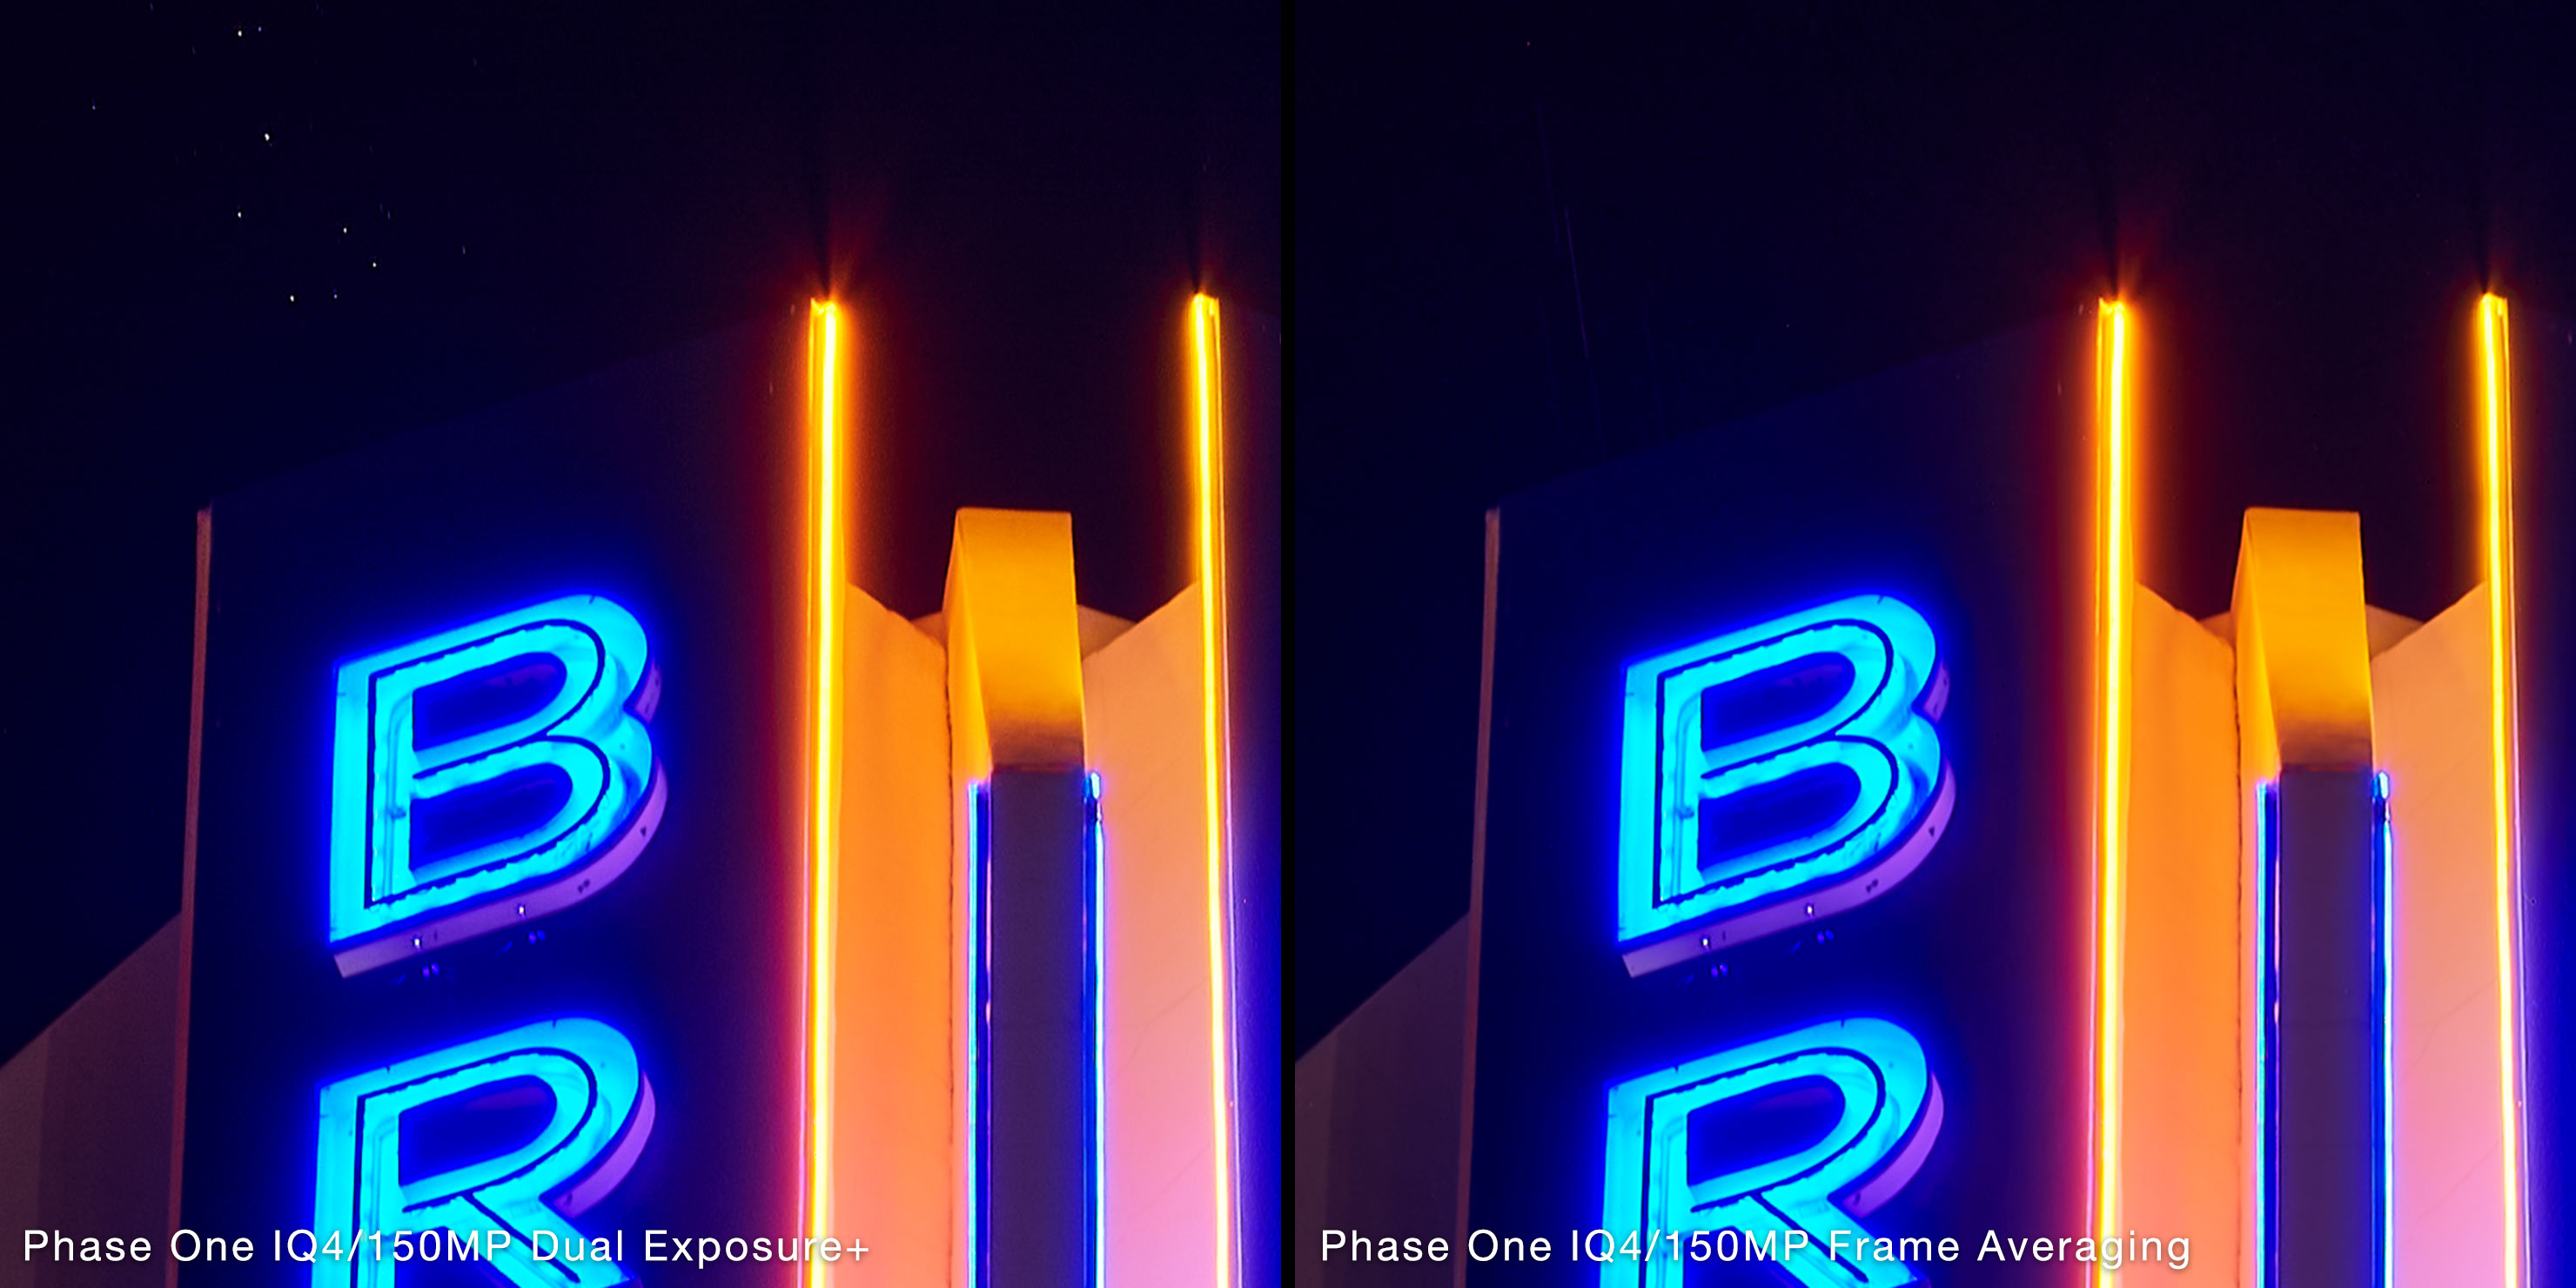
Click through, to see the stars have disappeared to faded lines in the right hand shot – yes, it’s kept control of the noise, but we’ve lost the sparkly things in the sky.
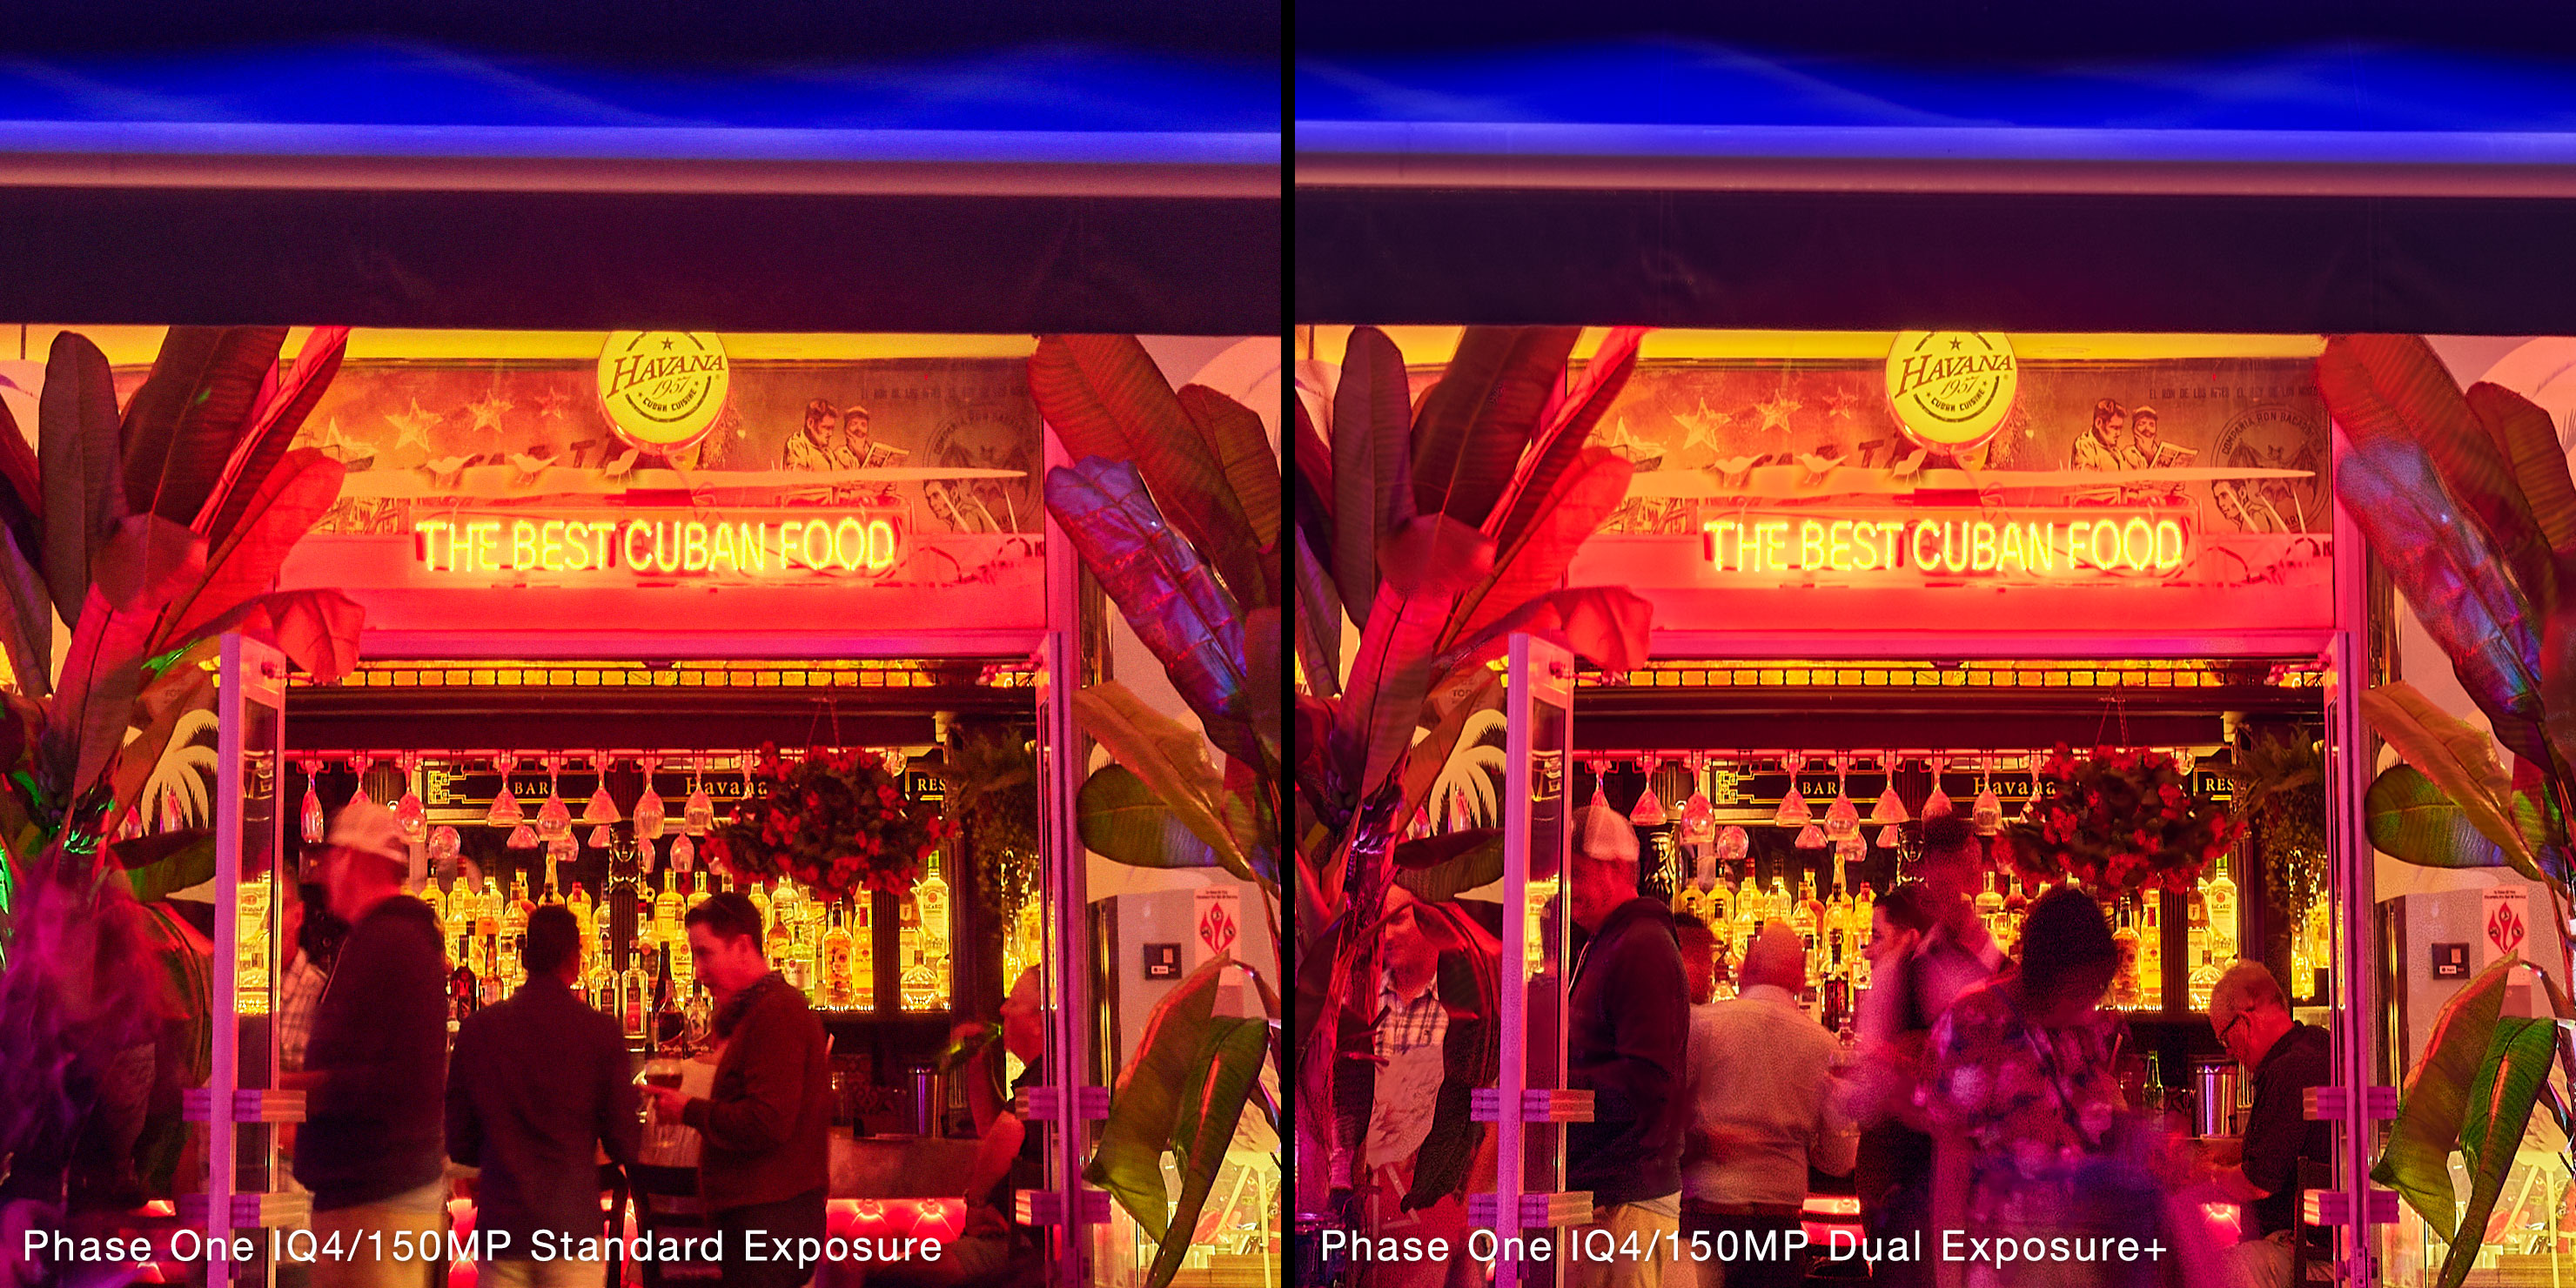
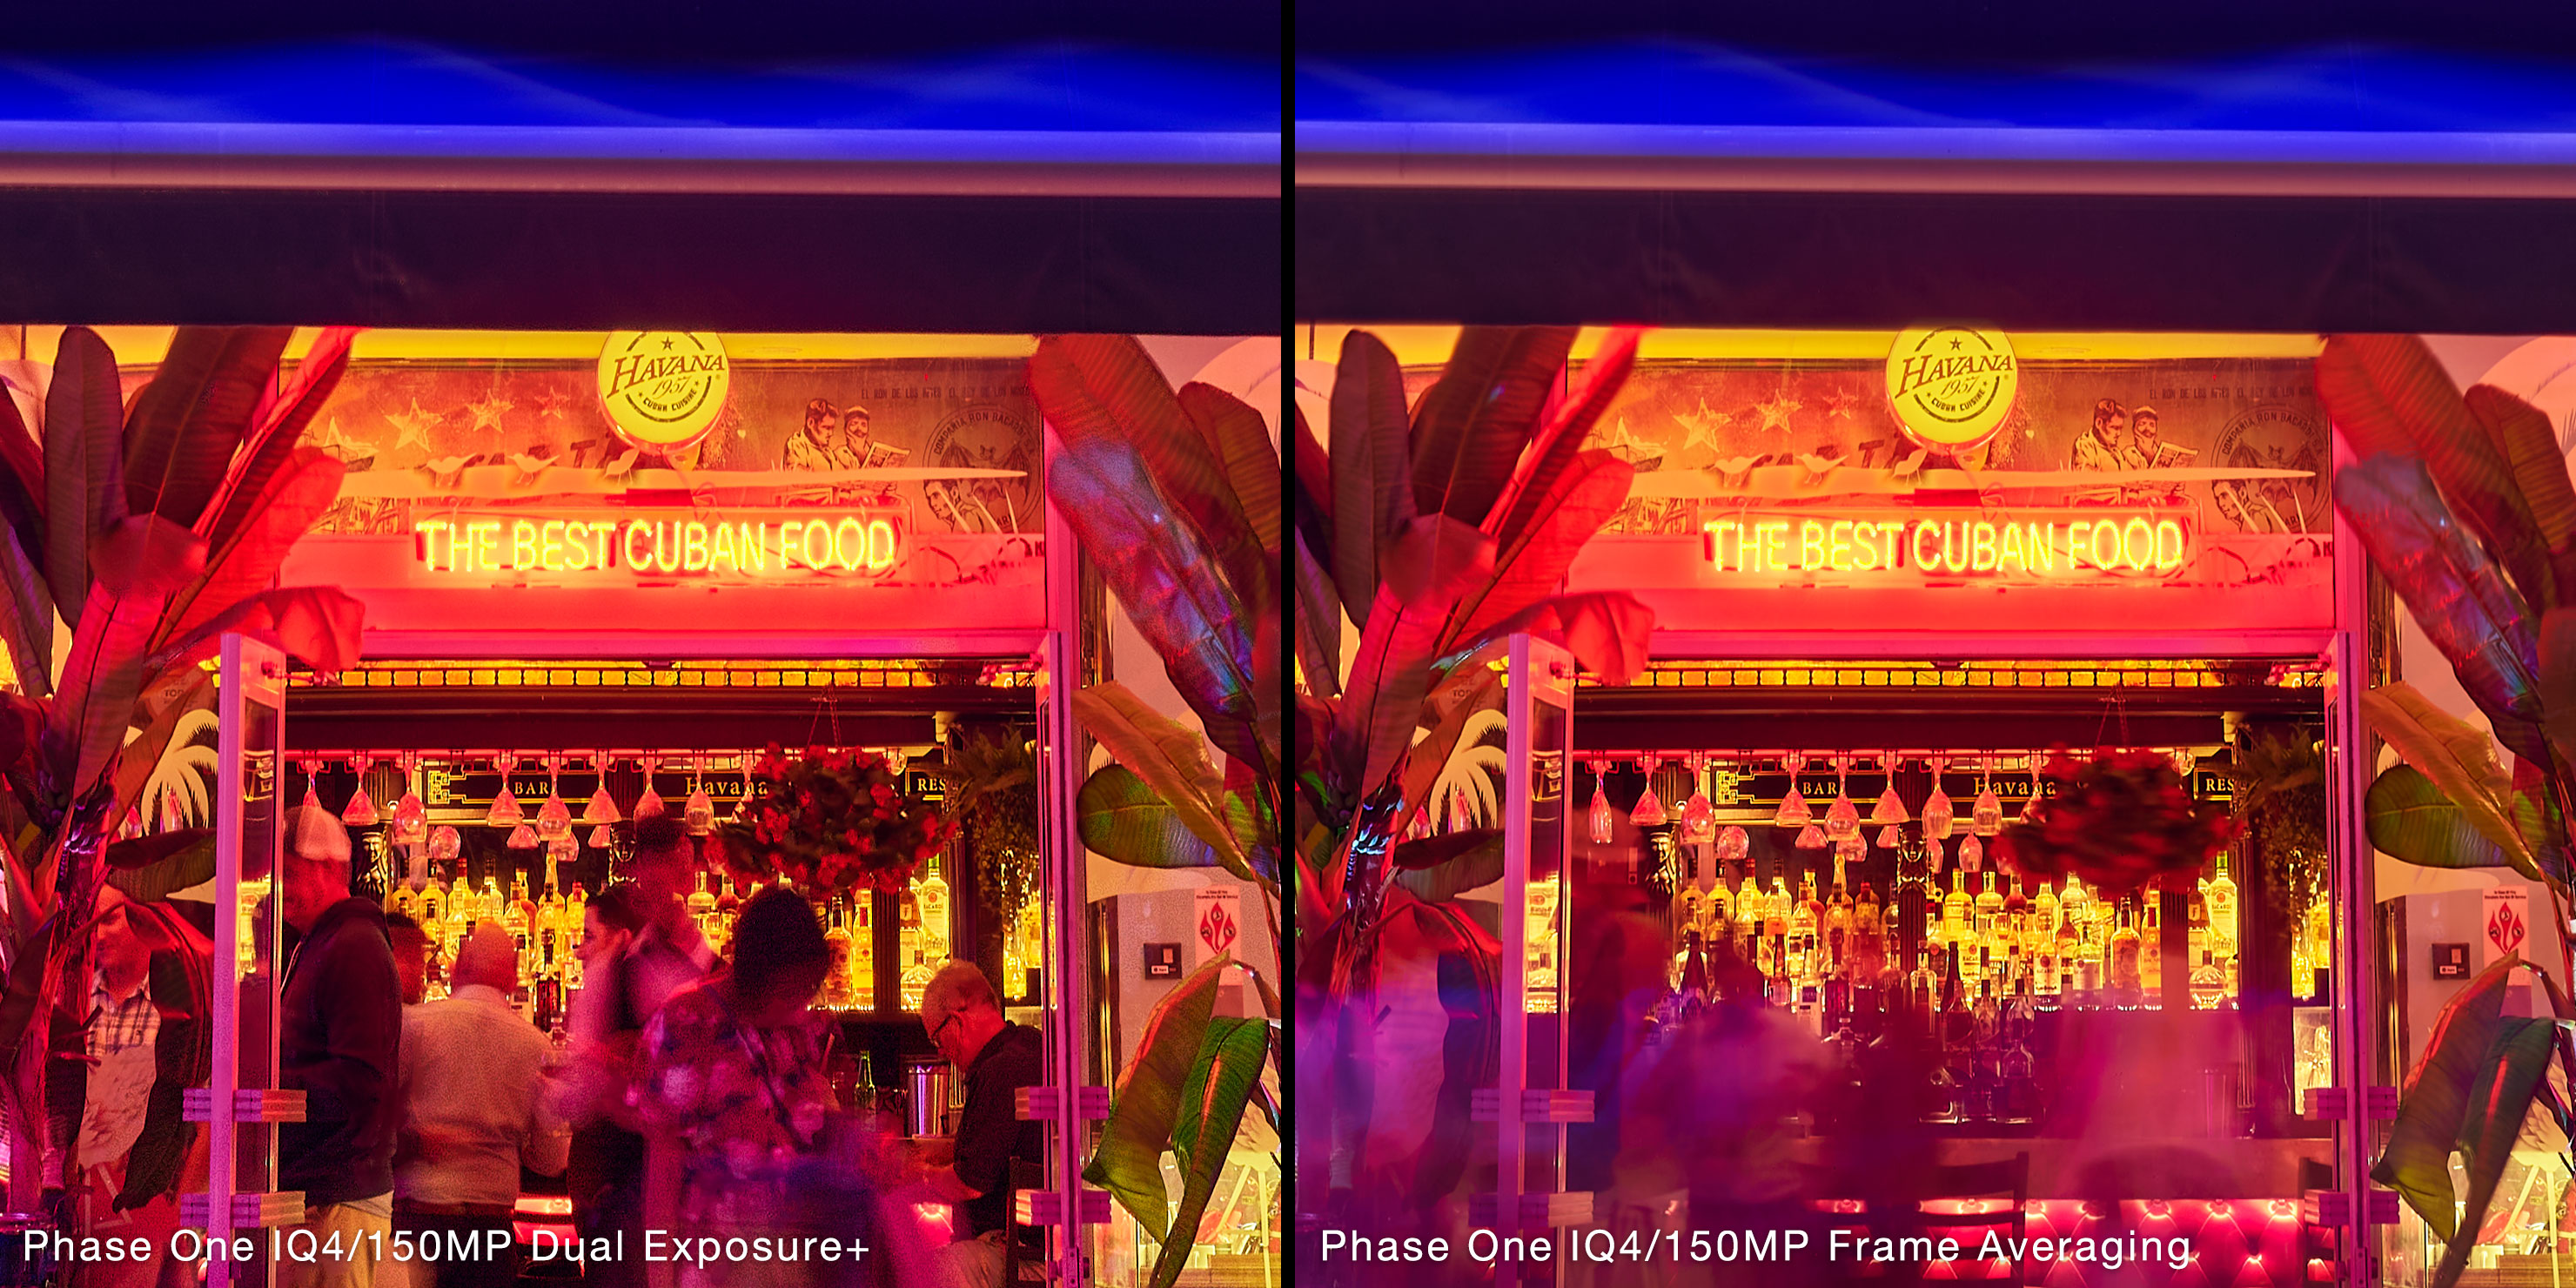
Moving down the street, it was time to shoot another iconic section of Ocean Drive – the Colony Hotel and Boulevard Hotel:
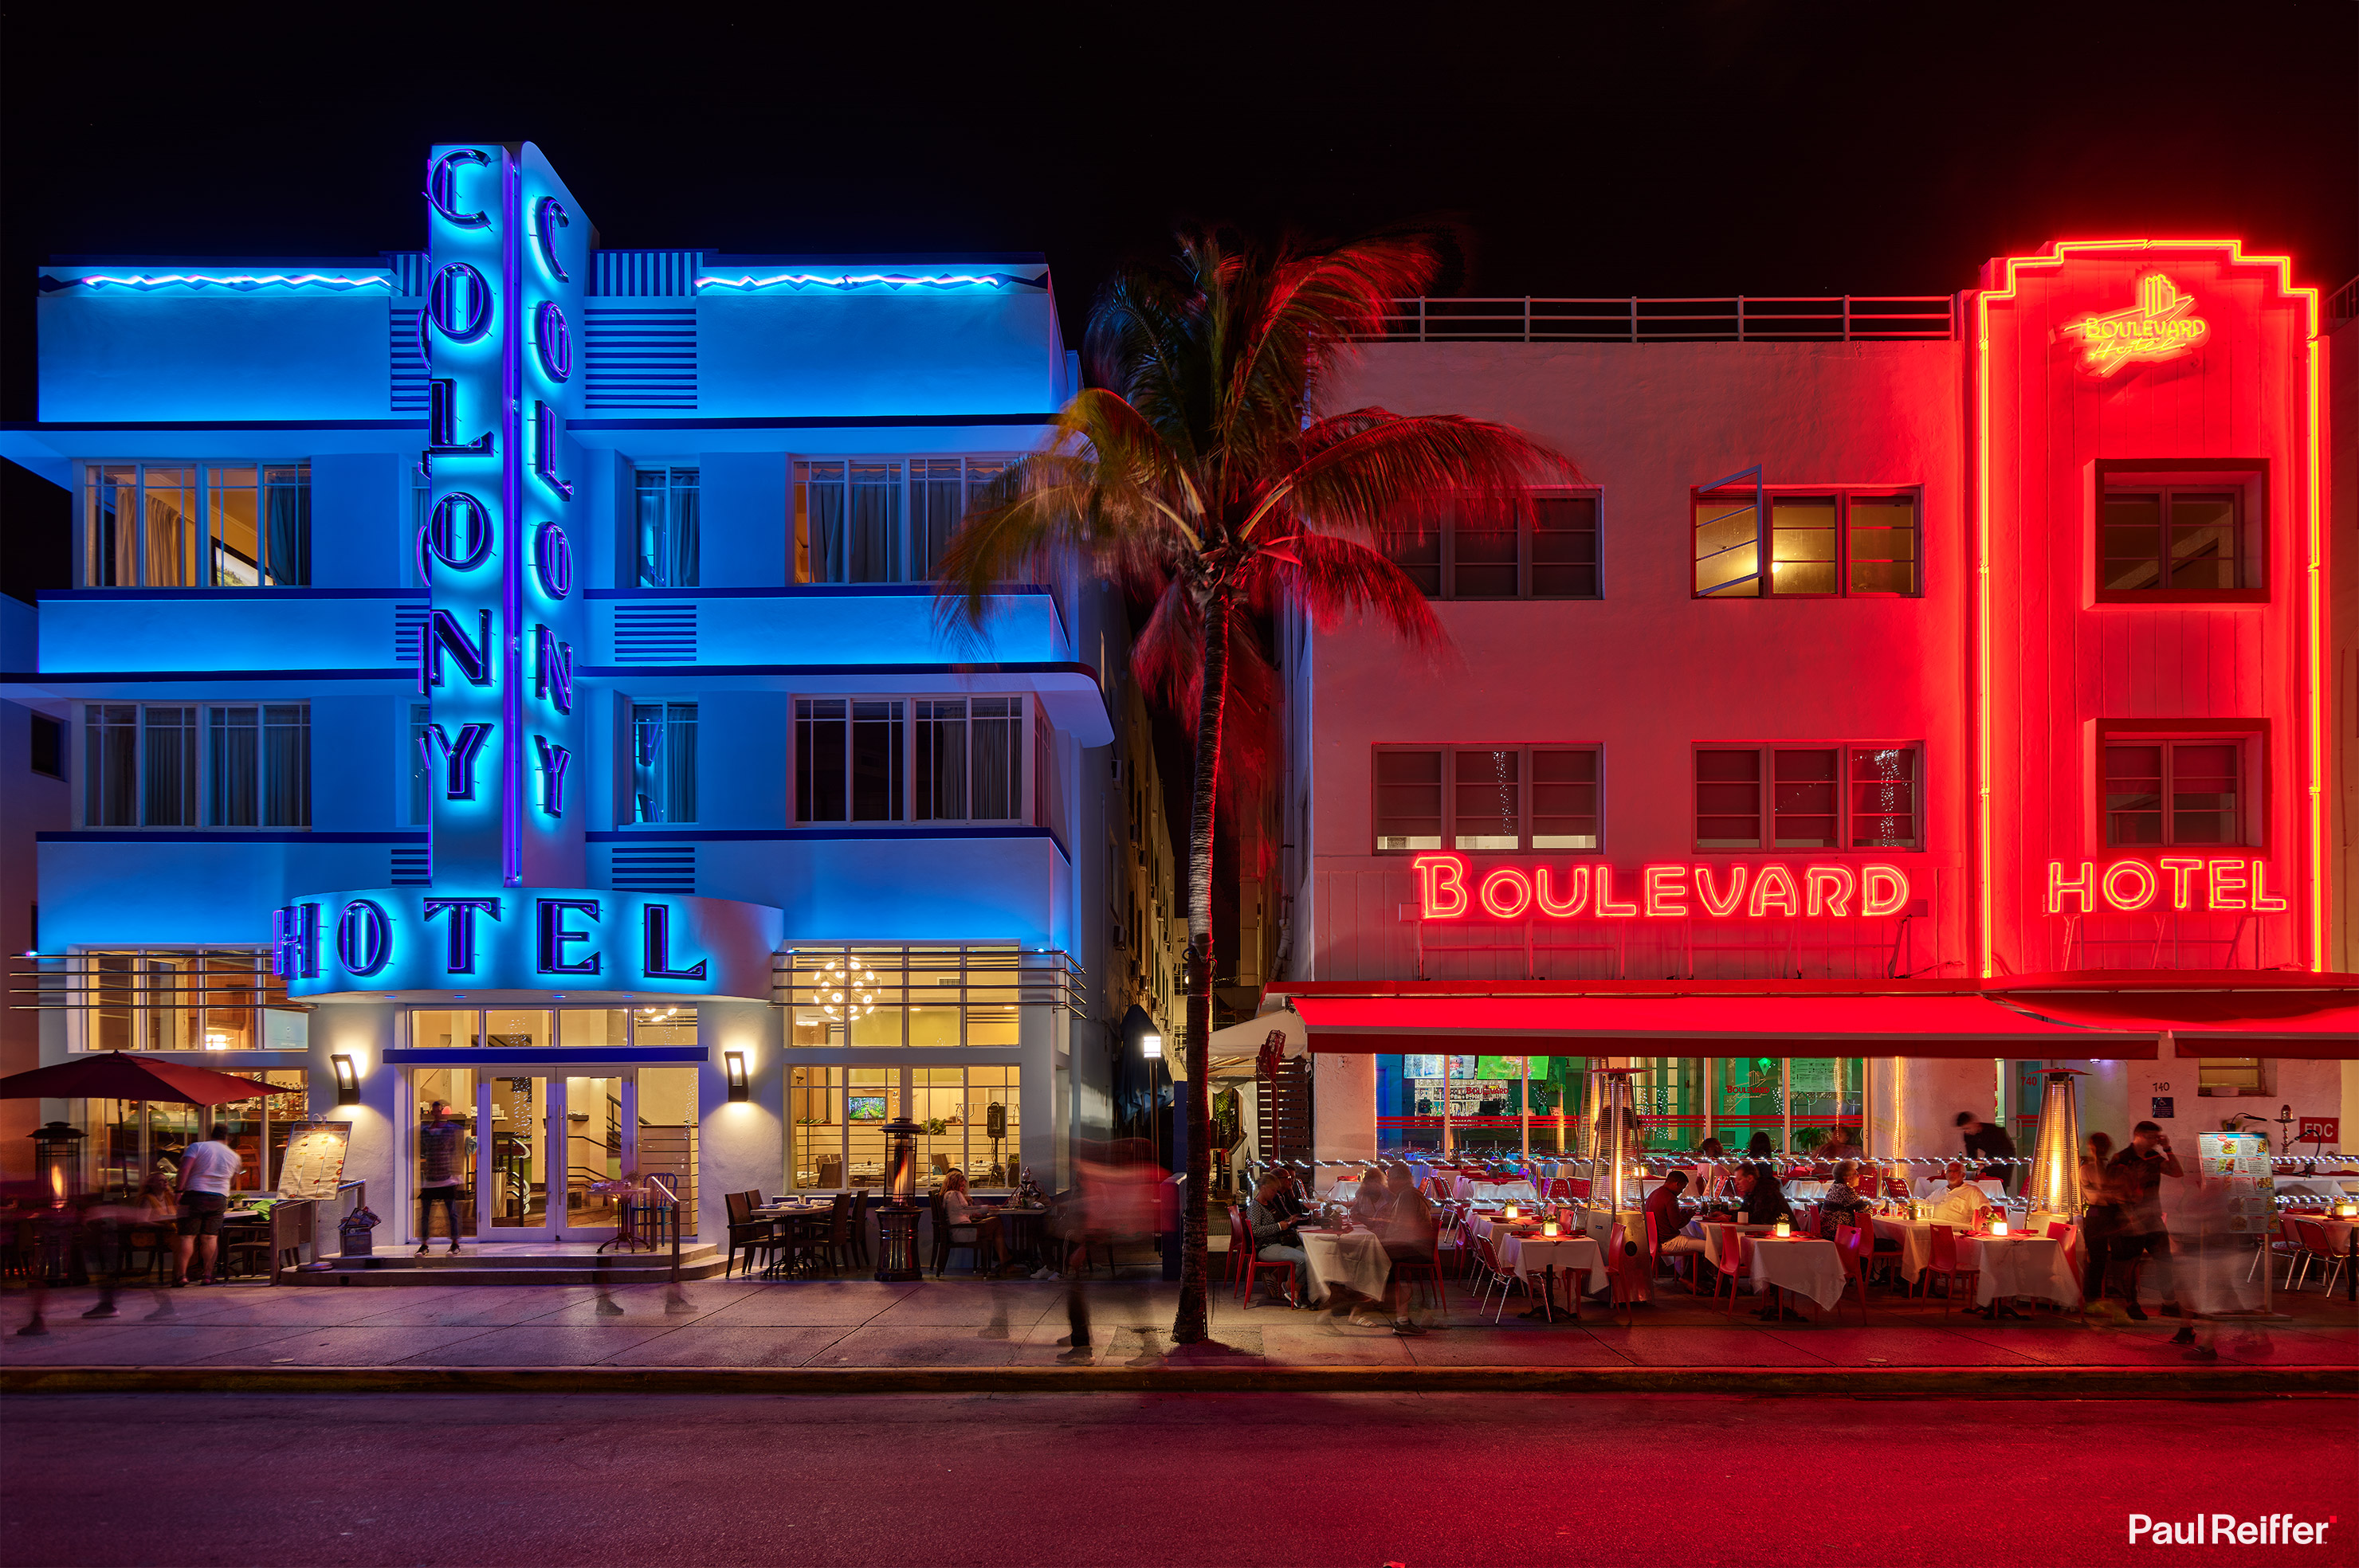
With what can often be a nightmare for camera sensors, these bright red and blue lit buildings proved no match for the IQ4 – but it was, again, the noise control I was interested in here, without the need to resort to a long exposure which would have left ugly car trails as they passed in front of the camera.
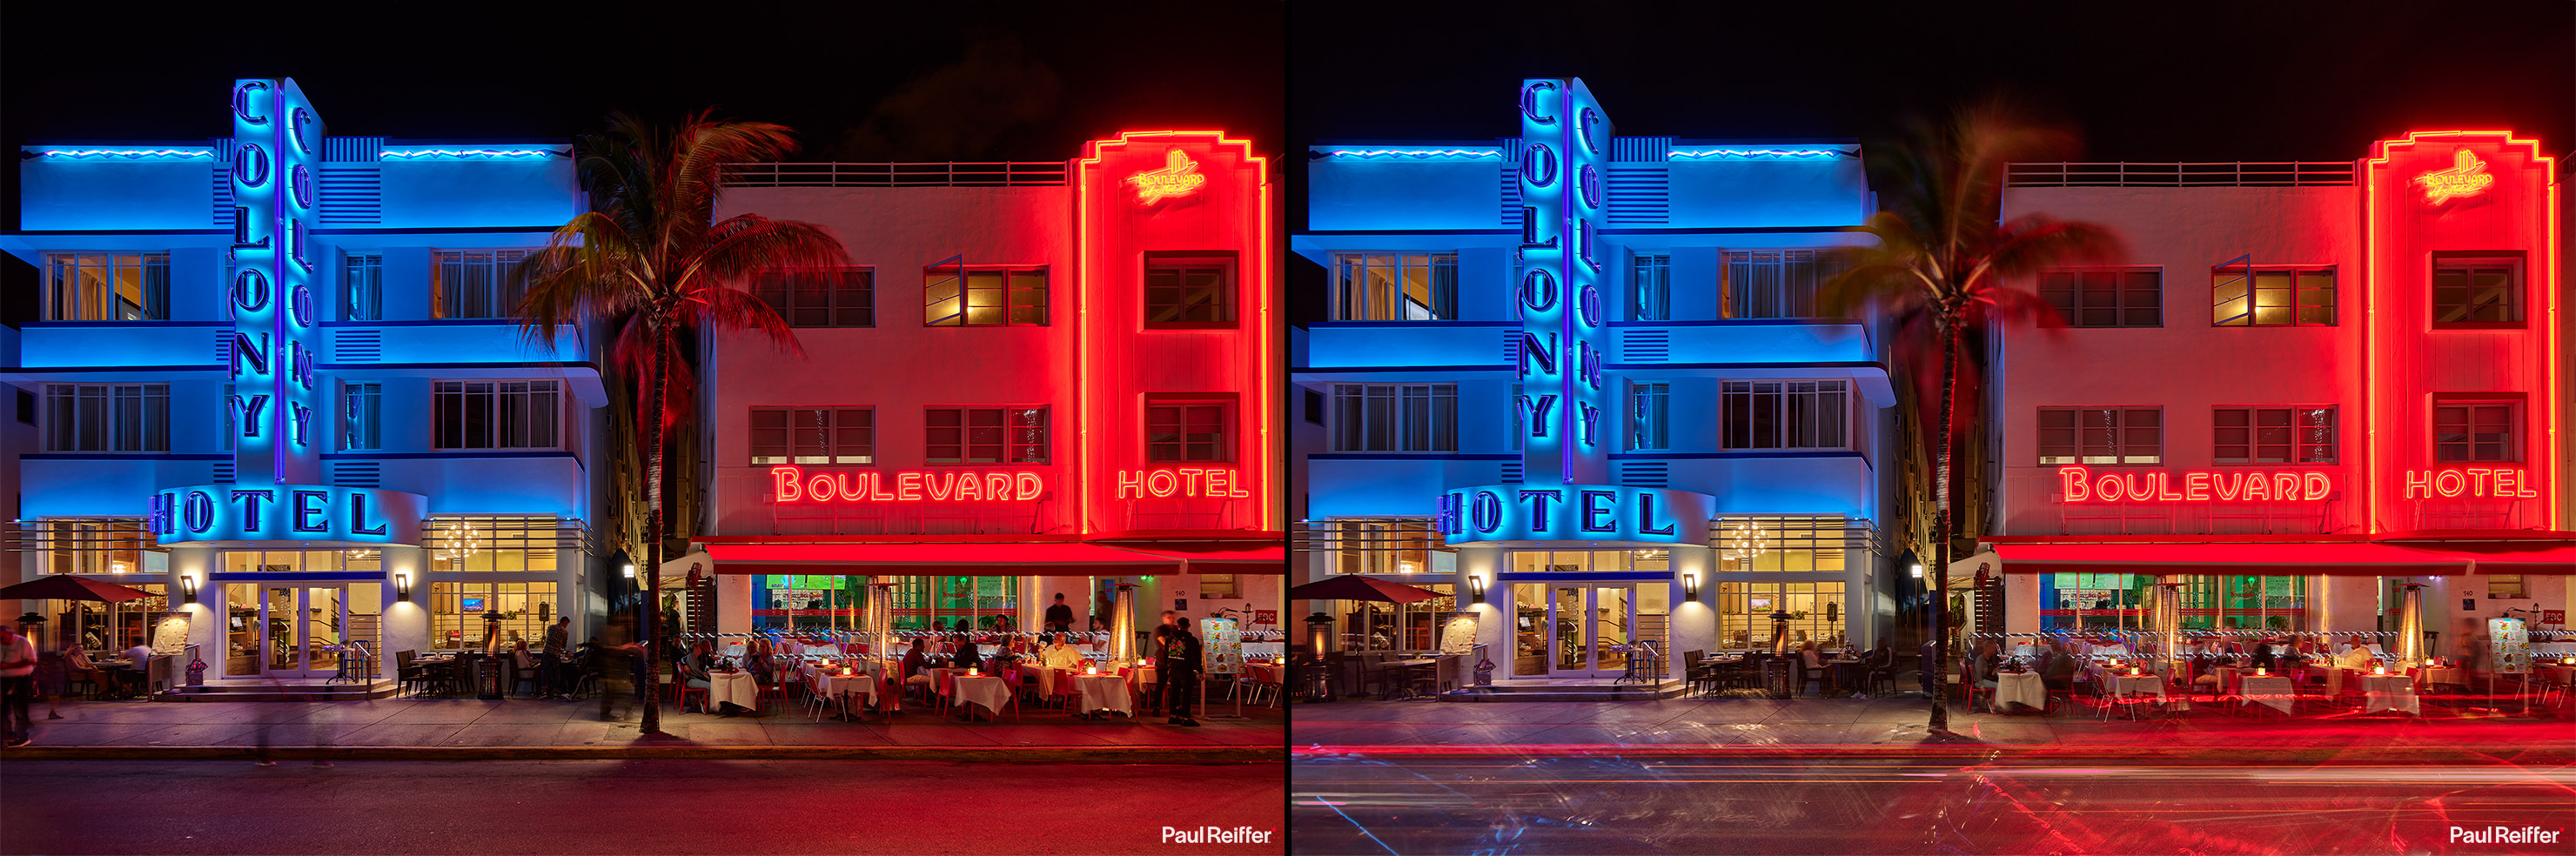
(It was possible to get a 6 second break – a 150 second break simply wasn’t going to happen).
The difference is quite something.
Yes, I could get an even cleaner shot using that 150 second Frame Averaged exposure, which would look great zoomed in to this area – but it also came with the byproduct of all those car and light reflections in the foreground, which I could avoid with the Dual Exposure+ option instead.
However, it was this closer inspection also led me to find the limitations of this new Lab tool.
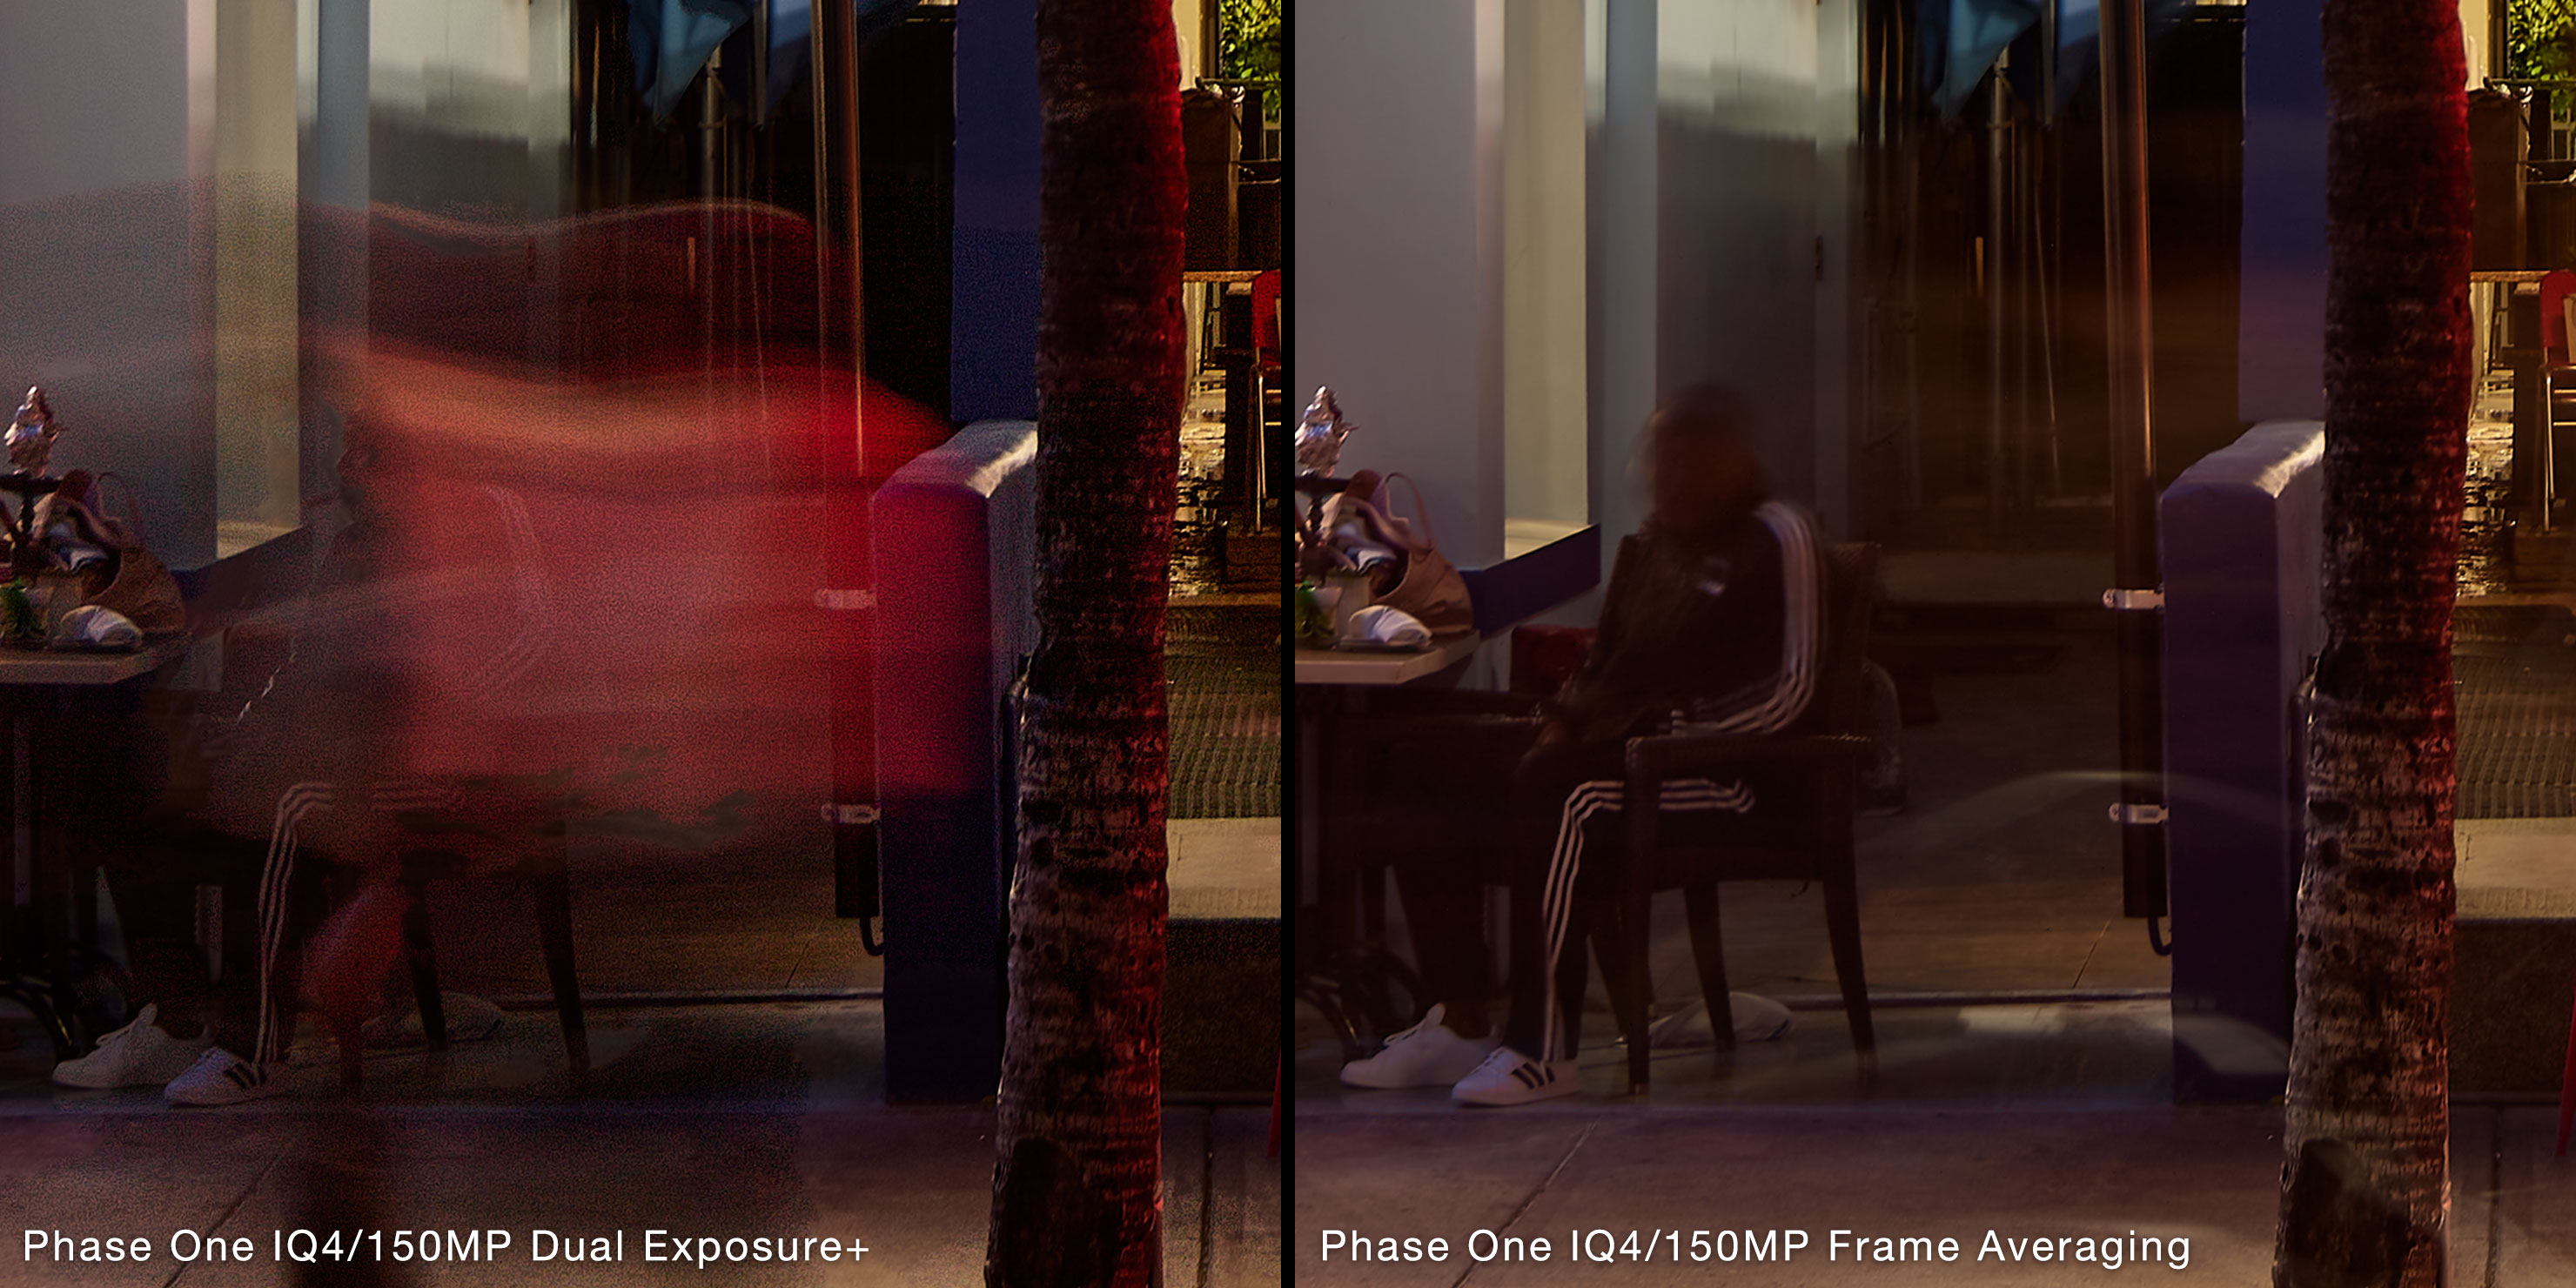
To start, let’s take a look at the palm tree, moving in the wind, in our Dual Exposure+ shot:
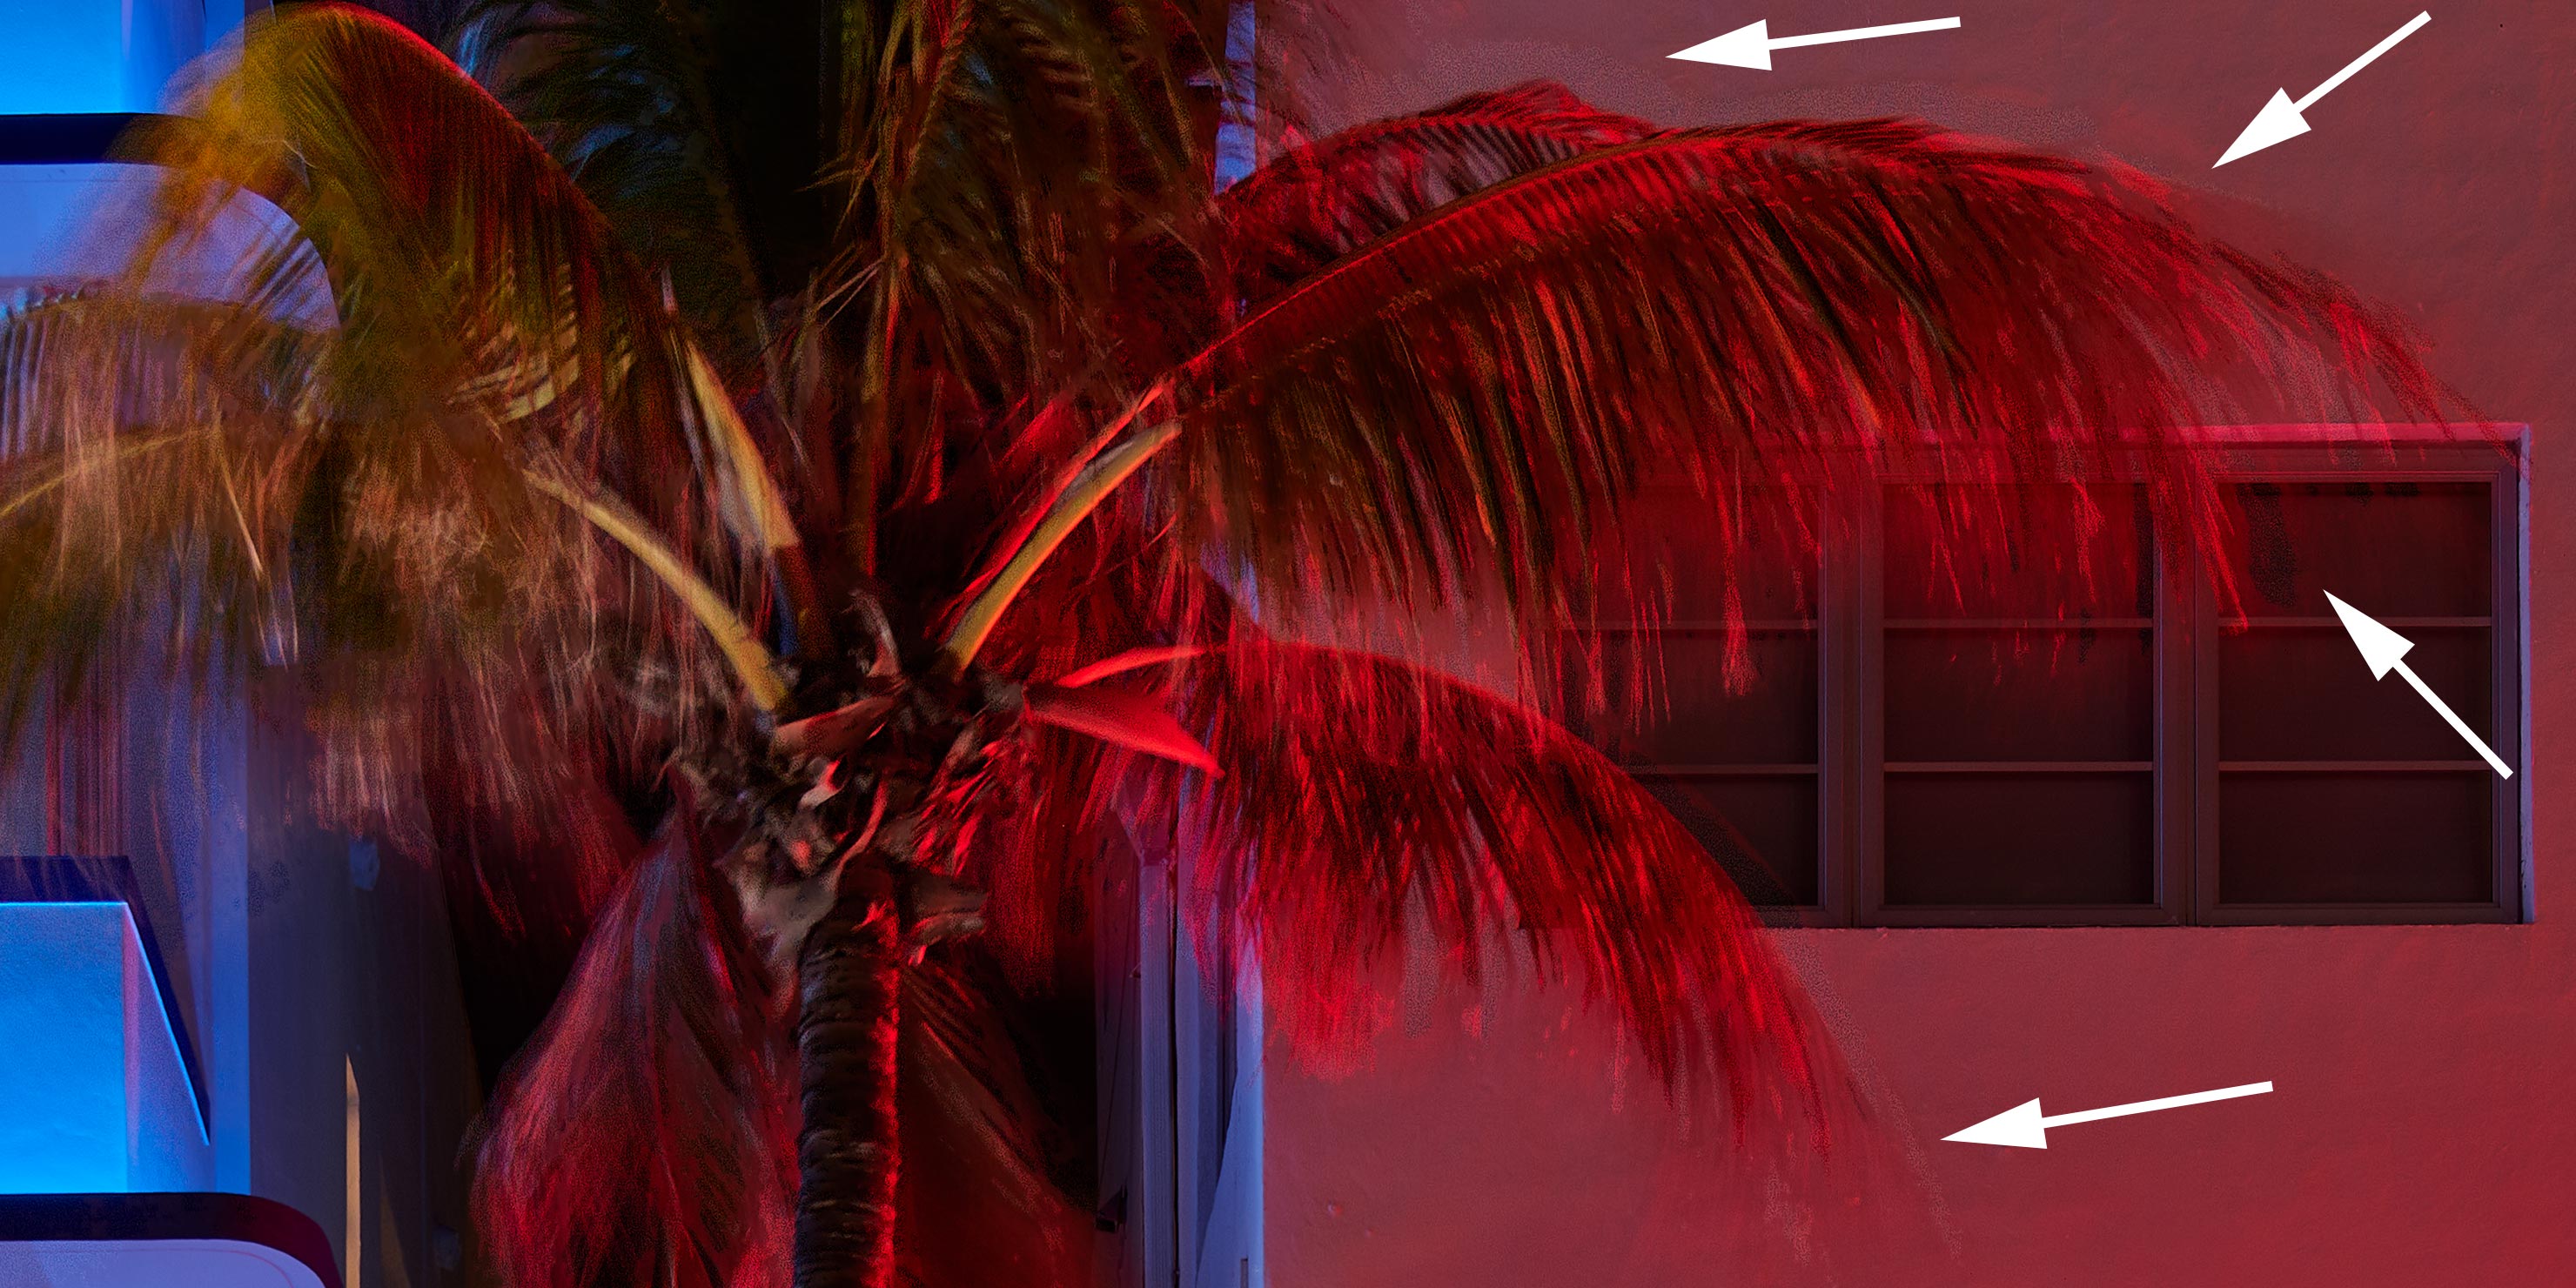
For some reason, there was more noise in this image than there was in the standard exposure, or the milky/blurry version from the Frame Averaging test I captured too:

The penny dropped.
The issue is where Capture One is using shadow data from something that’s moving against the highlight data of something which is not.
The result – strange artefacts, excessive noise, ghosted objects.
In these cases, the Frame Averaged shots really were turning out better – where there was meant to be motion, capturing that movement was my default way of shooting, and it’s always smoothed out any issues.
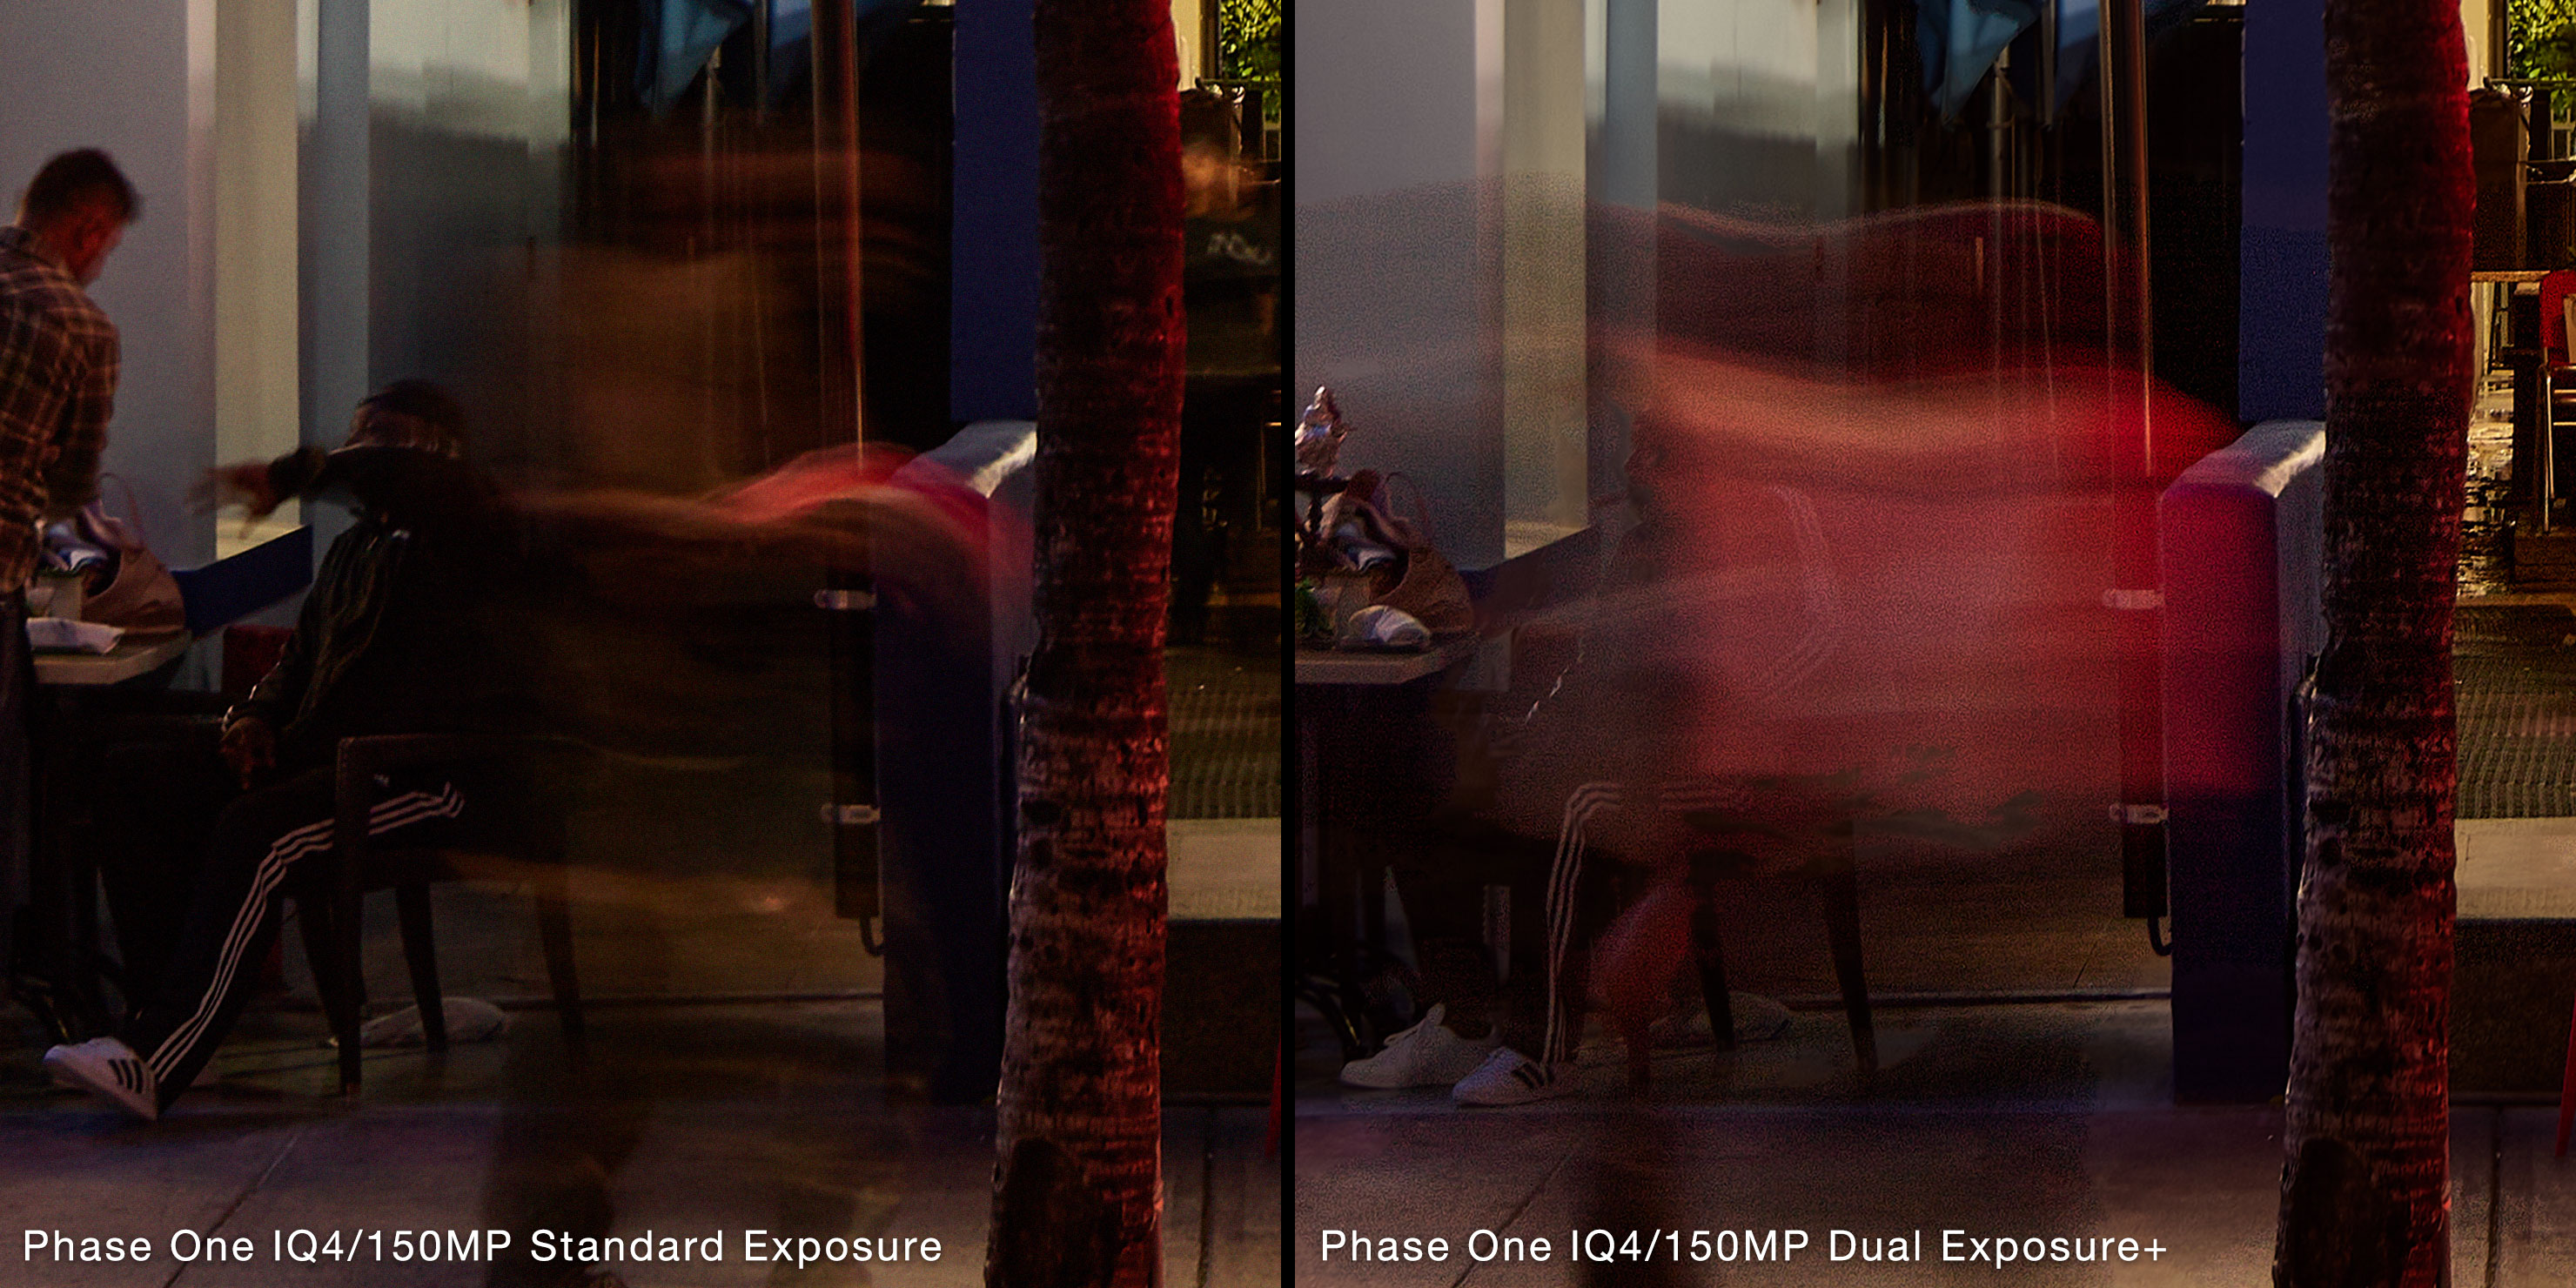
Looking back to the Breakwater, I could find a couple of areas where there might be a small issue with movement (specifically movement between light and dark lighting during the same exposure).
Again, in this case, a traditional long exposure or frame averaged shot would also be perfectly acceptable (noting that we’re exchanging the risk of changes in movement between shadows and highlights for camera movement due to the extended time, in doing so).
So where does that leave us with Dual Exposure+?
To my mind, in a really good place.
It’s yet another tool on my camera that can help me get the shot. It saves me worrying about balancing particularly challenging exposures, plus the reduction in post-processing and clean-up time – delivering reliably good results in specific circumstances.
It’s not the perfect tool for capturing movement (the blending between the two exposures becomes a little messy).
It’s also not the ideal way to capture lights that are moving (such as car trails) – remember, the short exposure is for the highlights, the longer exposure is only for the shadows. For this, you’d be better off relying on a traditional long exposure or Frame Averaged shot instead.
However, it IS a fantastic tool for photographing static architecture and objects which would traditionally present a huge challenge in terms of high contrast areas. It allows us to capture incredible shadow detail at the same time as protecting the highlights in a single shot.
Beyond that, the reduction in general noise is pretty incredible – especially for such a relatively short exposure time in comparison to Frame Averaging.
I’m also excited to see what this can do with photographing the stars at night – as hinted at above, the way this works could give us an extra little boost when it comes to capturing those tiny points of light while avoiding the inclusion of all that distracting noise we’d expect to see in the sky.
Combined with the huge dynamic range that the IQ4 digital back already sports, along with the flexibility of the Phase One Frame Averaging function that’s built into the camera, this is a great addition to an already very capable toolset – meaning I have another tool to use when met with a difficult setup to shoot.
At present, the Lab version is limited to ISO400 and a longest base image duration of 0.8 seconds – but that’s the point of the new Phase One Lab feature, to give photographers something to try in the field while the guys there just keep on tweaking things and making these tools even better for the future.
Is it perfect? Not yet.
Do I appreciate a company that’s willing to get bleeding edge technology, pushing the envelope of what camera systems can do, in the hands of photographers to use well ahead of time?
Absolutely.