
As featured on Phase One’s Capture One Pro blog this week:
Filters are a key component to most landscape photographers’ kit lists, but every now and then, we face a situation where the addition of those clever pieces of “neutral density glass” can’t quite cut it alone.
However, by combining Capture One 11’s advanced masking features, adjustment layers and dynamic range recovery tools, we can get that image back to exactly what we saw with a few simple steps.
Step 1 – The challenges at capture.
Well, there I was, stood in the freezing cold looking out over Yosemite Valley following New Year’s Eve in California – and the sky had been exceptionally kind to me. What started out as flat and grey overhead had rapidly turned into a fire-filled sky above our heads.
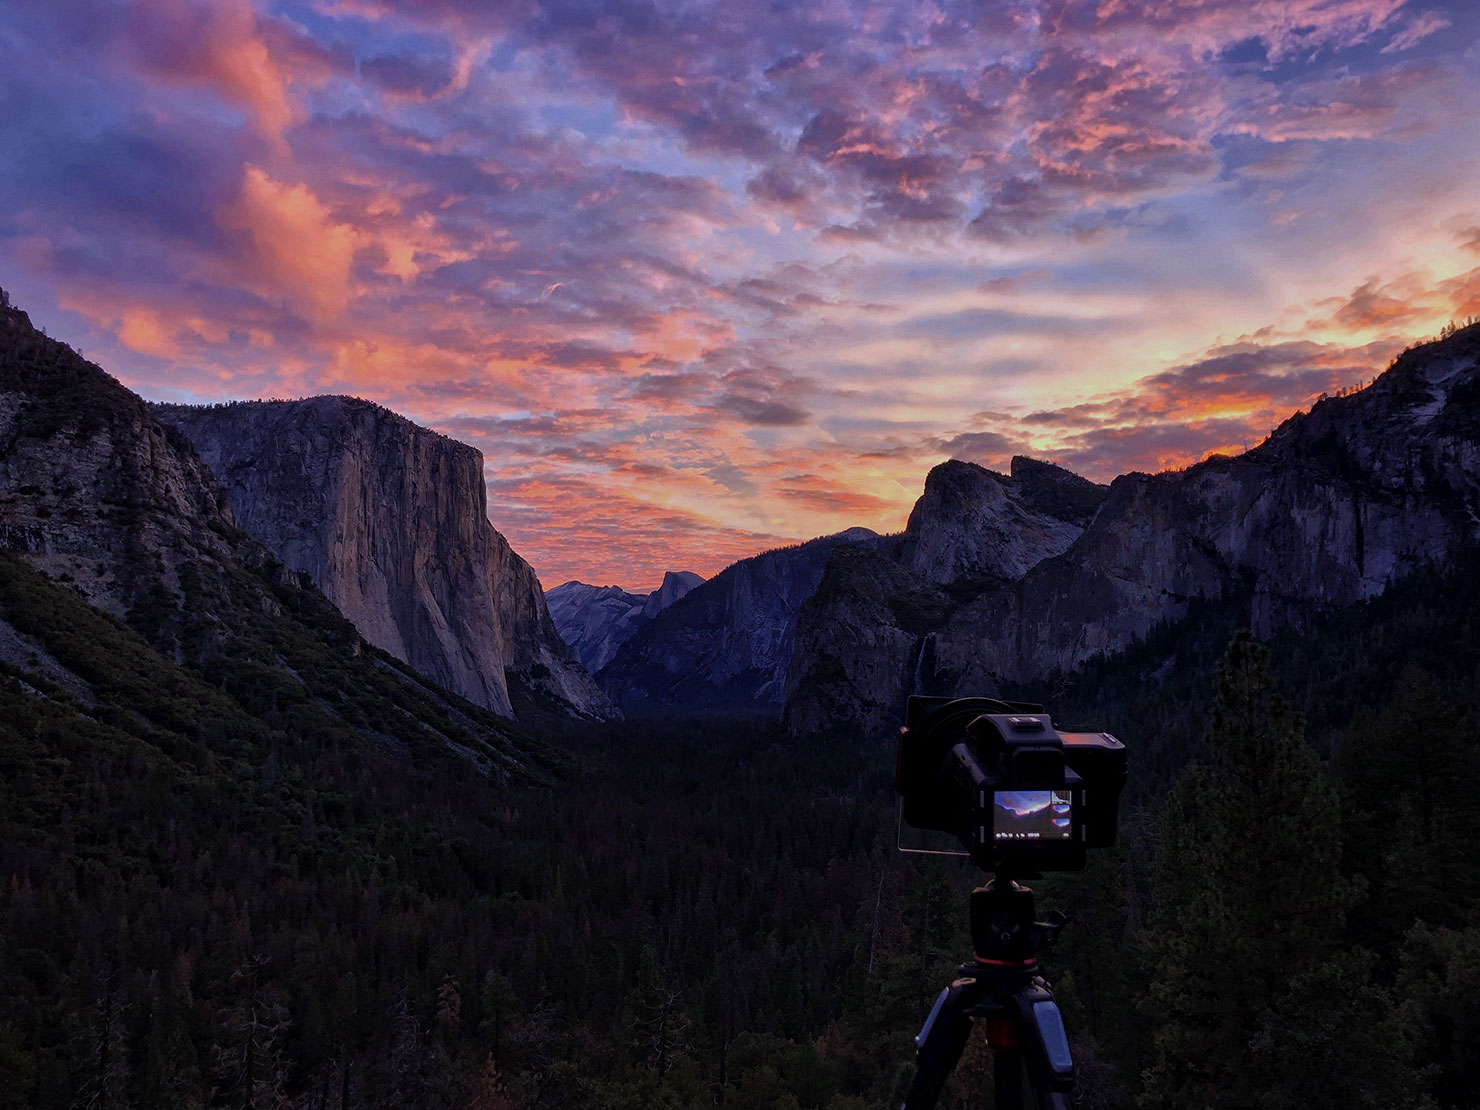
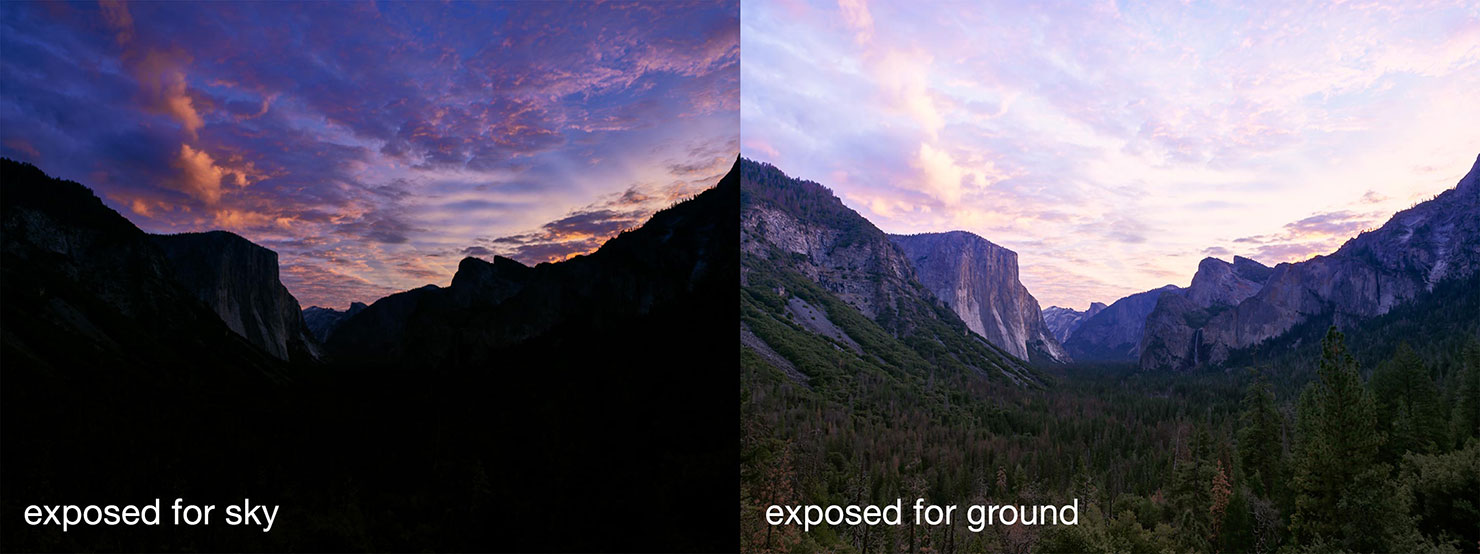
While my iPhone did a great job of capturing the sky above, it had certainly oversaturated the orange tones, and simply couldn’t handle the difference in light levels from above and below – even in its’ coveted “HDR mode”. To be fair, it’s a huge difference, and any camera would have struggled with the choice of exposing for the sky, or the ground below without some form of assistance.
Step 2 – Let’s add some filters
Of course, there is a simple solution to this problem – our handy “Graduated Neutral Density” (or “GND”) filters come in various configurations to allow for such differences in light, and in most situations, do a great job.
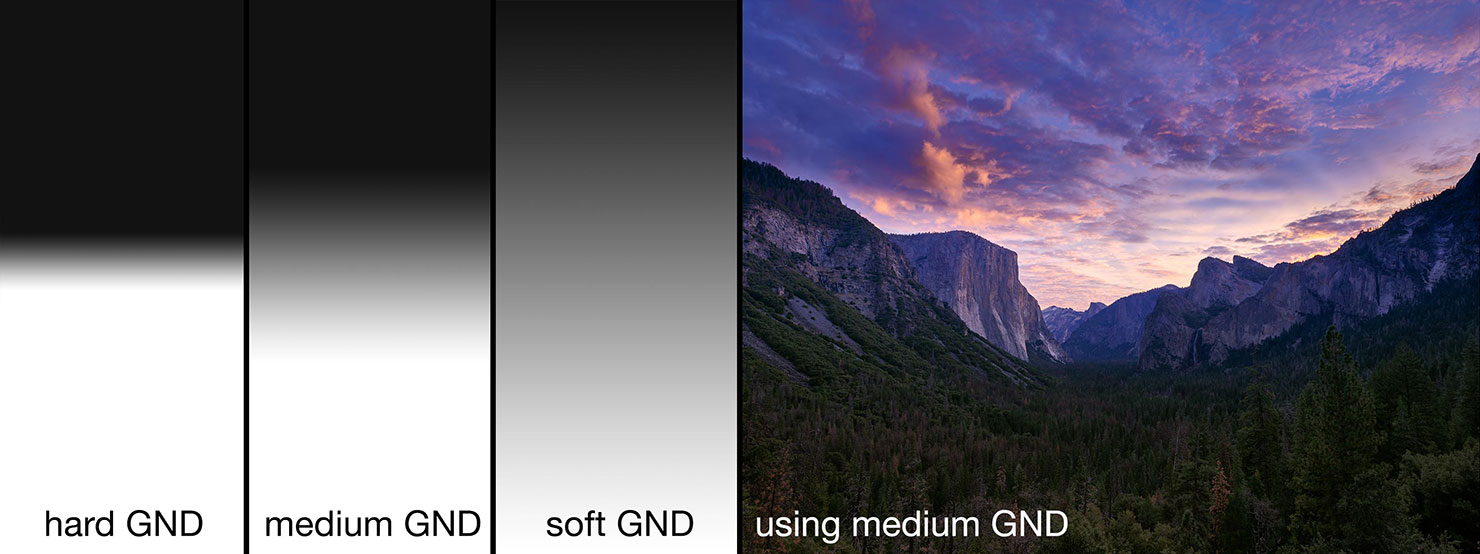
In this case, the use of a Medium GND (“medium” referring to the transition size between dark and light areas of the filter) allowed my XF iQ3 Trichromatic to exposure correctly for the sky above, as well as recording all the detail in the ground below.
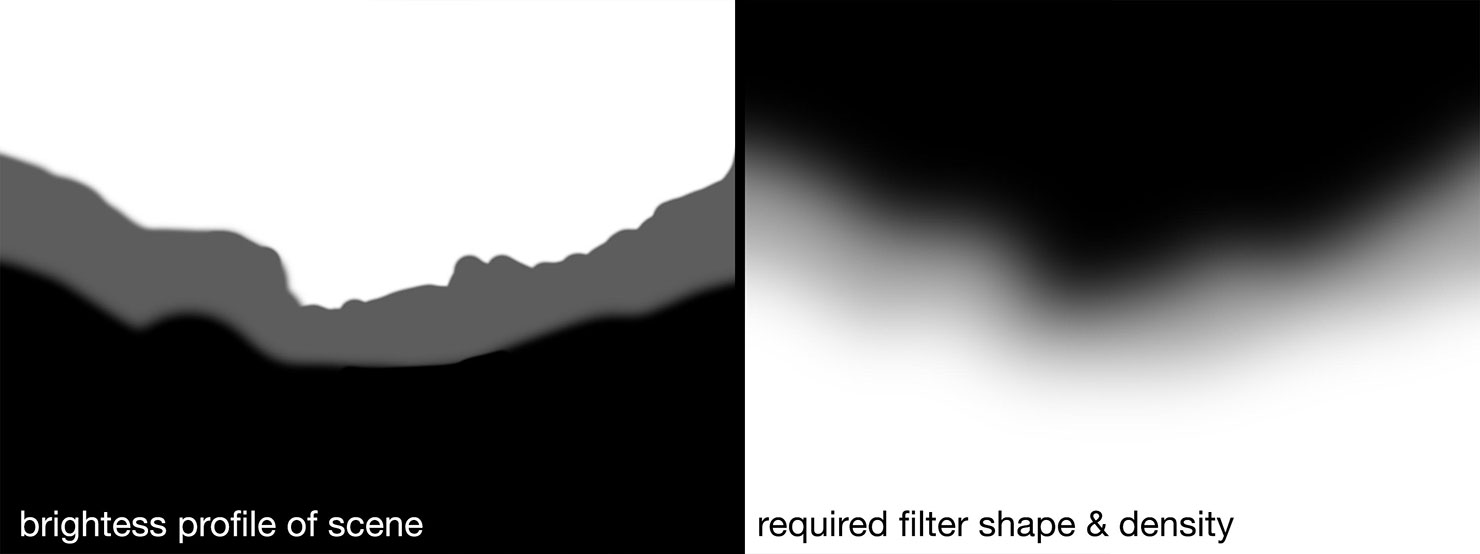
But there’s still a problem with this scene, even with the use of some amazing glass filters: Whether it’s a reverse, medium, hard or soft GND filter in use, we’re faced with the same challenge : the scene is not “linear” across the brightness profile, and the lightest part of the capture doesn’t match the standard filter designs that exist on the market.
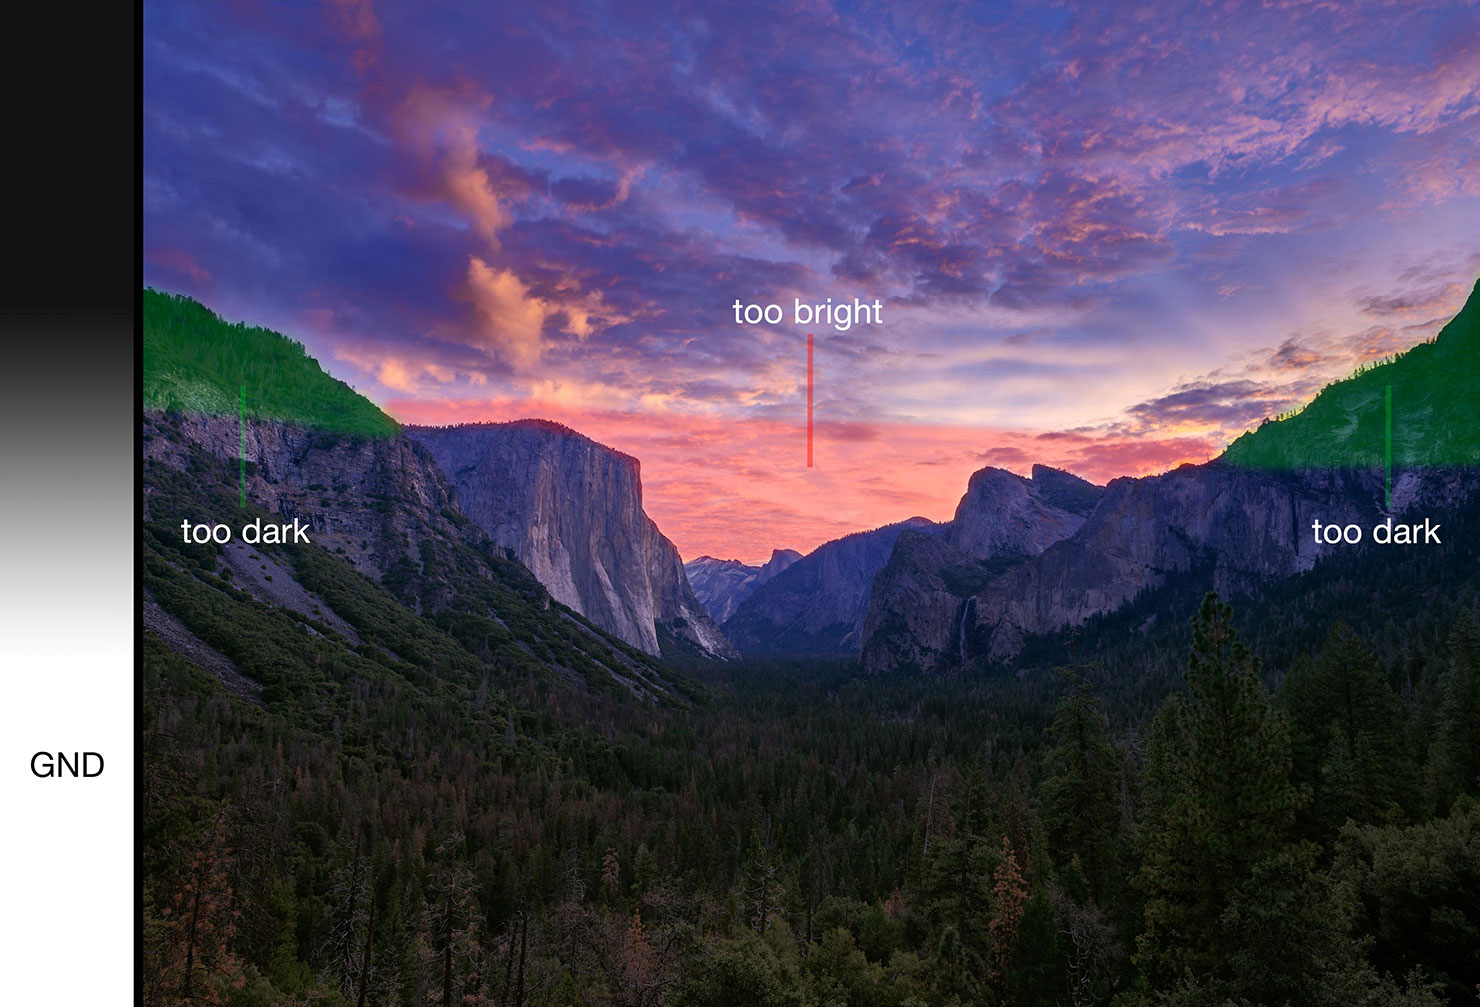
We have mountains which are being darkened even further by the filter, and bright areas of the shot which are not affected enough to maintain the detail I wanted. In essence, our scene (like many) is not regular enough.
Of course, it would technically be possible to have a custom glass filter made for this exact scene, but in reality, that’s not a viable option.
Step 3 – Using our Dynamic Range
Luckily, Capture One is able to recover a lot of the detail that our cameras are capable of storing – detail which isn’t obvious in the initial raw file, from the shadows and highlights of each image we capture.
With 15 stops of dynamic range in the Phase One iQ3 Trichromatic 100MP digital back, I knew there was a lot more detail in the image than shown on-screen at the time I was previewing. As such, I left happy knowing that I had no warning signs for any completely over (or under) exposed areas across the entire shot. Using the histogram and those warnings to ensure we’ve got as much data as possible, in this scenario, was as far as it was possible to go in the field.
The glass filter had worked as designed, and got me to 70% there with the image; it was time to get Capture One flexing its muscles to finish the job.
Step 4 – Isolating the sky with “Auto Mask”
Thinking back to our “ideal” filter profile (dark in the sky, medium over the band of granite rocks through Bridal Veil Falls and El Capitan, and then light in the foreground of the forest) – that’s exactly what we’re going to generate in Capture One.
Cutting out complex areas such as skylines with trees across them used to be a time-consuming task. Luckily, Capture One now makes this so easy to do that it really can be completed in just a few steps.
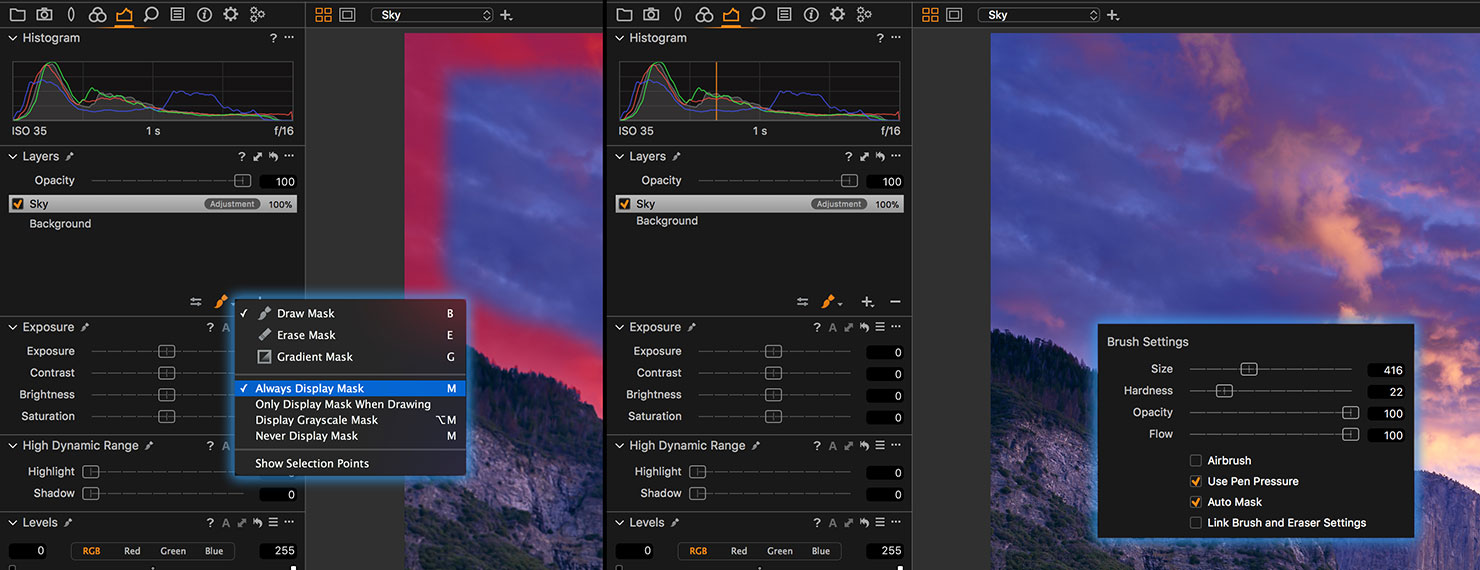
Once the image is loaded and all lens profiles and standard white balance adjustments (if any) are made in Capture One, we move across to the “Exposure” tab, and create a new empty adjustment layer by clicking the bottom “+” sign under the layers panel.
Clicking and holding on the paintbrush icon, we’re going to select “Always Display Mask” at this point, while we’re using the advanced features of the mask tool. By right-clicking anywhere on the image to bring up the brush options, I can tell Capture One that I need a medium size brush (400-500px), soft edge (22), 100% opacity and flow, and to make sure we have “Auto Mask” selected.
By doing this, our paintbrush changes to add a third “inner circle” to the brush tool.
To mask our sky accurately, we’re going to brush along that line of the mountains with the inner circle over the sky, and the middle circle just overlapping the rocks we want to remove from the mask. With the brush set to 100% opacity, going over the same area multiple times will have no effect anyway, so I tend to do this in manageable chunks rather than all in one go, just in case a mistake is made later on.
Each time we release the brush, Capture One analyses the scene and masks only the areas that we asked it to cover (effectively “cutting out” the rest from the mask itself).
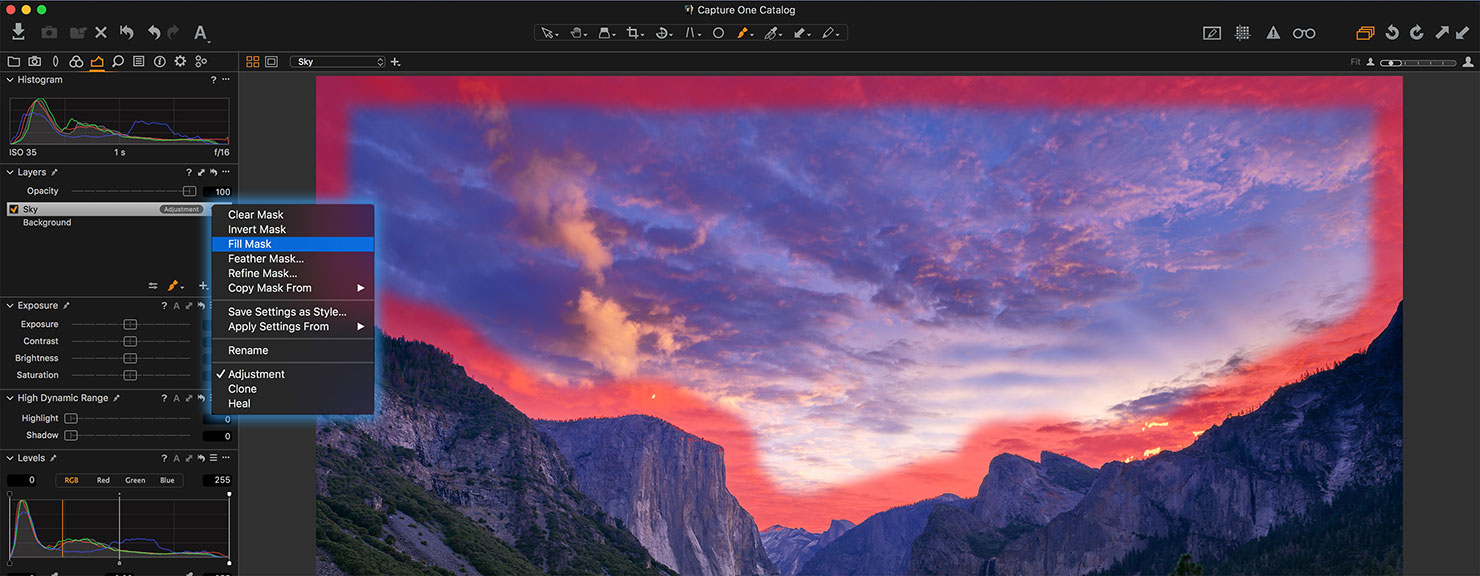
Once we’ve finished drawing roughly over the mountain edges, we need to close the mask by painting up each side and across the top of the image to cover the sky, then right-click our layer name (in this case I’ve called it “Sky”) and select “Fill Mask” – the entire area will then turn red while we have our mask displayed (hit “M” on the keyboard to turn the mask on or off if you’d prefer).
Step 5 – Refining the edges
While Capture One is a very clever tool, every now and then even auto-mask can get a little confused by our outlines. When fully zoomed in on this image, I did notice that a few of the trees had been added to the mask itself, so we can make use of the fantastic “Refine Mask” function to resolve any anomalies.
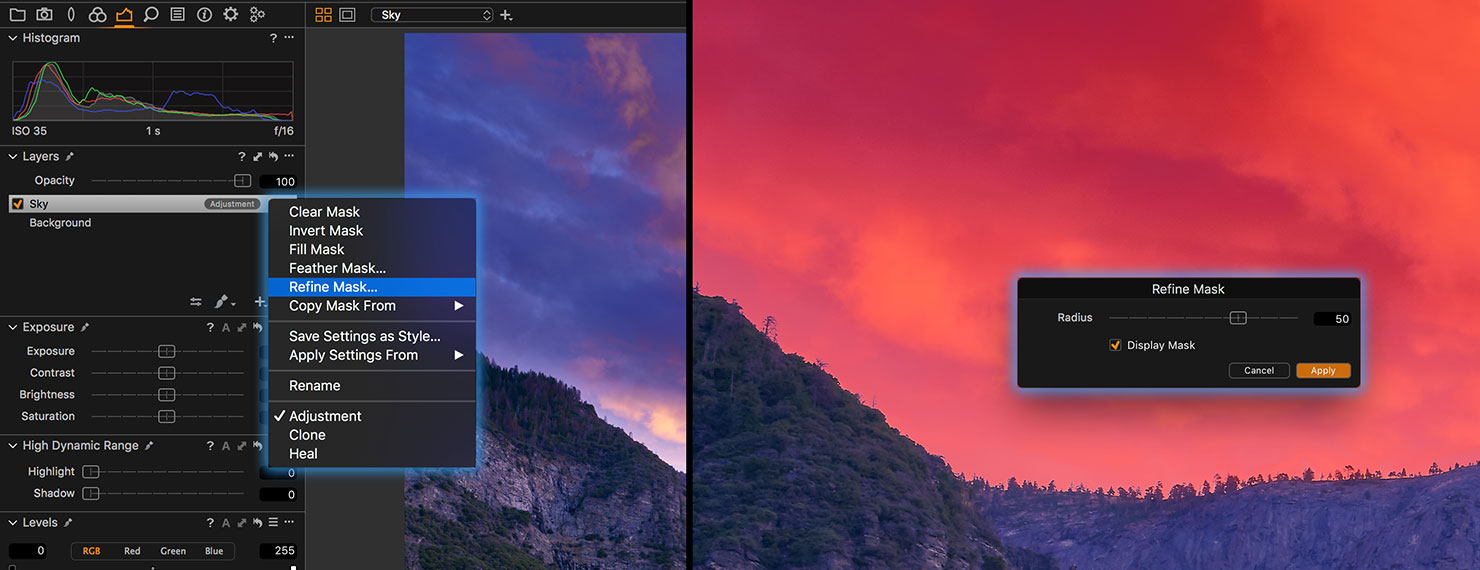
Again, a right-click on the layer name, then “Refine Mask” brings up a floating window over the image (it helps to be viewing at 100% at this point). Small alterations in the radius slider will improve the cut-out that Capture One has created, and in this case a value of 50 gave me a near-perfect outline with just a few minor tweaks remaining for the Eraser tool to remove later on.
Step 6 – Adjusting the sky
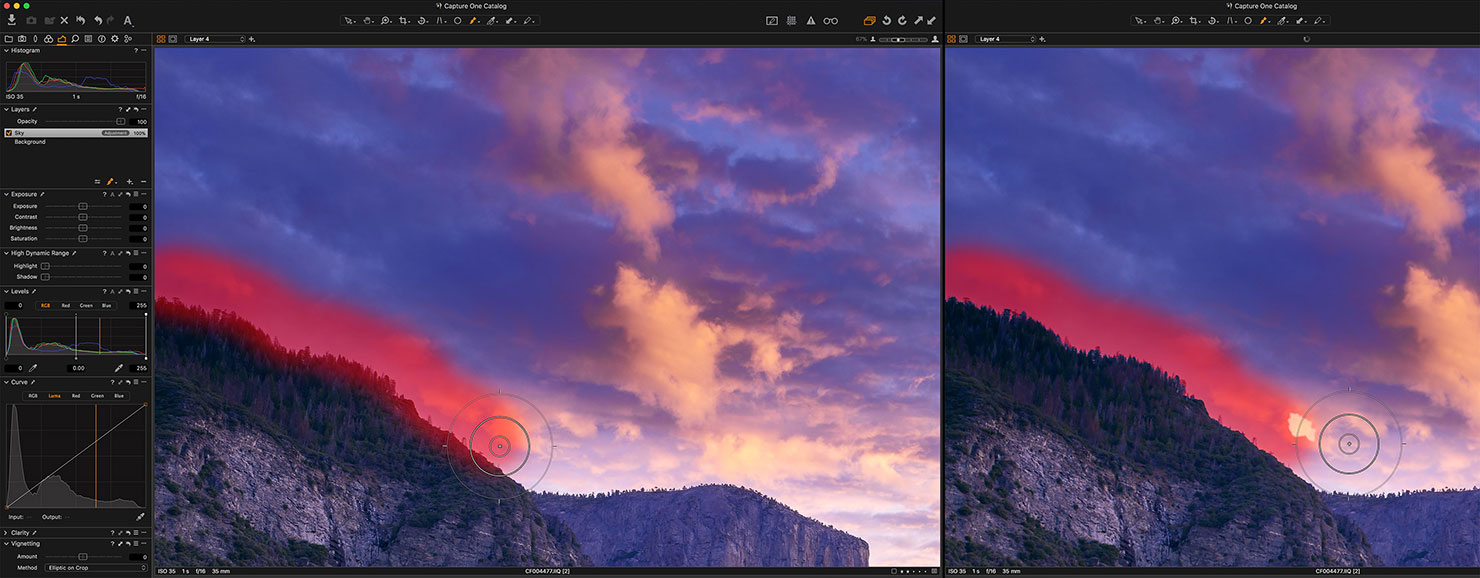
So, we have our sky completely masked, at a level of intricate detail which would have previously taken hours to achieve.
Using the “High Dynamic Range” slider to now recover the highlights specifically across the sky brought back a lot of the detail on the horizon, and a further reduction of exposure (-0.82) brought the scene back to a level that I remembered.
But there was still a small issue, even with those changes.
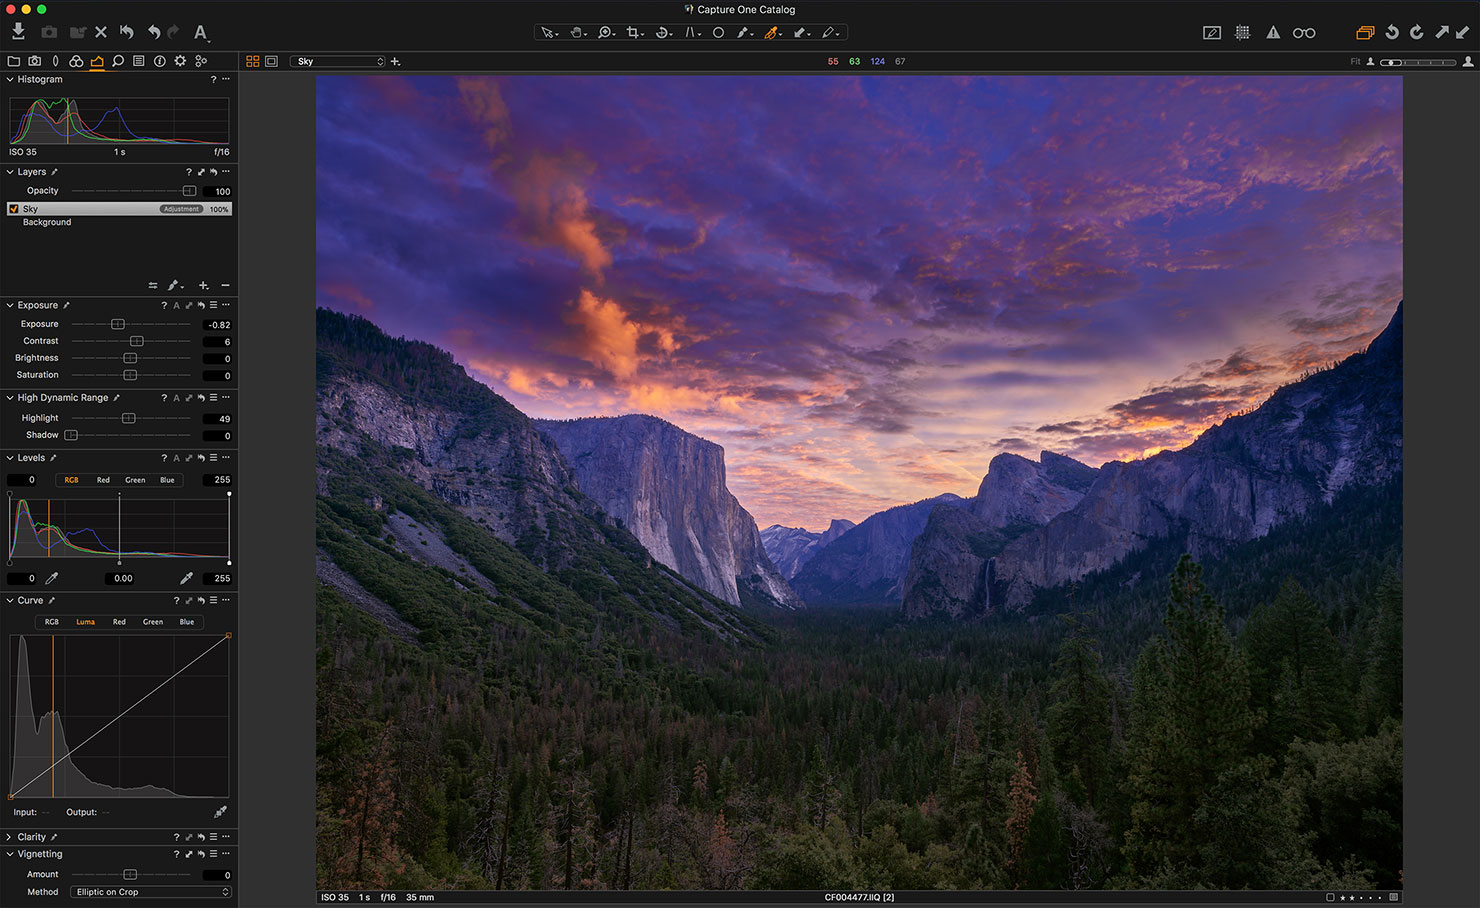
Remember that initial raw shot? I’d already used a GND filter – so the top of the image was already darker than the middle and bottom. By reducing the exposure to correct the brightness of the horizon, the top of the image had become way too dark.
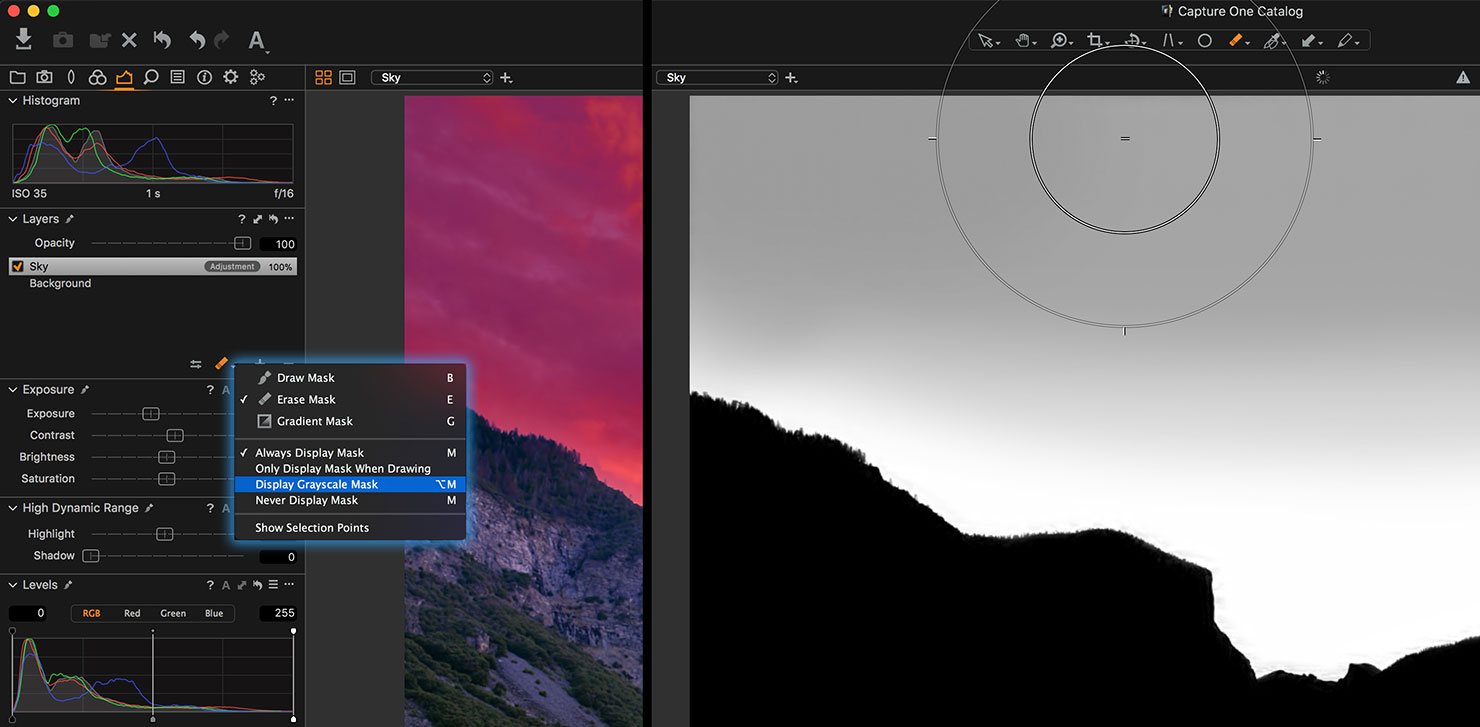
In Capture One, an easy fix: Clicking and holding on the layer’s paintbrush icon gives us one more option: “Display Grayscale Mask”. This removes the image from the viewer, and shows only the effect of the mask itself.
Using this, and the Eraser tool (again, click and hold on the paintbrush under the layer name), I could adjust the brush size and strength of the effect by right-clicking the image and painting across the top in 10% opacity increments until I got the result I was looking for.
Step 7 – The rock and the hard place.
Just as with the sky, our perfectly straight filter transition had also affected the granite mountains which make Yosemite so special and recognisable around the world. They were simply too dark overall.
I also wanted to bring back more of the texture in the rock faces themselves and reduce the blue tone that had crept in to the image at the point of capture.
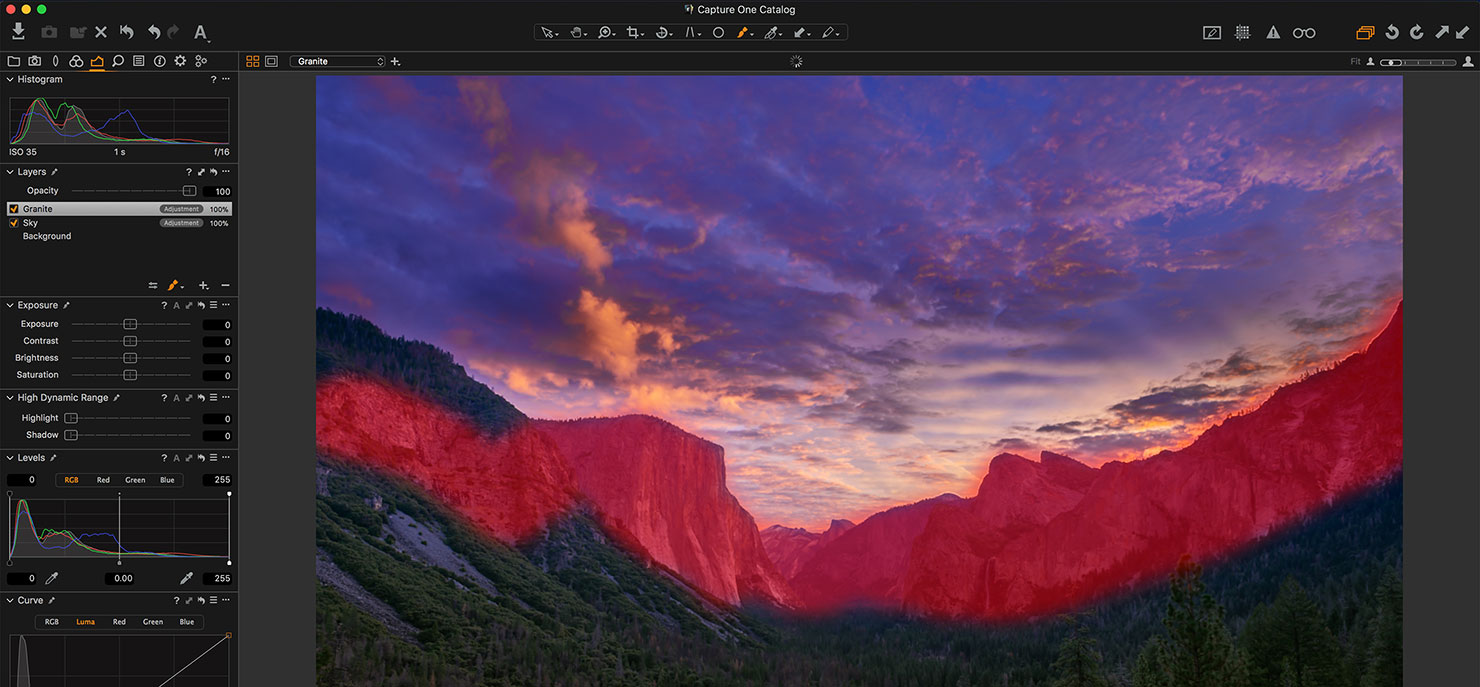
Using the exact same technique, I created a detailed mask and outline of the rocks themselves, and then further refine some of the areas that Auto-Mask found challenging (such as the transition between trees and hillside).
Flipping between the “Exposure” and “Color” tabs, this is probably the most significant set of compound changes to one section of the image:
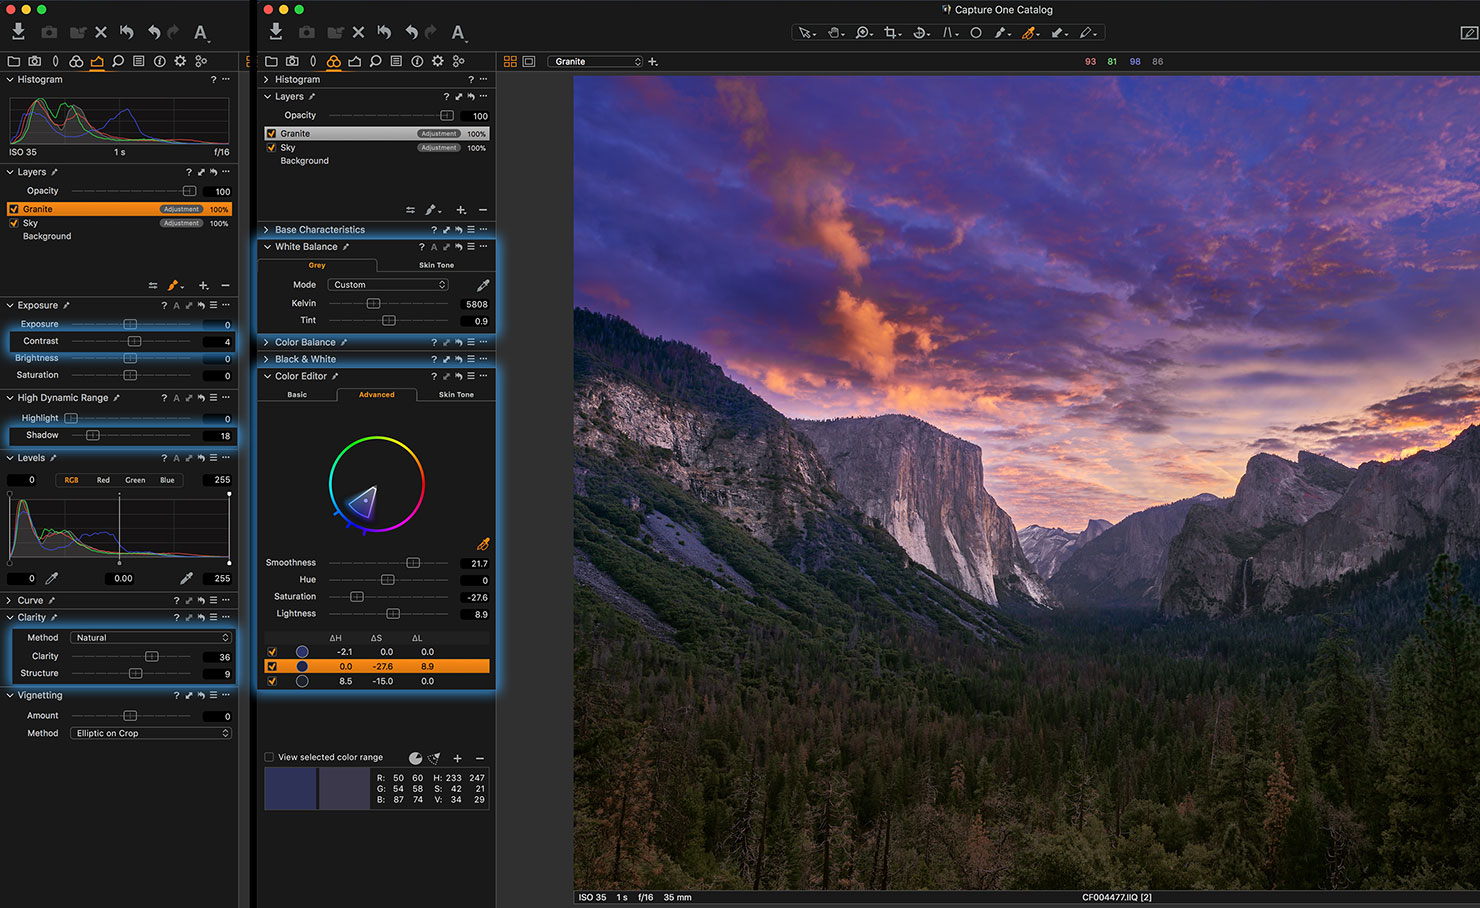
We now have those amazing mountains really taking their place in the scene, standing out with increased contrast, clarity, a warmer tone and reduced blues in the shadow areas.
Step 8 – Finishing touches.
There were just two final things to correct.
First, it was the glow above El Capitan. While perfectly natural as the cloud thinned out over the mountains, the “halo effect” was a little distracting when I looked at the shot from afar.
This needed a subtle, but important, tweak – and guess what, that meant another mask!
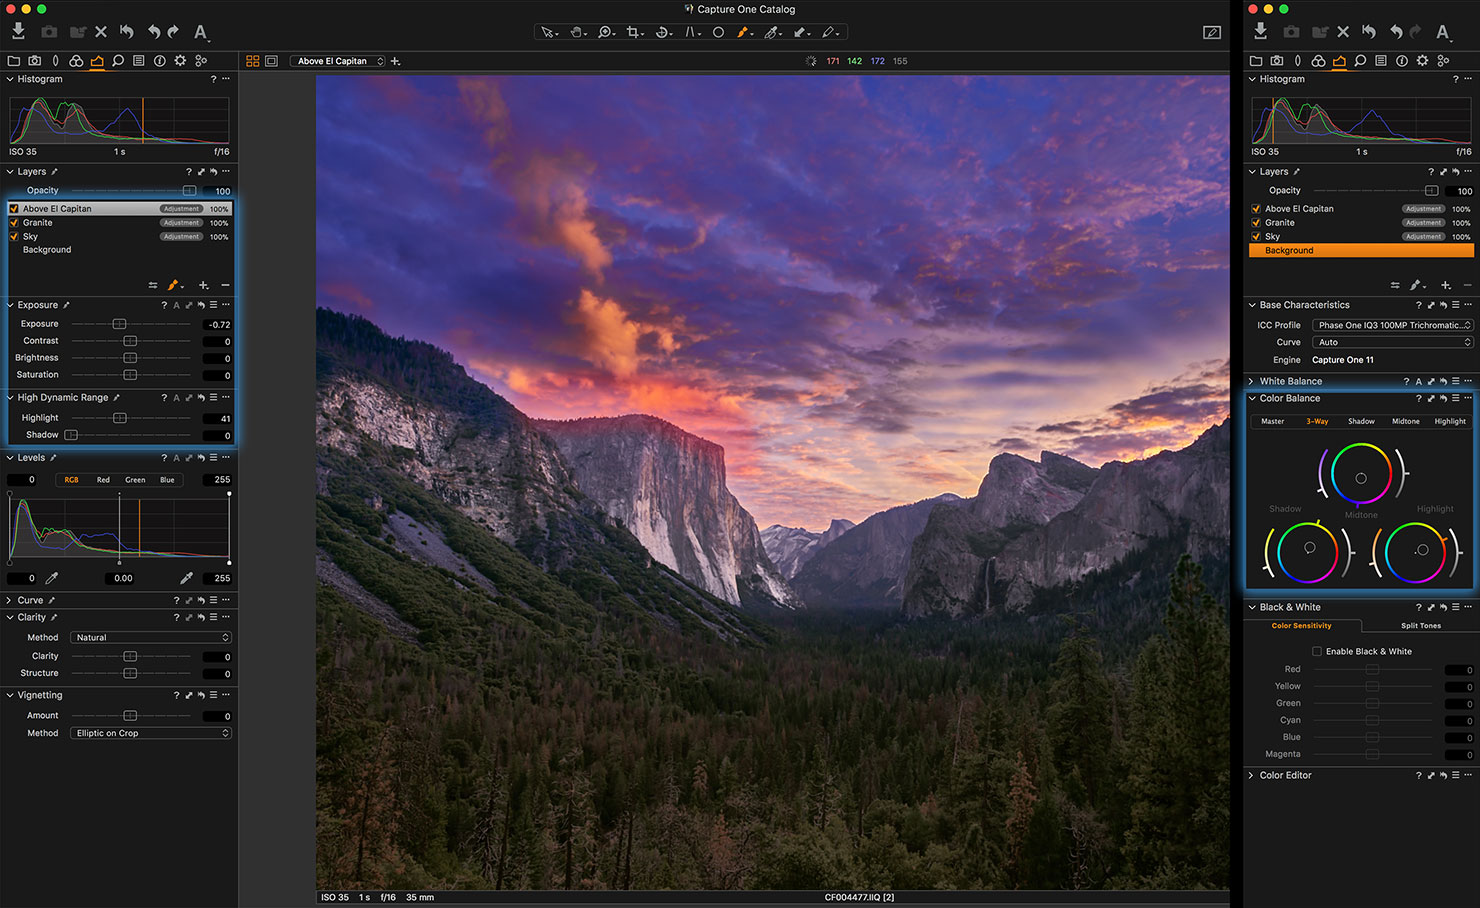
Once again, using a mix of “Auto-Mask” and the “Refine” tools, it was easy to isolate the glow and while I didn’t want to remove it completely, it was reduced to a level that was less distracting.
Finally, the subtle change that was needed to bring the image back to my recollection and reference iPhone shot; a few tweaks to the color balance of the shadows, midtones and highlights to warm the image slightly, and that was it.
As an added bonus, for the first time ever, I had absolutely no sensor or lens dust to remove (something to do with remembering to actually clean everything beforehand!)
So there we have it. A view of the amazing Yosemite Valley at sunrise; a view that I’ll never forget and one that can now hopefully be enjoyed by others around the world.